Mantua, New Jersey
Original Site:
September 2004
E-mail: usav8or@yahoo.com
The Radical Radial Fuselage.
March 3, 2012 The sun sets...
on my project
I've said this before...
The weekends seem to get away from me. All those important things kinda eat up the time; wash the car, swinging the golf clubs, beer run... yeah all those important things... yeah, right. Actually the nice, sunny days keep me from working on the biplane.
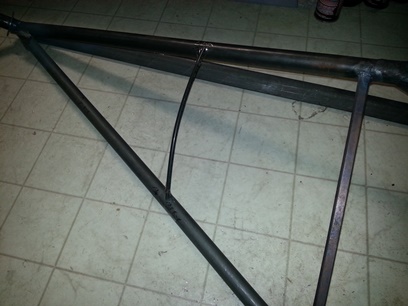
see photo credit below
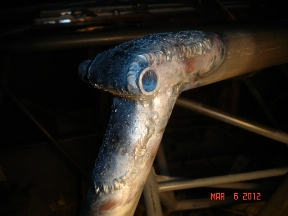
Well... Night finally falls upon us and I can get back to working on the biplane; more work on the first cross/streamline tube strap. Took the grinder to it and ground it to shape. (looks a heck of a lot better than my first go 'round)
After finishing up the welding on it I tacked and welded up the strap to the second cross/streamline tube intersection. Got about 1/2 way through welding on it and needed to stop to let it cool down. Still need to grind down that same area that I ground down on the first one. I'll do this tomorrow along with starting on the first of the last two straps; the ones that wrap around the front bushings. Then... it's on to welding on the brake backing plates... Then, um, airplane noises ???
Still a few more sunsets before this puppy is flying.
March
4, 2012 Today, heating
and tacking... tomorrow...
maybe.
Go figure... the day after I say that sunny days keep me from
working on the biplane... I find time to work on it during
the day. Put an hour on it while the sun was still shining.
Well... it was actually an overcast day, but ya know what
I mean.
Worked on and finished the 2nd strap on the cross/streamline
tube area during my first work session today. After the sun
fell below the horizon I worked on the project another 2.1
hours.
Before doing anything during my second go 'round, tonight...
I had another look for that missing strap. Couldn't find it
so I headed down stairs to the basement work area and looked
around the grinder for shits and giggles (actually I was looking
for a piece of .o65 4130 because I was almost out of it when
I cut the straps). I just happened to find a piece of .o65
next to the grinder... which, as a matter of fact, turned
out to be the "missing" strap. YAHOO !! (It doesn't
take much to make me happy.)
Took the strap that I found and ground the one square end
round and headed back out to the garage work area. Heated
and tacked on the two straps that wrap around the front bushings.
I need to do some contour grinding on them before I can weld
them on... tomorrow ??? maybe...
tomorrow... maybe ??? not if I can help it.
March 5, 2012 uuuuuuh...
I ain't got nuthin' much to say
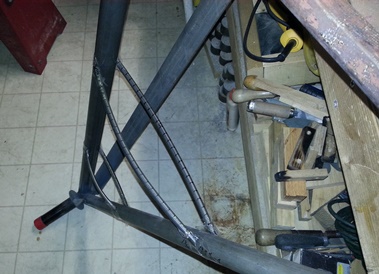
Welded on the strap for one of the front bushing/attachments. The under-cut welding on the bushing... a royal pain in the arse !!!
Tomorrow... I'll weld on the last strap and then I'll check the gear for movement again... make the adjustments if necessary and then weld on the brake backing plates.
March
5, 2012 a few thoughts...
a
few more 10 percents ??
Started
welding up the final strap on the bushing/attachment area.
Must have skewed the strap a little (even though I had adjusted
it after I began tacking it in place the other day)... had
a little bit more overhang on the one side than the first
one did. Decided to cut that back and put a filler piece of
.o65 in that area to have a full size strap.
After welding up most of the strap, I worked on making that
filler piece and then called it a night. I want to take my
time and form that filler piece when tacking/welding it in
place. It was getting close to 11PM so made the corporate
decision to save it for my next session... tomorrow.
As an aside... I was thinking (surprise surprise).
When I near the end of a project I tend to stay more focused,
put more time in it, etc etc, to get it completed. Taking
that thought a little further... if I think of the entire
biplane as a single project to complete, I wouldn't start
that "stay focused, put more time in it, etc etc until the
last 10 percent of the project. BUT if I view (and
I do) each task as a mini project I'll have a lot of "last
10 percents". Which in theory will push the project
to completion faster, yes ?
as I said... it's just a thought
keeping track of time
March 5, 2012 He who hesitates...
ain't flying any time soon.
I'm here to tell you it always happens like this.
You come to an obstacle in the road; aka this main gear for me. Some of the time spent between the last set and this set have been wise thinking. But... a lot of it was "Why did it ?, How could happen to me ?" time. Most of it was hesitation.
I can understand all my wondering and thinking "Why did it happen ?" and "How could it happen ?" when I thought I took all the right precautions... only to see my flaws in that 20/20 after the fact view. But hesitating... I've been down that road too many times to know that the only thing hesitation does is push back the finish of the project. And no matter how many times I sit down and write the same damn thing after it happens, I hesitate again.
Well, I'm past it now... I welded on that small "splice" to the final strap. Looks great ! Judgement Day was upon me again. I locked both legs into the fuselage to see what happened to the tubing with all that heat. (Now understand... I did weld on the straps in small sections, going from one side to the other to try and avoid the heat pulling and locking the gear in a skewed state.)
Dropped the plumb bob from the left gear... it move in less than 1/8"; good front to back. Took a drop on the right gear... SAME thing; moved in less than 1/8" and no movement front to back. Not sure what the 1/8" in movement is all about, but hey, moving in that small amount is nuthin' !!!
Can I get a "Hell to the Yeah?!?!?!"
Saaaa... weeeet !
So what did I learn from all of this ? Brake down big welding projects into stages where you can test fit all along the way, making small corrections at each step instead of needing to make a major correction/corrections at the end. Also... big welding projects should be done welding small sections on one side then the other. It keeps things from skewing as much as if you were to just continue welding a long line on one side.
Hmmmm... yeah, they're the two things I'm taking away from this.
Tomorrow I'll weld on the brake backing plates. This weekend I'll roll her out into the sunshine !
New Gear
March 8, 2012 Putting the brakes on the project
and no, I'm not talking about giving up on it
Tonight I plan on fitting on the brake backing plates and welding them on... ready for the wheels and away we go ???
Not quite.
I could have welded on the plates but got stuck on figuring out the brakes and how they go together... went to the box that I had them in. I hadn't really taken a look at them since I bought them from Gus many years ago. All the pieces are there but not in a together form. I'll need to stop by Whitey's to ask him, and the rest of the gang, about them.
Since I had the time, I threw the question out to the biplane forum group. Got a quick response (which happens all the time) from Dennis and another one from Doug. Dennis posted a link to Vincesrocket.com. Doug posted a link to EAA's site on Cleveland brakes. Thanks guys !!!
Another source I just thought of, the man who is also the author of the second link, are Tony B's books. Duuuuuuh, Jer ! I've got my reading cut out for me for the next few days... or at least a lot of pictures to look at. Some hangar talk too...
March 9, 2012 The gear is finished...
and I've learned a lot.
The day is finally here !!! It's 9:24PM and the main landing gear is welded up... Two brake backing plates. A little over an hour's worth of welding. And... the gear is ready for a set of wheels.
It's been such a looooooong time, a long process, a long experience. It's not that I've wished for this day to get here. It hasn't been like that at all. Through all of this I wanted to learn something. At the end of it all I wanted to walk a way and have a better understanding of how to build a set of gear the right way and how to do it welding with O/A.
If there was ever a time to repeat Teddy Roosevelt's quote... the time is now:
"It is not the critic who counts, not the man who points out how the strong man stumbles, or where the doer of deeds could have done them better. The credit belongs to the man in the arena, whose face is marred by dust and sweat and blood,
who strives valiantly . . . who knows the great enthusiasms, the great devotions, who spends himself in a worthy cause, who at the best knows in the end the triumph of high achievement, and who at the worst, if he fails, at least fails while
daring greatly, so that his place shall never be with those cold and timid souls who have never known neither victory nor defeat."
Now the task of figuring out the wheels and brakes and seeing if I can find a worn set of 6.00 x 6 tires to put on them. WOOHOO !!!
March 10, 2012 Brakes and wheels...
and now a set of tires.
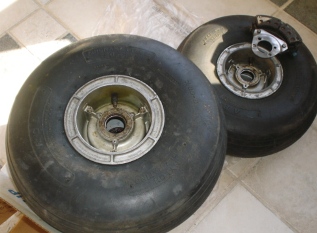
One of the guys from my EAA Chapter, Tom McDowell, stopped by today to pick up Whitey's heavy metal brake. I went over to Whitey's to help take the moster off the back of his pick-up. (thank you, Mr. McDowell !) Got to see Whitey... it's been a long time.
When I was there I showed him my Cleveland wheels and brakes. Asked him if all the parts and pieces looked like they were there. Other than a few screws and washers it's a complete set.
He has a large parts washer that he let me use to clean up the brackets that hold the brakes onto the brake backing plates. (by the way... he uses kerosene in the washer) Took them over to the wire brush macheen afterwards to clean them up a bit more.
I asked Whitey if he had a few old, worn out tires laying around that I could have (figured he might... having all those planes in the past) and he did. Hopped up into the 40 ft. trailer he has and found a stack of them, along with a stack of tubes. Picked me up some 7.oo x 6's. I'll be looking around in my can of airplane screws to see if I can find the right screws to hold on a few bearing plates. I'll need to make a washer out of cardboard to hold one of the washers in place too. Please Note:I'm making the washer out of cardboard just soes I can get it up on the gear. I'll be replacing the screws AND cardboard washer as soon as I get the replacement parts.
I still need to put it all together and take a picture of it on its gear.
March 11 - 12, 2012 bound and...
determined
Spent the entire weekend working towards getting the wheels on the biplane.
Sunday...
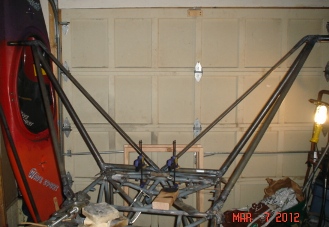
After spending more time piecing the wheels together I hoisted both gear legs out to the garage work area to see about getting them attached to the fuselage. The work area looks like hell right now because I was moving things out of the way just to get them out of the way. aka... all kinds of crap is piled up on the work bench (of which I will put in order in the next day or two... promise).
Took awhile to clean all the stuff out of the way and a little bit more time to jack up the fuselage high enough to attach the legs to the lower longerons.
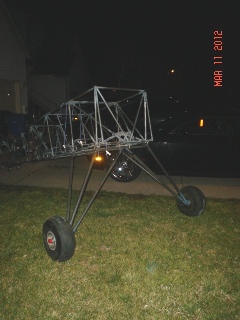
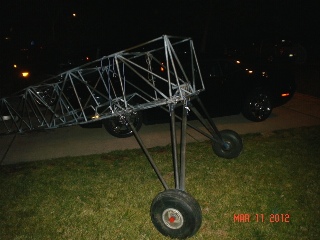
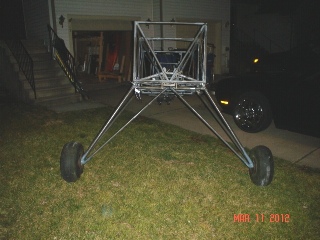
I finally rolled the skeleton of a biplane into the moonlight of night at about 9PM on Sunday, March 11, 2012. I felt like I just had a child... it was a great feeling !!!
Tonight, March 12, 2012...
After sitting in the fuselage for awhile, day dreaming, I started reading up on stringer stand-offs. I want to give shape to the fuselage and then start fitting it out with all the internal fittings. Not sure if that's a "six or 1/2 dozen" deals or not. It'd probably, make that definitely, be more cumbersome working around the stand-offs once they have been welded on. hmmm... but I'd have something that looked more like a biplane.
Thinking about the stringer stand-offs got me to thinking of the firewall, which got me to thinking about the engine mounting ring (which I need to purchase... that ain't something you want to make), which got me to thinking about...
Oh yeah... a few photos of the fuselage on its gear:
March 13, 2012 more time thinking...
than doing.
The stand back and thinking stage of the next project.
I want to start placing the stringer stand-offs on the fuselage (so I change the look from a rail dragster to an airplane) but should probably weld in most of the parts and pieces that need to attach to the inside of the fuselage. I have a few parts that I've made in the past that I can take a pretty good bite out of it.
Pulled the plans and looked at where all those pieces go; reversers, idler arm and control column. Grabbed the pieces, the plans and a roll of tape and headed out to the garage work area. Close to a half hours and all the pieces are in their close to where they need to be place on the fuselage, locked in with some clear tape. I need to locate some fishing line so that I can string all the pieces together; the connections from start to finish appear to be in a straight line on the plans (more than appear... they ARE in a straight line).
Tomorrow I'll center the pieces, run the fishing line from first fitting to last, making sure that the line is straight and then tack/weld them in. Next to place in the fuselage are the rudder/brake pedals (thinking of not placing brakes in the front pit).
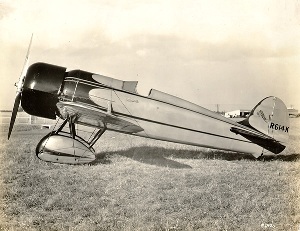
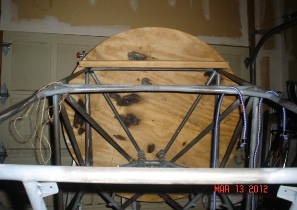
During all this test fitting and tacking and welding I'll be cutting cardboard pieces putting a shape to the fuselage. Hoping my idea of a TravelAir Mystery Ship shape will look good on the Radial Skybolt.
Here's a side view of the Mystery Ship and a shot from the back pit in the Radial Skybolt. enjoy...
kick-ass shape
view from back pit
July 23, 2012 a little welding...
and it's done for the second time.
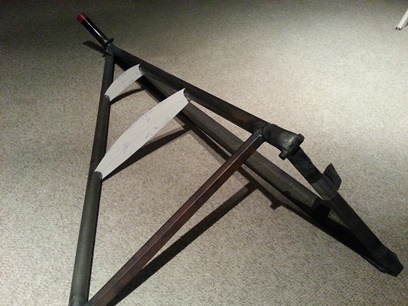
Finished glueing up the wood for the upper wing center section wing fitting jigs and had time to work on something else. Decided that working on the main landing gear would be the something else I would work on.
I've had the two metal ribs, that get welded to the top of the main landing gear, cut-out/bent up for a while now. Spent about an hour tonight notching them and fitting them up to the gear. When I have a few things that need welding up I'll weld these up with them. Once these get welded on I'll have completed the main landing gear. Which... after thinking about it... I already marked off my list.
July
29, 2012 a little more
welding...
and
it'll done.
Confirmed the location of the two metal ribs on the main landing
gear... tacked and partially welded them up. Need to take
them off of the fuselage to get a good angle on welding the
remaining area. Needs to cool off a bit...
July 30, 2012 just work on it...
and
leave the excuses for someone else
Got home from work... nice night to run with the pup. Back after the run, got something to eat and watched some of the Olympics.
I was tossing back-and-forth the idea of watching the games or going out to do something on the biplane. It's nice to see our youth achive their dreams. But I gotta tell you... I've got some dreams of my own I want to achive, and one of them is getting this biplane done. I FINALLY decide that I need to go out there and put some time on the project.
It's close to 10:30PM and I'm just walking out to the garage to weld up the rest of those metal ribs on the main landing gear. After doing my usual fighting with my work space, I get the gear off and finish the welding I started the other night. Close to an hour to do what should have taken less than 1/2 of the time.
Not a lot of time put on it... but I gotta tell you, I'm close to an hour closer to getting it done just because I worked on it tonight. You can make all the excuses in the world for why you can't work on it. And you know what... that's fine. You just won't be flying your biplane any time soon. I know that all too well.
December 26, 2015 Glue SNAFU...
and other more productive stuff.
Ain't makin' per se, but it is work on the main landing gear...
First thing I wanted to do was make the first seat pan (for the second time). Went over to Fazzio's the day after Christmas (a Saturday) to pick up another sheet of .o32 5052 aluminum and they were closed. Four other people pulling in and out of their entrance... had the same thought as me. So... needed to come up with a plan "B".
Looked at my "Punch List" and squaring up the rear tubes on the main landing gear attachments has been bugging me for way too long. Need to get that off the list. And... it wasn't going to be a fast thing. First... I needed to make a jig that would allow me to file or sand the ends of the tubes flat and square. Decided that I would take a piece of 3/8inch tube (the ID of the tube I was squaring up) sand it down a bit so that it would turn easily in the tube. I then drilled a 3/8inch hole in a piece of .o40 4130, then made a washer out of it by using a 1inch hole saw to cut the OD of the washer. Welded this onto the 3/8inch tube and WAA-LAA, sanding-jig-to-square-up-the-end-of-a-tube jig.
Cut a washer-shaped piece of sandpaper and spray glued the back of it... stuck it on the front of the washer and chucked the jig in my drill. Worked like a charm... on the first tube. The sandpaper wore a little on the inside so I wanted to replace it. Made another washer-shaped piece of sandpaper and decided to spray glue the back of it AND the metal washer that was welded onto the 3/8inch shaft. Let both sides dry, press together and BAM ! a secured piece of sandpaper. Jig-drilled the first end of the second tube and it worked like the first... second end... worked great until I wanted to puuuuuull iiiiiiiit ouuuuuuuut. The DAMN thing wouldn't come out. WTH ??? It would barely let me twist it side to side let alone allow me to pull it out. I fought with it for about 1/2hour before I thought... "Hey, maybe the spray glue got on the shaft and the heat liquified it and when it cooled..." Dribbled some MEK down the shaft and it began to turn. Pulled on it a little and it started working loose. Dribbled a
bit more and a little looser. A little more dribbling and it came right out. DAMN !
With a project this big, you're going to run into a few SNAFU's. And this, my friend, is one of them. Now, with all that unproductive time behind me I need something productive to do.
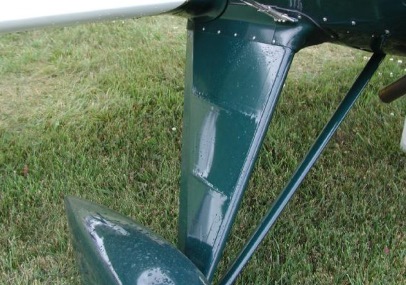
Saw this photo on Steen Aero's web site and thought, "Man, that really finishes off the main gear." Adds a tiny bit of weight, but it DOES give a finished look to it. And NOW that I'm writing this down, do I want that extra tiny bit of weight ??? And then I'm thinking, I was going to finish it off kind of like a Starduster II main gear which would have added a lot of aluminum to it. So... I think I'm alright with it.
Opened up my DeltaCAD program on the computer and started
making a few shapes. Came up with two that I thought would
work (needed two airfoil sizes as you can see in the photo below) and took that look and transferred
it onto paper. Made a few mistakes with sizing but hell it's
only paper. Finlly got the fit right but... discovered that
I need to tweak the thicknesses of the airfoils a little. I'll
make that adjustment next time... then make a pattern for
either bending up some aluminum or tubing and then fit them
up on the main gear.
Photo is lookin' artsy...
December 27, 2015: (update)
Tweaked the airfoils this morning...
Later that day...
Reason: and No Reason:
Decided to go the tubing way. Reason: Once the main gear has been covered there won't be any easy access to the screws attaching them to the gear. I don't want an "oh shitter" later down the road. My decision wasn't arrived at quickly. Actually spent part of last night and all morning thinking about which way to go.
okay.. on to building it:
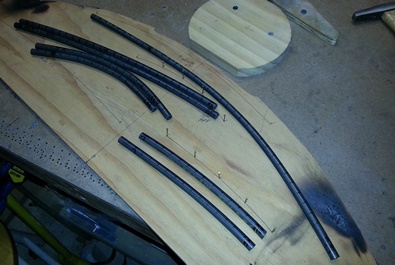
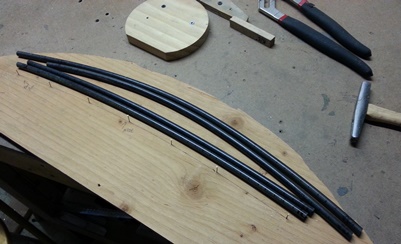
Wanted to find the lightest tubing I could get and found two lengths (lucky me) of .375 x .o28 4130 tubing. Made a few wood and nail patterns to follow for shaping... screwed the bending jig, I made ooooh so long ago, onto the table and started bending some tubing.
Bent and rough-cut all eight pieces then started grinding them down to fit the gear tubing. Three and a half hours later and I have them all taped in place ready for welding.
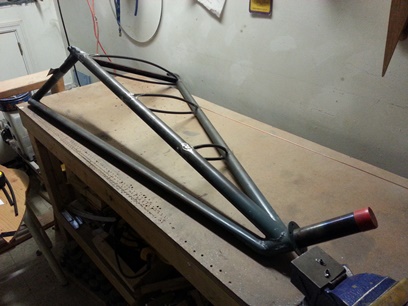
As you can see... the outside airfoil shape has more of a curve than the inside. Reason: No reason for doing it that way... just did it. Maybe I liked the look...
Looking... and thinking about this more now... I think I'm going to need to make this airfoil shape for the top of the gear also.
December 28, 2015 Big tweaks...
and little tweaks.
The BIG tweak:
I went ahead and did it. Took a bit of time... 'cause I had to figure out and draw up the new, larger airfoil pattern. Did that while having coffee this morning.
Later on I went down to the basement workshop and set the table up for bending again. Bent those pieces and fit them up to the main landing gear... and it was looking good.
The little tweak:
Took a break and then decided to bring them upstairs to take a looksee with them side-by-side. Decided to strike center lines (should have done this to start with...) to get a true feel of where the tubes should start and stop. My looksee saw that one or two of the front airfoils needed to be re-done 'cause they fell short (by quite a bit) of the center line that. Comtemplated whether to re-do the pieces which was basically just an exercise in comtemplation because I knew I would be re-making them.
Back down to the basement workshop... and re-attaching the bending jig ('cause I'm trying to leave the area the way I found it which means taking the jig off when I'm done with it and cleaning up the bits and pieces and throwing away the little scrap pieces that I thought I can use later which I never do use later) to bend a few more pieces of .375 x .o28 tubing. Went and searched for another length of it and I couldn't believe that I had another 8ft length in the garage. Santa was good to me this year ! Marked the tube. Made the bends. Cut, ground and fitted up the pieces to the center lines and I'm DONE !
Checked the back-sides for the same issue and there really wasn't any issues. So... DONE ! DONE !
More airfoil pieces for main gear.
Gear before the re-do on some of the airfoil pieces. Mainly
the lowest one on each gear leg.
December 29, 2015 Thinking time is usually...
faster than doing time.
Thought... I'll tack the airfoil shapes onto the main gear and get that seat pan made today...
Reality... it took over four hours to tack those pieces of tubes onto the main landing gear. Started off when I needed to shorten the longest ones due to them being squared off instead of following the line of the upper cross brace. and... Once I started checking that fit (after using a square to align the tubing instead of marking off lengths on the back-side) I needed to fine-tune most of the pieces. Not a problem 'cause I was happy to get the chance to do one last tune-up.
And, tacking, or anything you're going to be permanently welding, isn't a fast process for at least me. Align and check. Check again. Secure one side. Tack other size. Tack other side. And so on with the other two. By the time I tack the third one in place I can go back and check that the first one is 90degrees to the gear and if not... tape into place. Then... I can throw another tack on there to secure it in place. Do that with the other two and ditto on the second gear. I'm letting it sit overnight... for my "cool off" period. Come back to it tomorrow to make sure it's how I want it. and... if so, it gets finished welded.
It's a little bit of a pain in the arse... welding .o28 tubing to .o90 tubing. Just need to make sure that the main gear tube is good and hot before going in there to run a few weld lines.


 Started
welding up the final strap on the bushing/attachment area.
Must have skewed the strap a little (even though I had adjusted
it after I began tacking it in place the other day)... had
a little bit more overhang on the one side than the first
one did. Decided to cut that back and put a filler piece of
.o65 in that area to have a full size strap.
Started
welding up the final strap on the bushing/attachment area.
Must have skewed the strap a little (even though I had adjusted
it after I began tacking it in place the other day)... had
a little bit more overhang on the one side than the first
one did. Decided to cut that back and put a filler piece of
.o65 in that area to have a full size strap.
 I asked Whitey if he had a few old, worn out tires laying around that I could have (figured he might... having all those planes in the past) and he did. Hopped up into the 40 ft. trailer he has and found a stack of them, along with a stack of tubes. Picked me up some 7.oo x 6's. I'll be looking around in my can of airplane screws to see if I can find the right screws to hold on a few bearing plates. I'll need to make a washer out of cardboard to hold one of the washers in place too. Please Note: I'm making the washer out of cardboard just soes I can get it up on the gear. I'll be replacing the screws AND cardboard washer as soon as I get the replacement parts.