Mantua, New Jersey
Original Site:
September 2004
E-mail: usav8or@yahoo.com
December 27, 2007 That 90% done and
90% to go, keeps raising it's ugly head !
I have the week off between Christmas and New Years this year. Time to get some serious hours in on the build.
Yesterday I had a few errands to run in the morning. One of which was to pick up a new #5 filter for the full face shield that Denise got me awhile ago for welding. The filter that came with it
was a nine or ten and you couldn't see the sun through it, it was so dark. Anywho.... I've had all the pieces cut for the rudder/brake pedals for some time now... even been working on them. There's just a lot
more to these pedals than one would think... there's just so many tiny little pieces to it.
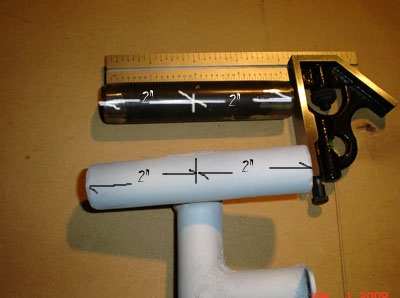
First thing I had to do was mark the "center" mark on the horizontal tubes, the ones that connect to the brake pedals. Take note that I put " " around center. I did that 'cause it's the center on the four inch tube, but
on the three and a half inch tube the "center" is two inches from the one side and one and a half from the other side. And make sure that when you weld it up onto the rudder pedal that the two inch side is on the same side as
the short two inch tube that is sticking out of the vertical tube on the rudder pedal. Look at the drawings and you'll see what I'm talking about. To some this just may be rambling... to those that are building... it just may
save you from having to either brake the tack weld you just made or having to re-make the entire rudder pedal again. (it always pays to look at the drawings two or three times before you go to marking and welding up the
actual piece.)
With the "centers" marked on all four tubes, I grab a handfull of rudder pedal parts and marched up the steps to the garage "welding shop" and set about welding on the horizontal tubes. I didn't make a jig to hold the tubes in the right location, kinda used
a "C" clamp to clamp the main rudder pedal assembly to the MDF board and also positioned that so that it would hold the horizontal tube in the right location for putting a few tack welds on it. Nothing fancy, but it did the job. (I'd rather spend my time makin' biplanes,
than making jigs.)
OK... all four tubes are now tacked and ready to be welded. (Oh, yeah, make sure that they are square to the vertical tubes.) Now get hold of one of those rudder pedals you're about to finish weld. Hold it up and look at it from every angle... take a look at how you want to approach welding it up. (You should do this with each weld joint you make.)
My approach was to weld the three sides of the metal "strap" that holds the horizontal tube. These were easy welds and it would give me a feel for the amount of gas I needed to weld the other parts of the pedal. It also heated up the pieces surrounding the horizontal tube. (But first I needed to weld the top edge of the
strap with a complete weld so that I could then take one of my mallets to the top of it and bend the piece over, per the plans.)
You'll see that welding the strap edges first helps in cutting down the time you need in heating up the weld area. Makes sense, but I'm not sure if ya'll saw it or not. I'd say that this is the second most important point in making my decision on how to approach the weld. The first point would be in seeing which approach would be the easiest.
After finishing the two additional welds on the strap I decided to weld up the underside of the horizontal tube. Probably, well not probably, it was the most difficult weld I had made up to that point in my welding "career." Earlier, when you bent the strap/tube to follow the drawings, it just wouldn't bend all the way to
touch the vertical tube (I always heard that you shouldn't force the fitting together and weld it because it could become an area that is stressed and could crack.) The reason it couldn't bend all the way is because the metal has a tendancy to spring back some. Anyways... there is a deep gap in there that you need to weld
which you'll just need to muddle through, like I did. Hard to explain what you need to do. It take a helluva a lot of pressure coming out of that nozzle to get the heat up to the point where the puddle will run. I'd say you need some experience welding in order to get a good weld on it. If you haven't had time in the saddle... I'd say put the piece aside and get ya some practice. Better that than having to throw away a lot of work.
You'll find that you need to adjust the amount of heating coming out of the end of the torch quite a bit when welding. The outside of the weld joint you'll need to cut back on the flame or it'll eat the metal up before you can blink. The inside, or area where the tubes are at 90 degrees to each other, you'll just need to keep adding a little bit more heat a little at a time until you start to see the puddle flowing.
It took me approximately an hour to weld up each of the four rudder pedals.
I put in a marathon of hours over the past few days to get these pedals completed. With the last weld normalized... I'm all finished with my cutting, drilling, reaming and welding on the pedals. WEW ! Here's a picture of the unprimered pieces.
December 27, 2007 continued...
I can see the light at the...
hey, wait a minute whats all this stuff
blocking my view ???
Figured I was going to grab a handful of tabs and a few brackets and spend the rest of the day welding these beautes onto the brake pedals and be done with the
pedals... another chapter completed on the build of the biplane.
It just doesn't happen like that, guys. Grabbed the tabs, shook them in my hand like a pair of dice (all happy with myself,) took a look at them
to make sure they were ready to be attached and low and behold... NONE ! of the edges were finished !
I spent two hours working on the two, two-piece brackets; bending and welding them to the shape that is shown on the drawings. These are the brackets that are welded to the vertical tube on the pilot's brake pedals.
Before I but the bend in the brackets I first drilled an under-sized hole into one half of the bracket; aka... one of the halves. The reason I did this is because when I go to weld it, the paper marking the center hole will burn off leaving me only to "eye" the placement of the hole. When it comes to the biplane, I'm not an
eye it up guy.
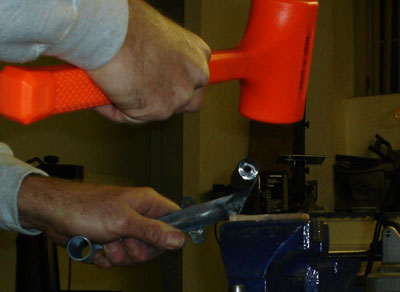
After drilling one of the halves with a hole, I paired the one side with the other then slid them into the vise up to the spot where I would weld the ends together. I then slid a piece of
1/2" tube down between the two pieces of metal and then squeezed the open end together. I slide the tubing up a little bit further and did the same. (you'll have a feel for it when
you go to do it... words and pictures just won't give ya that "feel".)
After both were bent, I took them out to weld the tips together. After the tips were welded together I brought them back down to the shop and, using the first hole as a guide, drilled the second under-sized hole
in the second half and then reamed the entire piece to the correct size hole, 3/16". After a little more than two hours I STILL had all those little tabs to get ready for welding. Tomorrow... tomorrow... there's always...
December 28, 2007 So many pieces...
and a lot more time...
Spent the day, about four and a half hours, finishing the edges of all these tabs, marking both the brake pedals and the tabs with position marks then
tack welding them on to the pedals. 'Nuff said.
December 30, 2007
Today I discovered that I'm not building a biplane...
I'm building a lot of smaller parts that...
once all put together... will make a biplane
Had a great time today. The light from the end of the tunnel was actually starting to shine on me.
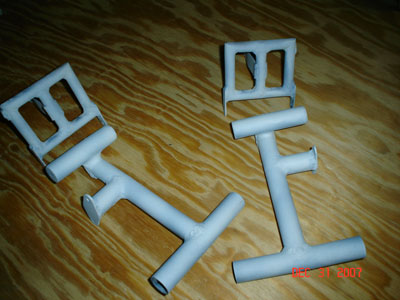
Spent about four hours welding on all those tabs. I was smokin' out there. Didn't even stop for lunch. Here is the result of all these past days efforts.
December 31, 2007
Today I took a little bit of time to clean them up then spray them with a good coat of primer. Finished the rudder/brake pedals before the new year. Just mere hours before... but now they're finished. Feels great having
completed something.
Now, the drawings call for connecting the brake pedals to the rudder pedals with threaded rod. One of the guys on the biplane forum mentioned
using a long AN3 bolt. Makes sense to me... so I'm gonna do just that. I think it will look a lot cleaner too.
Next... I'll be tackling the fuselage and all the unkowns with the Radial version's drawings.
January 3, 2008 One mo thing with the pedals...
The drawings show a threaded rod being used to connect the brake pedals to the rudder pedals. One of the guys on the biplane forum threw out the question what were some of the other ideas builders had for
connecting the two. Scott, a builder from Ohio, said that he used, as Hal Wallace did on the Yellow Bird, AN bolts. I took a look at the picture he had posted and said, "DAMN, mighty fine way of doing it."
Tonight I ordered the loooooong bolts for the four pedals along with the associated washers, nuts and cotter pins. BUT before doing all this I need to educate myself about the nuts and bolts of airplanes. Pulled out one of
Tony B's books and read the chapter while having some homemade turkey soup. Some interesting reading. Only a homebuilder could say that.
Got what I needed from reading that chapter and ordered the hardware from Aircraft Spruce. Needed to order just a small amount of tubing for the additional support of the bungee truss so I figured I'd throw the extra pieces on this order
and basically get free shipping for them.
One other thing... when you connect the hardware to the pilot's pedals, make sure that you keep the head of the bolts in toward the center of the cockpit, by doing this you'll keep the end of the bolt and the cotter pins close to the sides of the cockpit. If you don't,
you risk a chance of the cotter pin scratching your passenger or getting caught on somebody's clothing.
December 31, 2023 One mo thing with the rudder pedal mounts...
Whoa! Fast FORWARD to just about 2024!!! and... I'm back on the rudder pedals. Not quite sure where I left off last time... where I was writing about welding the mounts onto the fuselage (must be buried on one of the fuselage pages).
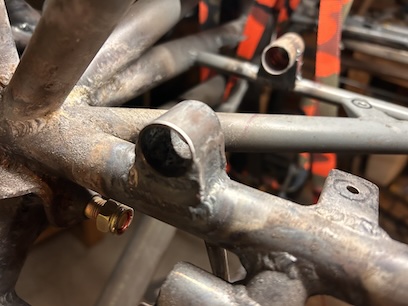
Lets start off by saying that the rudder pedal brackets were finish welded onto the fuselage. And with the fast forward to the end of 2023, I'm not happy with the look of them. They, um, needed a finished look. Thus starts my months long journey into making these things looking pleasing to my eyes.
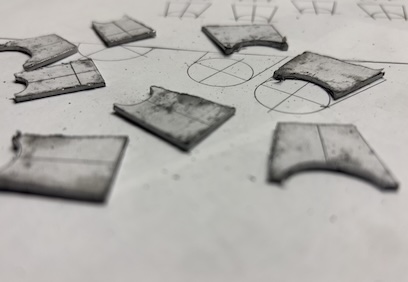
What I needed to do is capture the "rough looking" weld points by boxing them in. There's a total of ten (10) attach points which equals 40 gussets, gussets that needed to be shaped to fit around the tubes on the fuselage and the rudder pedal mount tubes. Forty pattens needed to be made... I could use the DeltaCAD program to repeat most of the tube cuts with just sligh variations on the width and angle for the various mounts. Which brings me to another point... about this time I go fed up with the seven (7) years of a agonizingly slow computer and smacked it a few times which made it rear its ugly head in defiance and decided to stop working... Two things arose from that brief interaction between me and that computer; 1. I was unable to use the DeltaCAD program to make all those patterns, and 2. I was unable to use the Dreamweaver program to update this blog.
Fast FORWARD two months... and I am sitting here typing this out on my new MAC Air Pro with 18GMB memory, and a terabyte hardrive running on MacOS Sonoma on the BBEdit program.
Okay... enough of the backstory. But not a lot to talk about the current story other than I've been hand drawing each of these forty gussets for what comes down to a nicer looking finish to the rudder pedals. Will anyone notice other than me, to the ordinary eye, no, to someone building maybe not, but if I didn't do this a builder would see the "unfinished" look of the rudder pedal mounts (at least I think they would.) And if not, is this all for not? NOT! If for anyone... it's for myself.
Side Note: I'm loving this new computer and the BBEdit program.
Now all I need to do is figure out how to reduce the size of my photos so that I can post a few to show you the progress. Update coming...
January 1st, 2024 HAPPY NEW YEAR!!!
UPDATE: Pretty easy to re-size photos. Just had to take the time to find the correct program.