Mantua, New Jersey
Original Site:
September 2004
E-mail: usav8or@yahoo.com
more work on the...Radial Fuselage.
September 16, 2016
Getting ready to do more riveting...
NOT !
Ordered the additional anchor nut plates I needed... at the same time I ordered two more sheets of the .o25 4130 for additional formers. To make sure I got the correct anchor nut plates I looked the product number up on a sheet Aircraft Spruce has of the items I've purchased in the past. GREAT ! Copied that number and pasted it in the search... found the item and ordered 50 of them. Once I get these I can continue riveting them in the pieces I've cut, bent, drilled and match-drilled for the rivets.
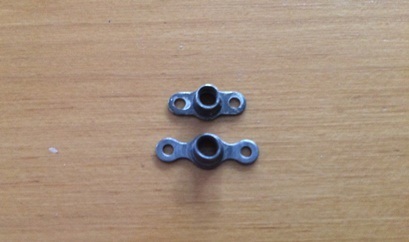
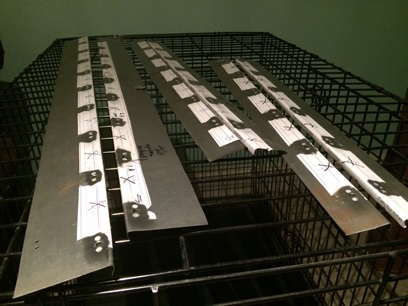
Today arrives and I opening it up and... DAMN ! The frickin' arms on the anchor nut plates are much longer than the ones I match-drilled for. DAMN ! Must have used THESE nut plates for the firewall. DAMN !!! I orderd the K1000 series instead of the MK1000 series. DAMN !
I needed the MK1000 series on top. Bought the
K1000 series on the bottom.
Okay... no riveting until I re-order the correct anchor nut plates. BUT... I do have the sheet metal to make the rear side-formers. So tonight I glued on the patterns and cut both blanks out with the bandsaw. Drill, match-drill and bend tomorrow...
September 17, 2016
Still getting ready to do more riveting...
NOT !
Did what I actually said I was going to do... same as always.
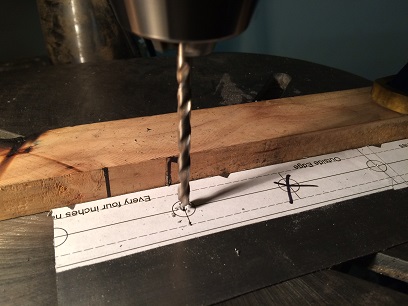
Had the blanks cut for the rear side-formers so I went to work working on them. Set up the drill press by clamping on the wood guide (keeps the holes the same distance from the edge even if I wasn't spot on with my glue job) then started drilling; centering bit then a number 8 bit. Worked through both of the side formers, deburred, then got things ready for match-drilling the rivet holes.
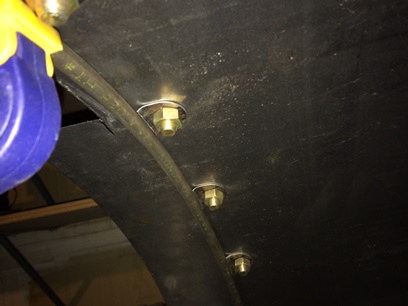
Clamped the flat piece of metal to my work bench, put a bolt into the anchor nut plate (to keep it in postion) then clamped the one edge to the metal... and drilled. Repeat... etc. Then... deburred.
Reay for the rivets... ? Not quite yet. Still need to dimple the holes for the rivets.
September 19 and 20, 2016
Still getting ready to do more riveting...
NOT !
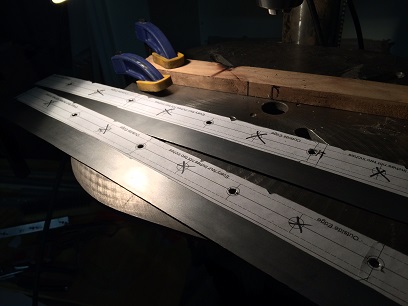
Spent two days... one day each on putting the hand-made bend in the two rear, side-formers. They look pretty damn good.
They're 36inches long; pretty damn long for putting a hammered bend the length of them. Clamped the first one good and tight... and after tapping up and down the length of it a few times saw that it had moved some on the one end. Like... what the heck ???
Un-clamped it and banged part of it back to its flatten form and re-clamped with a few C-clamps, not just the adjustable clamps. Took some time but was able to get it to look pretty damn good. Next day I did the second one. Drilled a few holes in it for using brads to keep it from moving and used the C-clamps from the outset. Took half the time of the other one... but the normal time overall.
Both of these are finished and ready for me to put rivets in them then fit to the fuselage... etc etc etc.
September 24, 2016
The pay-off...
of making a jig.
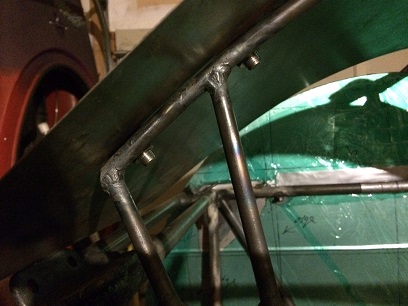
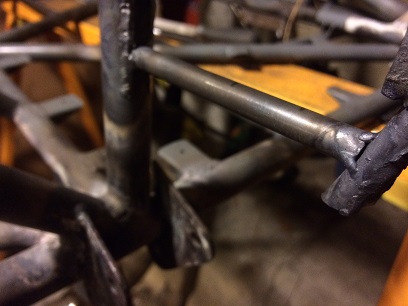
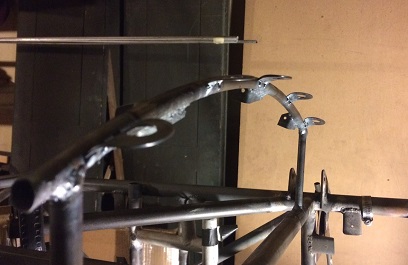
A small break from riveting the anchor nut plates onto the side formers... Today work on the tabs for sheet metals skins.
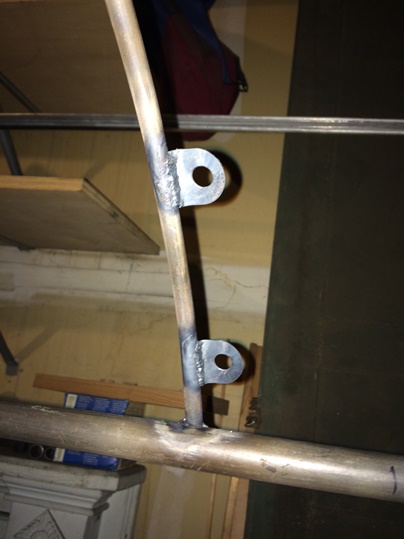
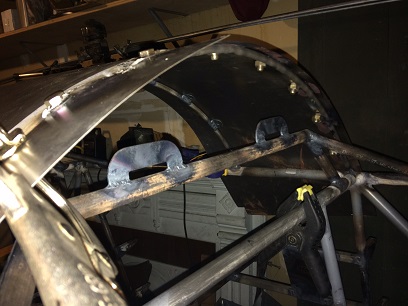
As shown above, I made the jig for holding the tabs in place for welding onto the upper formers. The jig took some time to make but it paid off in dividens today. Worked like a fickin' charm ! Centerted on the former. Wrapped it around. Clamped it. Checked for alignment... made sure it was centered with a few measurement checks. Fired up the torch and tacked all tabs in place. Then... welded them into place.
The angle at which I had to weld on those tabs and the distance from the piece itself... it twernt easy welding.
September 25, 6, 7, 2016
The difference between parts...
isn't always visibly apparent.
It's a little thing but it's a big thing... You wouldn't see it but I would know about it.
If I don't do it, it'd be lying underneath the skin of the plane... a part that I know I could have made a little bit better; up to my standards.
It's one of the rear, side formers. Yeah, like I said it isn't anything major or big, but it is. If most people could keep to their approved standards themselves, think how much better this world would be. Anyways...
I went and cut another blank for one of the rear, side formers. Cut, drilled... bent (but this time I held it in place with a few brads to keep it from moving), matched-drilled the anchor nut plates, then dimpled.
There isn't a big difference between the two formers in the photo below... but, really, there is a big difference.
September 28 - 29, 2016
What's new...
Another former...
More re-doing of the rear, side former. Part of that excellence thing I've been working on for so many years...
I've been getting lazy as of late. Combing work on the project from several days into one post. Guess it doesn't really matter... I'm just re-doing what I had already done and have been doing for quite a few days,or weeks, now. What new is there to write about other than something odd that occured to me that hadn't previously... hey, maybe the Phillies won... that'd be news-worthy.
But alas, the Phils are getting their asses kicked by the worse team in our division. Yeah... I know all about the high's and low's of a season... but the players on the Phillies seem to get those high's and low's together nothing holding a steady stream of runs coming across the plate. Enough about the Phillies...
Like I had mentioned earlier... more re-doing of the rear, side former that had been made once but now being made again for "excellence" sake. Looks better to me... and I know it's the best I can do with what I have (hand tools).
October 1, 2016
Failed tests...
which weren't actually a waste of time....
It was time to bend the six side formers I just completed. Better do a few test before screwing up all this work I've done. And tests I did... 1.7hrs later and I still didn't come up with a bending method that would work and look nice. WHICH, is why I tried doing it on test pieces... I'll need to find someone that has a bender that I can use for about 5 minutes.
After burning all those daylight hours... I still had time to accomplish something today. Decided to pick up back where I left off on the upper former tabs. Just a matter of bolting on those puppies. Aligning and clamping the jig to the upper former and tacking away. Well, a little bit more involved than "just" doing it, but I got it done... they're ready for finish welding now.
October 2, 2016
Side-tracked...
what's new....
Made the decision to not take these side formers anywhere for bending until I've made the bottom two. But... decided to finish attaching the tabs on the upper formers before making those bottom, side formers. So... get everything lined up for tacking on the tabs and discovered that I had wanted to remove a few of the stand-offs I had made with .o32 metal and replace with .375 x .o25 tubing. Had made the decision to do this awhile back but wasn't working on it at the time. Spent my work session doing just that.
October 3 and 4, 2016
Back on track...
for now....
The past two days... welded up and then filed/sanded the previous remains of the tack welds/welds from when I had the flat 4130 former supports, supporting the curve of the former.
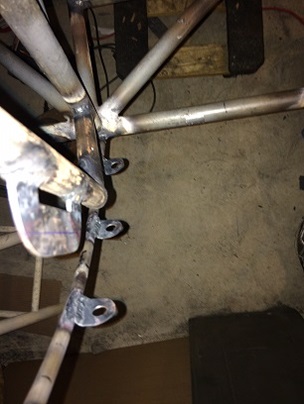
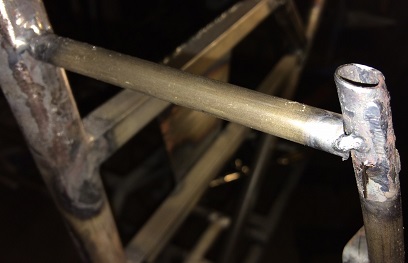
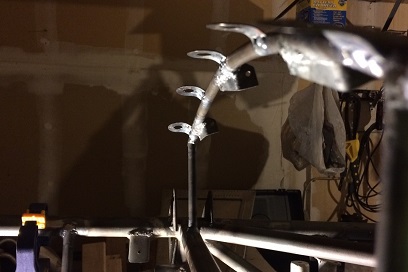
Aligned the tabs onto the former on Tuesday, the 4th. The outer most tabs fall partially off the ends of the curve. I'll need to tack the other seven then make a small jig for the outer two to make sure that they fall equal distance from the each previous tab on both sides (follow that?). I just don't want to kinda place the last two tabs on the former and hope they both fall at the same distance... since they'll both be less than the standard 4inches from the last one. (that's a lot of explaining for such a simple process).
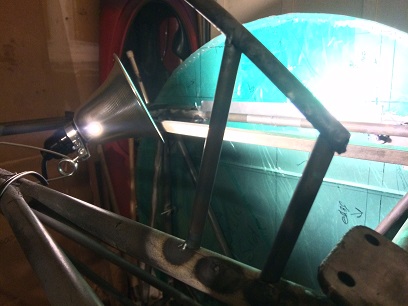
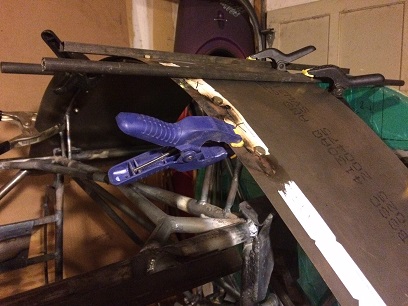
Here's a shot of the welded up former with the tab jig in place. The jigging ain't pretty, but I'm not looking for the jigging to be pretty.
October 6 and 7, 2016
Weld back on tacks...
all good for now....
Double-checked the placement of the jig and it's in the correct location. Figured the spacing of the outer two tabs will be 3.25inches on center instead of 4inches (which would have thrown them off the ends of the former by 1/2 their width.)
In between tacking... letting it cool... tacking... letting it cool... I put in close to an hour in on it the first night. Day to... a little bit more.
Friday... out for another tank of acetylene. I thought it was strange the last time I bought a tank and it only showed about 600psi. This time I'm showing close to 1600psi. Got ripped the last time... same guy wasn't in there that was usually in there so I couldn't really deal with it... oh well... I'll know from now on.
Friday night/day two... First thing was to make the jig for the outer two tabs. As I had mentioned before... I decided to put them at 3.25inches, on center, from the last hole, the others are 4inch on center; measured, centering bit, drilled, deburred... repeat.
Bolted the jig into the closest tab then slid the other tab up against the upper former and tacked. Did the same for the other side. In doing all this I knocked two of the tabs off of the former I was working on and a tab from another former. Like What The Heck ??? So... after finishing up on the two I had planned on tacking, I needed to re-jig the other three and tack them into place AGAIN.
They're all where there are suppose to be now...
October 8, 2016
Didn't run...
but I did weld.
It's been raining all weekend. This morning I had a chance to go run with the pup but I pulled a muscle in the back of my left leg the other day... could hardly walk up the steps last night and now feeding it with ibruprofen... I can at least move around to work on the biplane.
Did the usual stuff in the morning... mowed, cleaned, wash, etc... then started on the project.
Tabs, tabs and more tabs to be welded. Flipped the fuselage on its side, pulled up a chair and did just that. A number 201 tip for the thin metal tabs and I was off and running. Took a break. Ate some lunch then back at it again. Flipped the fuselage on its other side and started welding tabs again.
Finished up the tabs and, hell, I've got some more time and the A/O is on so... hmmmm ? the mounts for the firewall are only tacked on (real good) so I started welding up the tabs that I could get to. Finished ! for now...
It's raining... nothing to do outside. What the hell, again... went out and took a look at the biplane. What can I do ??? Make more tabs... took a look and I don't have enough patterns for 20-25 of them (later discovered that I do). Would like to start fitting up the upper sheet metal but need to put the bends in the side formers but I don't want to do that until have the bottom two made so that I'm not traveling to somewhere for only two of them.
Took my measurements. Took a quick look for the hole pattern layout for them... couldn't find but 18inches of it, but what the hell I can at least cut the blanks. And so I... cut the blanks. DONE !
October 9, 2016
Didn't...
Didn't do as much as I wanted to this weekend.
Had a family gathering today... my nephew's Steve's birthday. Always good to get together with family...
Got home from there later than I thought I would. Decided to start on something with the biplane... looked for the paper patterns for the hole spacing for the bottom side-formers. Couldn't find them for my life... until 1/2 hour later. Found one sheet, which is enough to do one. Went down. Glued it on and started filing the one side straight. That's it ! Decided that I'd wait until tomorrow night before drilling the holes (not sure why now...). Oh... yeah, was going to wait until I had the other one done so I wouldn't have to re-set the drill press, but then... thinking of that now, why was I thinking that ??? oh, wait... maybe because it was close to 9PM and I wanted to watch the 2nd Presidental Debate... yeah, yeah, that's it.
October 10 - 14, 2016
If nothing else...
I have notes and photos.
I'm getting into the bad habit of NOT posting to my blog... The only saving grace is that I jot down notes on the dry erase board; my hours and what I did that night. I usually take a photo of that night's work... I always have one or the other to refer back to.
Over the past few days I've been working, or should I say, I've continued work on the sheet metal mounting system; aka... metal formers and tabs.
I've completed all eight .o25 side formers, so I'm ready to take them somewhere to bend. And... I just started back on making a few more tabs so that I can align, tack, and weld those into place and have everything set for the sheet metal (as far as I know up to this point).
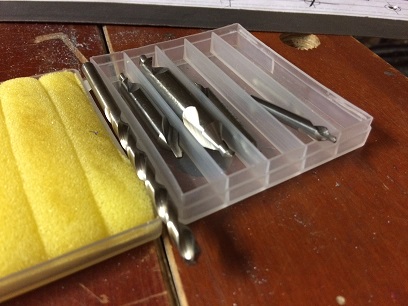
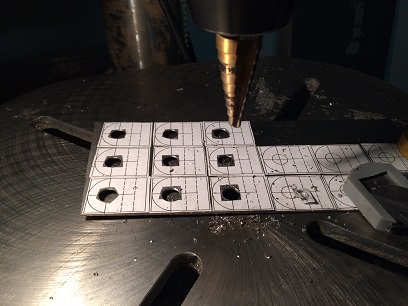
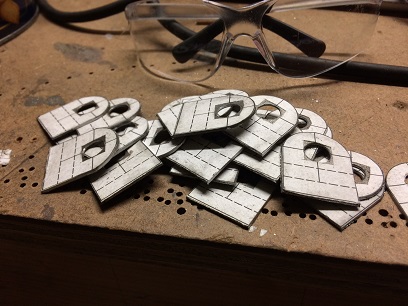
The one new observation that I did make was with the unibit. I have several; the unibit that has only the one break in it leaves A LOT more slag on the other side than the unibit with the two breaks in it. Just an observation that I made tonight. wait... Make that two observations: I found that if I left the paper around the holes I was going to drill, metal fragments would get up under the paper pattern and lift the pattern away from the metal. If you carefully cut a circle or square around the area you are drilling the paper will break away and you won't have any of that lifting going on.
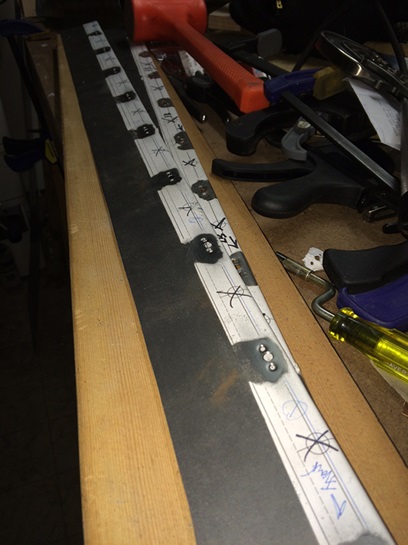
No. 8 drill bit and a No. 2 centering bit.
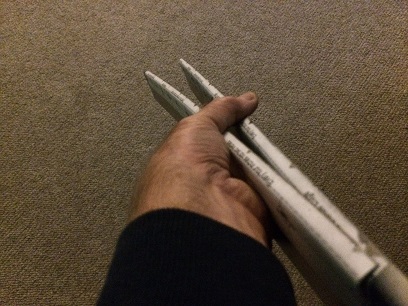
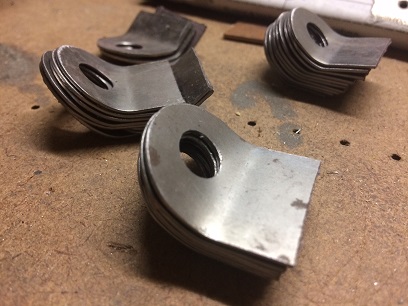
Bending metal makes bows. Need to get these straighten
out.
Areas around drilled holes were pre-cut so that the metal
wouldn't get under the pattern and lift it away from the metal.
October 15, 2016
Nothing else to say...
that I haven't already said.
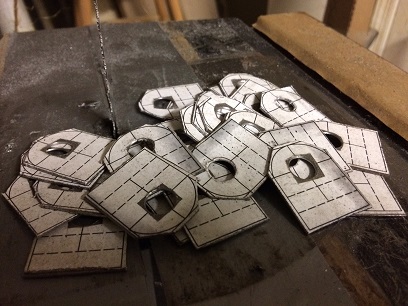
Same ol' same ol' from a few weeks back. Back to the tabs. Cut them apart and ground them to shape tonight. Not much ya can say about that that I haven't just said, eh ?
October 16 - 20, 2016
Making...
more work for myself.
DAMN ! It's happening again... going a few days without making any posts to the blog. Bad BAd BAD !!!
More work on the tabs. They're all nice and "pretty"; bent and cut to size. All ready for aligning on the side and bottom formers. Moving right along...
Well, moving along not so much...
The two side and one bottom former that are to receive the tabs needed to have stand-offs (because of the BIG radial engine shape). Back when... I decided to make these stand-offs with flat sheet metal which, 1. created all this extra weld build-up that will now be in the way of the tabs. and, 2. could be a problem area for collecting dirt and a hard place to get to to clean. Off them come ??? Yep ! Off they come.
Off with the old stand-offs... but I need to do it in steps so that they don't move (since I already have the tab mounts for the stringers on them). I decided that I'll need to cut away some of the sheet metal stand-off in each location, tack on the right length of tubing, then cut away the rest of the sheet metal stand-off. Easier said than done.
A lot of the cutting and trimming are in areas that are hard to reach with the cut-off wheel and the hand-held grinder. What's left I need to file down by hand. And that, my friends, takes some time...
Working on the side formers first... The first one has both stand-offs tacked in place with the sheet metal trimmed away. Working on the second one...
And right now, it ain't that pretty looking with all that slag from the previous weld still on the tubing.
October 21, 2016
Getting back...
to moving forward.
Long hours with not much to show for it, but...
This is one battle-scared biplane. I go along thinking one way and then, because of something I didn't think of, or I didn't like the look of it... I'm cutting off and re-doing. Needless to say, this is leaving a little build up of weld on the tubing.
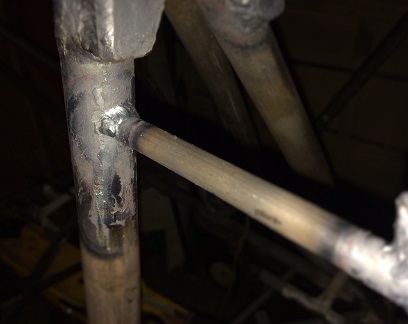
More work on the forward, side formers. I tacked the new stand-offs in place, cut away the old stand-offs, then welded up as much of the new stand-offs as I could. Well, all of that after I filed most of that excess weld from the initial stand-offs. Still need to flip the fuselage to get the underneath part of the welding completed.
Tacked. All the ugliness on the former to be filed and sanded.
Partially welded
October 22, 2016
Almost ready...
for the tabs.
When you're scratch building a biplane there are going to be a lot of days where it looks like you're doing the same thing... not so...
Take for instance these tabs that I'm just about ready to attach now. Buy a kit and you pull them out of a box and tack them on... and in most cases, they're already attached to the frame for ya. Us "hacksaw and file guys" need to draw the pattern, glue to the steel, drill the holes, deburr, rough-cut each tab, grind and file and sand to shape, grind to size, jig (after making the jig), align and tack into positon, finish weld.
Where was I now ???... oh yea, Ground and sanded smooth all that excess weld that was left from the original side-former stand-offs. Took about two hours but they're looking pretty good now.
With the condition of the side-formers back to square one I'm ready to tack and mount the tabs. They're in the jig ready to be tacked tomorrow. Still need to take a few measurements for alignment before tacking in place.
October 23 and 24, 2016
I'm ready...
for the tabs.
I'M THERE ! I am finally there... I'm ready for the tabs.
Took a few measurements to see where the ends of the starboard side former fell in relationship to the upper and lower longerons. Less than a 1/16inch difference. Put the jigged tabs in place and did a few back-and-forths (actually a lot more than a few), from side-to-side, to make sure that each side was the same distance from the end of the former. After, what seemed like an overly anal period of time of checking, I started tacking on the tabs. That was it for day 23.
Day 24, flipped the fuselage and did the same; measurements of the ends of the side former to the longerons (less than 1/16inch again)... the only difference this time, I knew the ends of the tabs were 3/4inch from each end so... I marked 3/4 inch on the former to give me a starting point, THEN placed the jigged tabs in place, made sure they were aligned correctly THEN tacked them in place. With the fuselage on its side, and the other tabs in a perfect location for welding, I finished welded the tabs on the starboard side before finishing out the night.
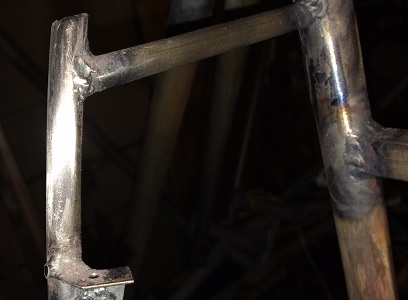
Starboard side-former with tabs tacked.
Port side-former with tabs tacked.
October 25: Update
Finish welded additional tabs !