Mantua, New Jersey
Original Site:
September 2004
E-mail: usav8or@yahoo.com
more work on the...Radial Fuselage.
October 28, 2014
making a few...
aircraft-like parts.
Moving forward with the empennage enclosures...
Started off tonight with bending up of the tabs. Didn't take long and I didn't think that they would. Next thing...work on the shape of the enclosures.
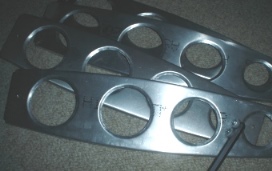
As mentioned before, I have this grand idea of making these look aircraft-like; similar to metal wing ribs or the baffles that are in a gas tank. Not quite sure how I'll close off the lightening holes, but that's just a small matter. I'll figure it out. The task at hand is making the pattern for the parts. (by the way... these ribs are for the upper wing fuel tank, not the enclosures)
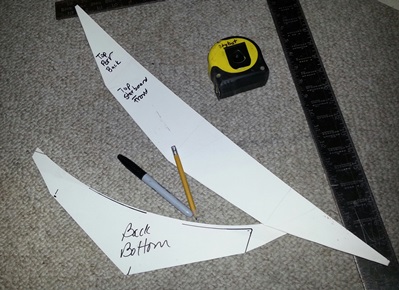
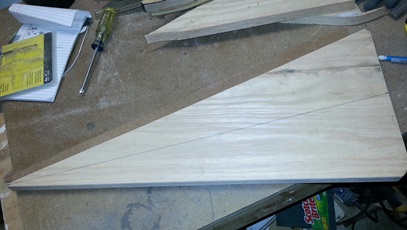
The pattern... paper or plastic ? or maybe wood ? The best thing to do is make a paper pattern. Get it close... then a little closer... until you have the pattern which you transfer to a sheet of plywood for further refinements (hoping that it is already dead-on). Once the final plywood pattern has been made it's time to cut out the blank, cut out the lightening holes and then form it over the pattern. Followed by edging the lightening holes; edging helps to stiffen the panel AND make it look aircraft-like.
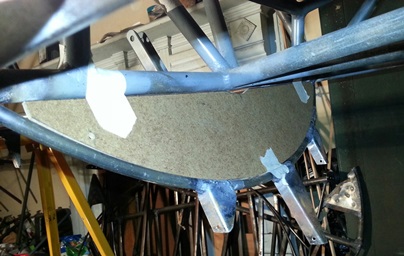
I'm to the point of having the paper pattern close to the shape it needs to be. I'll transfer this to a thin piece of ply before making the 1/2inch final plywood pattern.
The above photo:Actually a better fit than it looks. It's not taped in very well.
October 30, 2014
Happy with these...
aircraft-like parts.
ya know... I was real happy with the progress on the biplane project tonight. It was the beauty of... needing to make patterns and they are for two uses; positioning the tabs AND patterns for the enclosures. I think part of that happiness comes from liking the design of the enclosures... something different, unique.
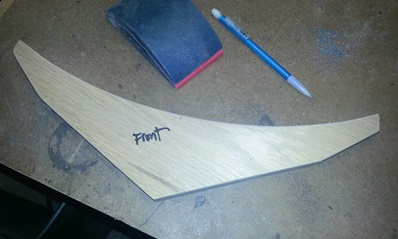
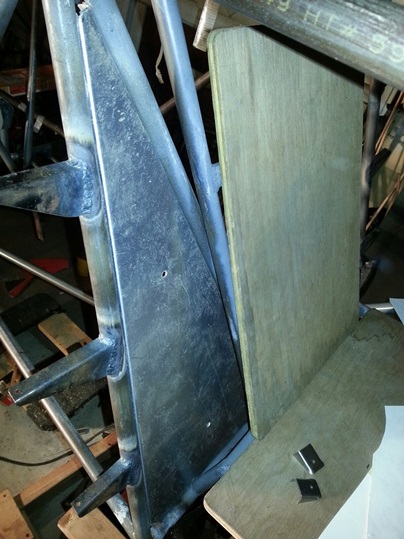
Transferred the paper pattern for the side enclosures onto a piece of masonite. Filed a notch out of the bottom and it fits nicely on both sides. I'll take about 1/16 off each edge for a little bit more clearance to allow for the .o40 alluminum and the bends.
Had some additional free time so I worked on figuring out the belly enclosure. Took a piece of scrap display board and taped it into position. Drew a rough of what shape it needs to be... figuring I'll need to refine that line with the next iteration. On my way to grab a pair of scissors I walked by the stack of display former patterns I kept (for some reason) and thought... I bet you the belly former pattern for station 77 is in that stack. Find that and I'll have a spot on shape.
A few minutes of looking and BAM ! I found it... Made a new paper pattern for the enclosure. Held it up and then taped it in place and BAM ! finished paper pattern. Now all I need to do is transfer it to a piece of masonite. Once thats done I'll transfer both patterns to a 1/2inch thick piece of ply and then make these puppies. I'll take those same patterns after making the enclosures... to use as jigs for positioning and tacking on the tabs.
Looking good !
Need to make the hole for the pushrod.
November 1, 2014
A piece, start to finish.
If I could only do this... on a daily basis.
Got a lot done today.
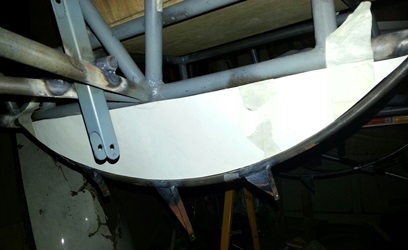
Started off with fine tuning the lower enclosure pattern. A little trimming here and a little trimming there... and it's ready for the next step.
I'm looking at the pattern and wondering how well the sheet of aluminum is going to follow that large radius... we'll see.
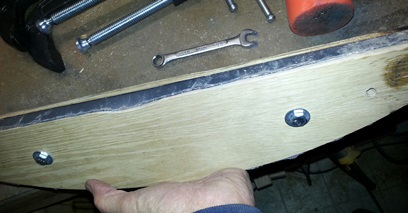
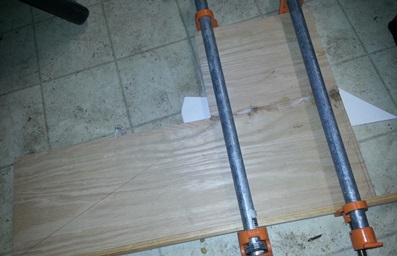
Found a piece of oak for making these kinds of jigs (nice and hard... so you can pound on them without them deforming). Found a piece of 1/2inch ply big enough for making the top clamping piece (to hold the sheet of aluminum in place). Found a piece of 3003 aluminum (left over from the wupper wing gas tank). Marked it. Cut it out. match drilled the location holes. Clamped it... then started banging away at it.
Remember... you can't bang one small section completely over. The point between it being completely bent over and the part that it still vertical will have a large stretched area that will look like it's "rolling" on the edge. There's going to be enough issues with "extra" aluminum on the edge without you/me making more of an issue.
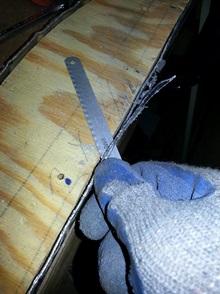
The edges of the piece are pretty long... and they're still rough cut from when I cut the piece out for clamping and banging it. I un-clamp the piece and use the 1/2inch ply as a guide for trimming the edges of the piece. (looking at it after it has been trimmed... I may trim it to 3/8inch). To get a nice close cut, I took a hacksaw blade and held it to cut the excess aluminum off the sides before using a file to get a nice clean edge. oh... as a reminder, you'll need to drill a few stress relieving holes at the points where the edges of the bends are. If ya don't ya make get a few stress cracks. And another oh yeah... wear a pair of gloves if you're doing it this way. I don't wantcha sueing me for cutting your hands.
A little over five hours and this is what I have so far; pretty much made a part start to finish. I test fitted it and it's a little over-sized. I think it's from the edges of the piece not being fully bent over along the entire length of the curve and the straight edge. So... I'll need to tweak those areas and also straighten the entire piece out a bit. Although... looking at it... there's not much twist in it. After all that... THEN I can drill those lightening holes.
November 4, 2014
Not so much a piece, start to finish.
There's always a lot of tweaking going on.
More work on the lower enclosure. It was a little tighter than what I wanted it to be so I tried bending over the lips... thinking that they were flairing out a bit. Nope, that wasn't the issue. I needed to trim a bit off the forming jig itself. Maybe 1/16inch? I'll give that a try. If it doesn't work, this'll be a practice piece.
Marked the flat side of the oak former with a 1/16inch edge and took it to the sander. Shaved it down and re-clamped the aluminum enclosure to it. Started banging away on it, with it on the table, and it wasn't really forming that well. Placed it on the floor, where I had linoleum on top of a concrete floor, and started hitting it... and surprise surprise surprise... the edges of it were better than before. The edge, that was like the surface of the ocean with a 15 knot breeze, was now like the calmest of seas; the radiused edge was smooth. I don't know what the heck I was thinking last time.
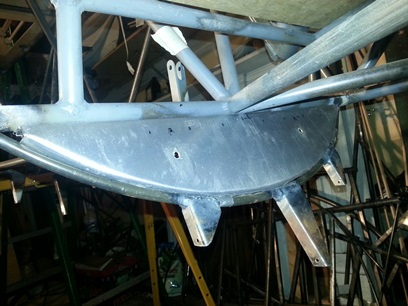
With it looking this good, I held it up to the belly former and it fit in there as nice as could be. Nice ! The tips of it were a little flaired out, but nothing I couldn't fix later on.
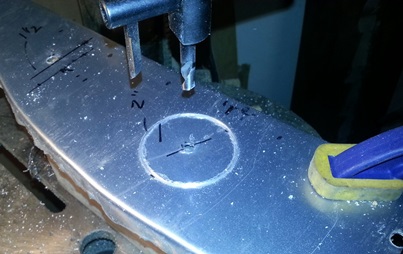
After prying it off the oak former I took it over to the drill press and cut the two size holes out with my circle cutter. A little akward, as usual, but I got them cut out in a reasonable amount of time.
I wanted to make the most of my time at Woodstream Ct., I can edge the holes back on Lombard making good use of some of my time there as well.
The aluminum for the side enclosures was delivered to Andrea's work today and I need to make the oak former for those (one former to work for both sides). Stopped by a Home Depot on my way back from an earlier appointment today and picked up a 12inch x 48inch x 1/2inch piece of oak just for that purpose. Cut it down on the table saw. Glued it and clamped it. It'll be ready for me to cut to shape on Thursday when I return...
Update: November 5, 2014
I'm just now looking at the bottom enclosure and realized that I'll need to make a enclosure that will span the space between the stringer support form and the fabric on the biplane. duh ! Can't do that until I have the fabric on it to see how the scallops will form...
November 5, 2014
Not so much...
to say.
Tonight... work on the side enclosures. I have a large enough piece of oak, since I glued it up yesterday. Took it out of its clamped stated and marked the cut lines on it and I had at it.
A few 10ths under two hours and I have the oak, wood former ready to be used and the first marked up blank ready to be cut out.
What can you say about making a forming jig for a few aluminum pieces... not a whole lot.
November 7, 2014
Bounus...
time...
Felt good working on the project tonight...
An hour and fourty-five minute drive from work... yeah. what a pain in the ass (seems to be more of a common occurance lately). AND... it's only 28 miles. Go figure. But, when I got home to Lombard Street, not only was the pup waiting for me, but a piece of the biplane was too. Brought home that lower enclosure piece the other day.
I thought it through enough where I brought home the edging tool and the degree-measuring-whatchacallit. Spent almost a 1/2 hour working the edges around the holes. I'm going to like these pieces in the cockpit area. They's lookin' nice...
The pup just finished eating...
Rough edges... the plastic is still on it.
November 8, 2014
Same Stuff...
different day...
More metal work...
It's Saturday... I have a few hours to make one of these side enclosures. Should be enough time to make the complete piece (all except the flanging of the holes).
The pattern was already transferred onto the sheet of .o40 3003 aluminum all I head to do was the additional 99 percent of the work.
My apologies for such boring reading material, but there ain't much to write about AND there weren't any inspirational moments during the session. All I gots ta say is... don't cut the aluminum with a full cut on the snips. If you do, you'll stretch the material and it will show with a jagged cut.
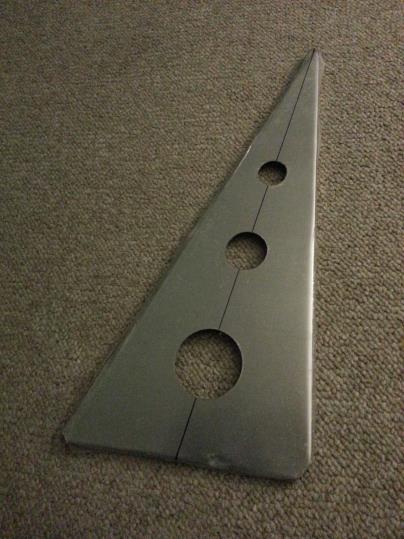
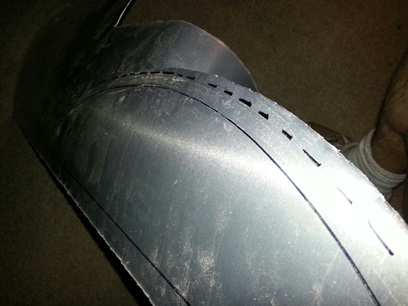
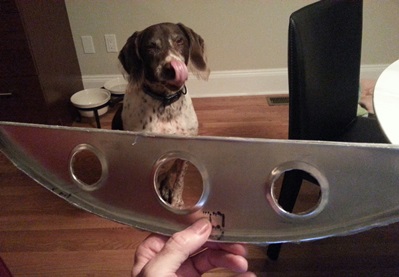
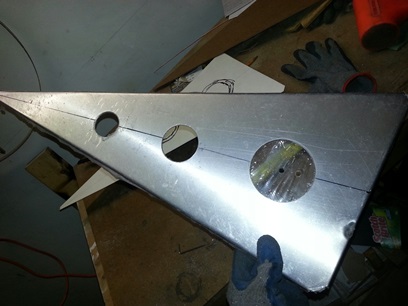
It was a little bit easier this time since I didn't have to bang the curve into the piece. As you can see from the pictures below it's ready for me to flange the lightening holes.
I'm just so damn happy with how these are turning out.
.
The little indentation was made purposely.
There's a tube that it needed to fit around.
November 9, 2014
More...
bonus time...
Sunday morning time...
More work on the biplane project... on Lombard Street.
The ragged edge... part of the plastic torn away
November 10, 2014
Lightening holes ???
and Lightening Speed...
The closer I get to finishing the biplane... the more it looks like I'm accomplishing things; checking items off that list.
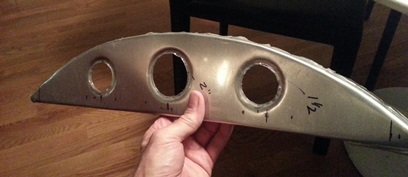
Tonight I worked on another one of the side enclosures. Cut the blank out. Match drilled the alignment holes. Bent and trimmed and filed the sides on all three sides. Drilled all three lightening holes. I did a lot in 3.6hours. I did a lot and it felt real good.
Maybe it's because I worked on parts and pieces for soooooooooooooooooo long that making a part, start-to-finish, in a few hours seems like lightening speed. Whatever can be attributed to it... I'm likin' it. I've mentioned it a few times over the past month or so... maybe I am getting close to finishing up the fuselage ??? just maybe...
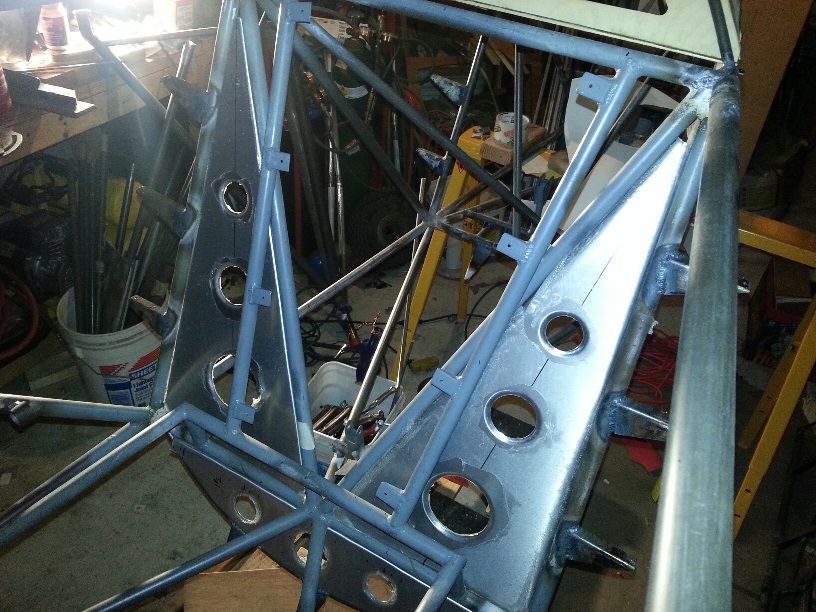
I actually took a shot of all three enclosure pieces in place (the one still un-flanged) but I'll wait until it's "finished" before uploading the finished piece.
The bump... again, made on purpose.
November 11, 2014 even More...
bonus time...
Tuesday night time...
even More work on the biplane project... on Lombard Street.
again...The ragged edge... part of the plastic torn away
November 12, 2014
All that bonus time...
now being eaten up...
Here it is, but it ain't done !
Click for LARGE image.
I knew about this for a few days now... The enclosures that I've made so far are fine and dandy for part of the enclosure but isn't cutting it for the space between the outside of the former and the fabric on the fuselage. and here... I thought, I was close to checking off one of the items on my list ??? Lookin' like I'll be spending more time on this then I originally thought I was going to be spending on it.
Not a problem, but I did need to think it through before making the pattern and after making the pattern. I need to allow for the stringers and for the the slight bow of the fabric and the stand-offs themselves. I'm allowing a little excess for the space between the aluminum enclosure and the fabric. I don't have the exact shape and I don't want to make these so that the fabric rubs up against them and wear any...
Spent some time making the patterns for the two sides and the bottom. I think they're pretty damn close. I'll check them again tomorrow before cutting the oak formers. I'll need to mark where they'll need to be notched also... before making the bends.
November 13, 2014
Picking the paints
and making the brush strokes...
Nooooo... I'm not painting the biplane yet, but, I'm liking this finishing off business. Not because it indicates that I'm getting any closer to completing the biplane, but because I like the visible details that I'm creating; paint on my canvas.
Worked on the lower/outer enclosure. Got the pattern tweaked and cut out the oak jig/former. All I need to do is cut the aluminum and bang it out...
November 14, 2014
He still doesn't get it...
The Pup... Daylight Savings Time...
It's 5:15AM on November 15th. Up with the pup who doesn't "get" Day Light Savings Time, yet. Well, actually I don't get it either. Hell, wake up earlier or later... whatever fits your life style. We're all big boys and girls, right ? anywyas...
Last night... working on the assumption that you should try to put in a few minutes on the biplane project every day... I worked on getting a blank cut out for the lower/outer enclosure. Brought the aluminum back to Lombard from Woodstream. Brought everything else that I needed to get the project done also.
Didn't take long, less than 1/2 an hour. It's ready to be banged out on the wood former.


 As mentioned before, I have this grand idea of making these look aircraft-like; similar to metal wing ribs or the baffles that are in a gas tank. Not quite sure how I'll close off the lightening holes, but that's just a small matter. I'll figure it out. The task at hand is making the pattern for the parts. (by the way... these ribs are for the upper wing fuel tank, not the enclosures)
 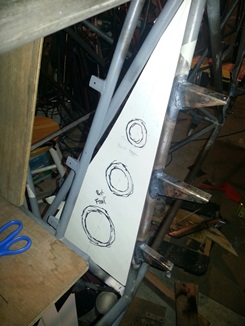 The pattern... paper or plastic ? or maybe wood ? The best thing to do is make a paper pattern. Get it close... then a little closer... until you have the pattern which you transfer to a sheet of plywood for further refinements (hoping that it is already dead-on). Once the final plywood pattern has been made it's time to cut out the blank, cut out the lightening holes and then form it over the pattern. Followed by edging the lightening holes; edging helps to stiffen the panel AND make it look aircraft-like.
 Transferred the paper pattern for the side enclosures onto a piece of masonite. Filed a notch out of the bottom and it fits nicely on both sides. I'll take about 1/16 off each edge for a little bit more clearance to allow for the .o40 alluminum and the bends.
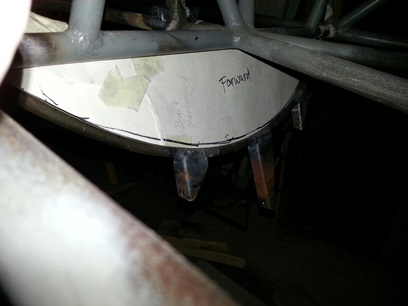
 The edges of the piece are pretty long... and they're still rough cut from when I cut the piece out for clamping and banging it. I un-clamp the piece and use the 1/2inch ply as a guide for trimming the edges of the piece. (looking at it after it has been trimmed... I may trim it to 3/8inch). To get a nice close cut, I took a hacksaw blade and held it to cut the excess aluminum off the sides before using a file to get a nice clean edge. oh... as a reminder, you'll need to drill a few stress relieving holes at the points where the edges of the bends are. If ya don't ya make get a few stress cracks. And another oh yeah... wear a pair of gloves if you're doing it this way. I don't wantcha sueing me for cutting your hands.
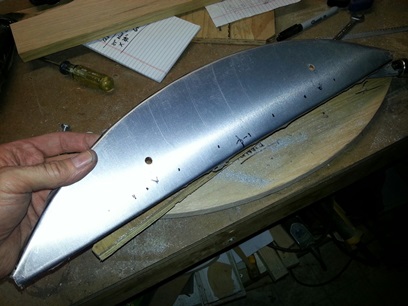


 .
.