Mantua, New Jersey
Original Site:
September 2004
E-mail: usav8or@yahoo.com
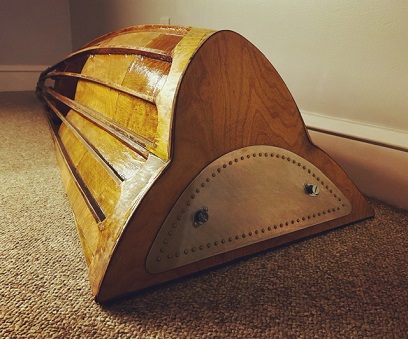
The Radical Radial Turtledeck.
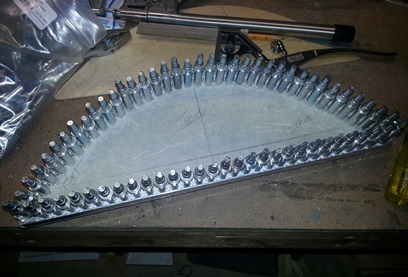
August 20, 2015 Lots of clecos...
filling lots of holes...
After drilling and clecoing the bottom flange on the inner hatch cover it was kind of a repeat... of the past few days.
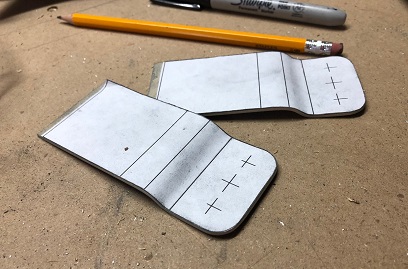
Cut the outer hatch cover blank 1/4inch larger all around; basically 1/2inch larger than the inner hatch blank. Filed and sanded blank before match drilling the inner to the outer. A lot of the same of what I've been doing a lot of... drilling and deburring.
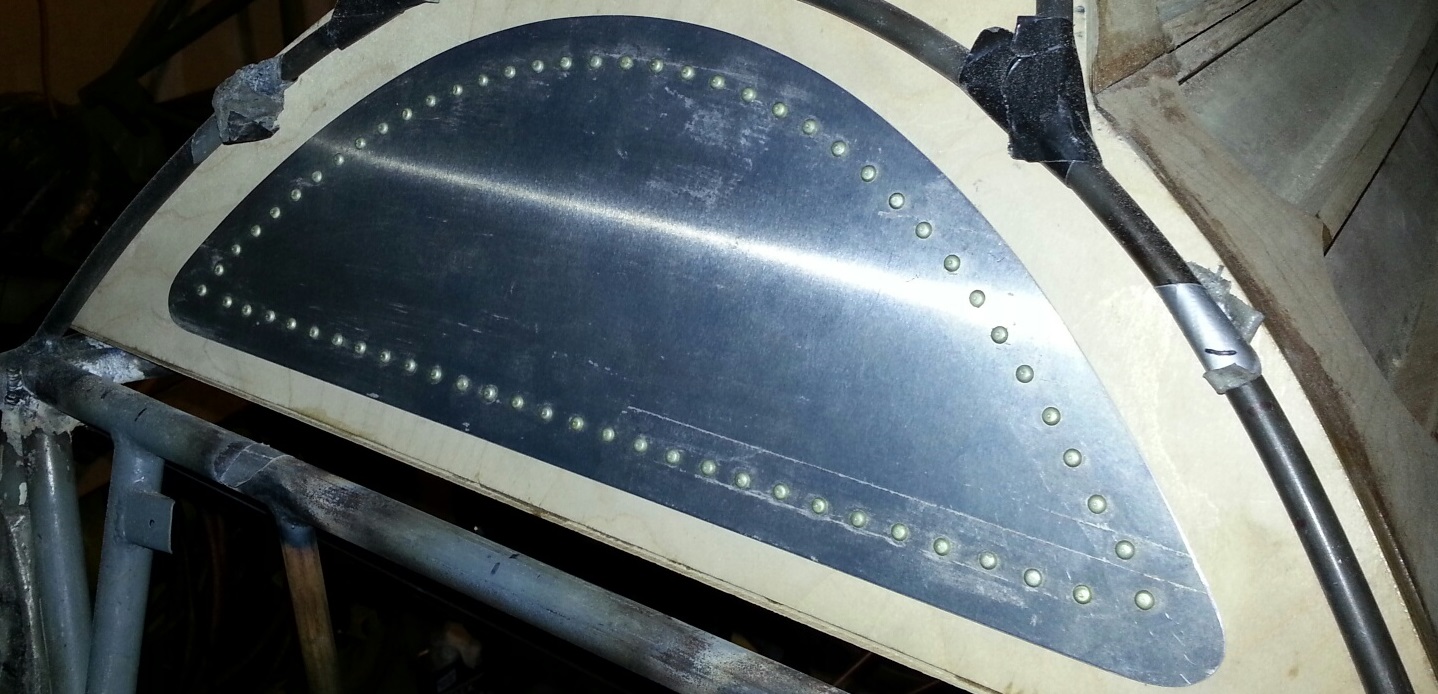
Inner hatch all clecoed up.
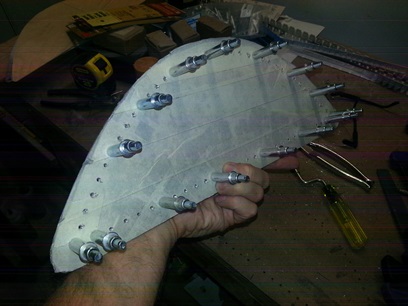
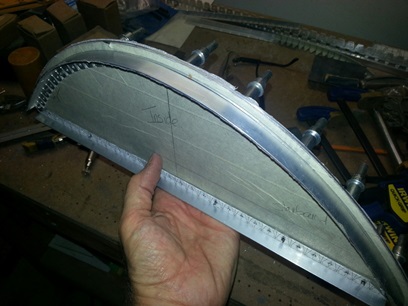
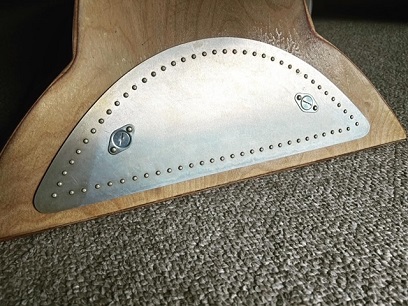
Hatch, outside shot (with tape on it).
Hatch, inside shot (with tape on it).
Not sure how all those RV guys keep their aluminum sheets from scratching, but... I put either masking tape or that plastic floor covering over it while I'm working on the piece.
August 21, 2015 Lots of filing...
for the fit.
Spent quite a bit of time filing and sanding the flange and edge of inside blank to get them to fit nicely into the turtledeck opening.
August 22, 2015 A new skill set...
to learn.
A little hesitant to begin the riveting on the turtledeck hatch. The hesitation comes from possibly screwing up all this work I've done prior to the riveting.
Took my time lining things up for the first one and... the sucker started going side-ways on me. DAMN ! Stopped before going too far with it (I'll come back to this one and drill it out later).
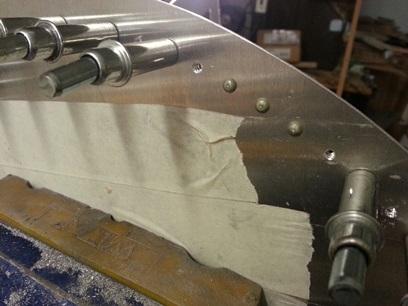
Lined up for the second squeeze... trying to make sure it was square all around. Looking at the part I was flattening and... when finished it looked a lot better. The back side was still a little too high and not round enough so I adjusted the squeezer and pulled the trigger on it again. After the re-adjustment it looked pretty darn good. Had time to do about a dozen rivets before needing to get ready to head out with Andrea tonight.
Before packing things up I decided to drill out the bad bad rivet. Wasn't easy even though I was taking my time. Started going nice then it JUMPED! off the head and put a small nick in the aluminum face. DAMN! Screw this... I'll take a Dremel cutoff tool and knock the barrel of it from the back-side. DAMN!
All-in-all... I'm real happy with how this squeezer is working out.
Rivet on the right is the bad bad rivet.
August 24, 2015 Fits with clecos...
rivets, not so much...
Tonight... doing a pretty good job with the rivets. Taking my time making sure I've centered the barrel of the rivet on the squeezer's head then made sure that I was squared up left-to-right and top-to-bottom. Moving a long real nice.
I thought...
If I finish up in time I'll start cutting out the back insert for the pilot's seat... About two hours into the session and I'm ready to fit the hatch to the turtledeck and get moving on that seat back insert. Went to insert the hatch and... it's NOT fitting. WTH ??? Took a close look at the hatch and the bottom flange kicked out a little on the port side. DAMN! and it's riveted on !
Spent the next frickin' hour and a half sanding both the bottom flange and the turtledeck hole opening. Just pisses me off. I take all that time getting things all lined up all those days before and What The Hell Happened ? I had it all cleoced up and everything was lined up; the flange to the inside blank to fit the hole opening with room to spare and... I'm just a little pissed right now.
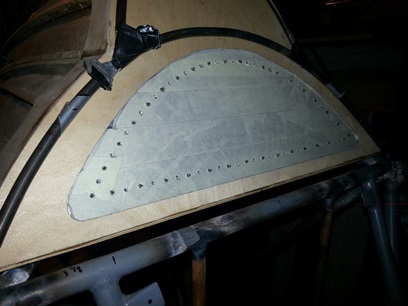
With a lot of sanding it fits but that's not the point. It fit beautifully before I riveted the flanges on... ahhhh, whatever...
Still looks good. Click image for close up.
December 16, 2016 Feathering...
the bird.
WOW ! A lot of time has gone by since working on the tailcone... It was one of those little things I was pushing off doing. I needed to do a little building up around the opening for the horizontal stabs; the space between the front of the opening and back of the opening... along the spline. Both pieces have been cut and fitted. Only glued the one side. Other side will be done tomorrow. I'll then need to take some sandpaper to feather it. It's close now but it can be better.
No photos of it. I'll take one tomorrow.
December 19, 20, 2016 More feathering...
then attaching.
More work on the tailcone and attaching it to the fuselage.
Glued on the second filler piece the other day and then feathered into the existing tailcone shape.
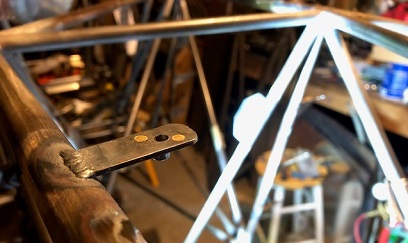
Spent Tuesday night fitting up/grinding to fit, the bracket I made the other night.
June 10 - 28, 2019 The many iterations...
of attaching the turtledeck hatch.
I've been back on the turtledeck hatch for a while now... trying to figure out the best way of making it detachable. Thinking... and thinking... and thinking... and more thinking.
In the beginning I was thinking of having a mechanism that would insert a few pins into the bottom of it, while the top had some type of tab... I'd move a lever and the pins would either lock or release the bottom allowing me to take the hatch off for access. A lot of other ideas floated... in and out of my head. I was flipping between loocking at Tony B's books to the Aircraft Spruce Catalog... then searching the internet... Too many possible, but not possible, ways to jot down right now, and not what I finally ended up with.
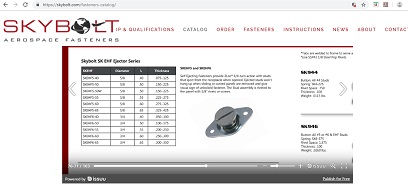
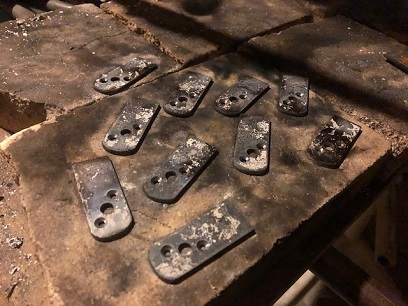
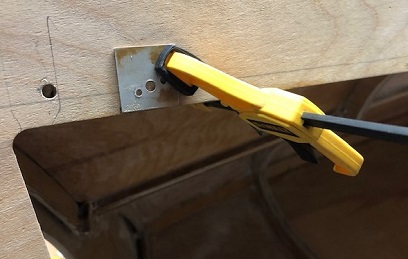
I finally arrived at using the 1/4 turn fastener... better known as the Dzus fastener. I wanted to have the clean look of just the single stud inserting into the front of the hatch but special tools would need to be purchase to connect a collar to the outer panel to keep the stud/pin from falling out. This collar also has depth which... let's just say there were too many things adding up with this method that I decided to go tot he self-ejecting stud/pin that is already set up so all you need to do is drill, deburr, and rivet on. Then rivet on the appropriate spring on the backside of the bracket I made (see below) and it's ready for using.
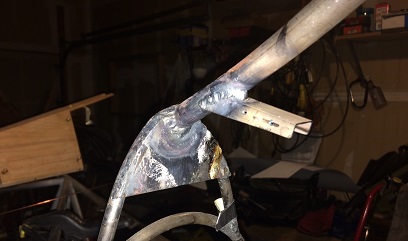
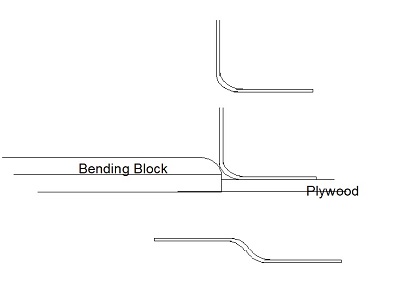
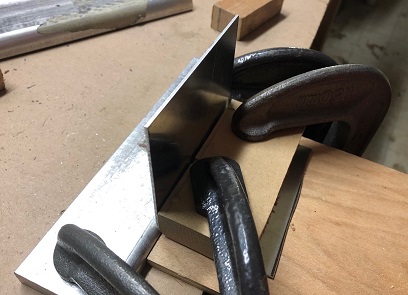
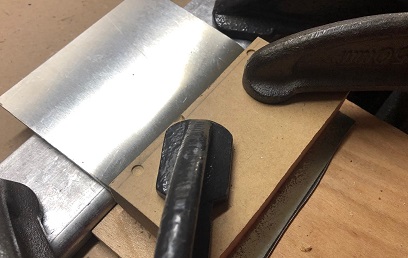
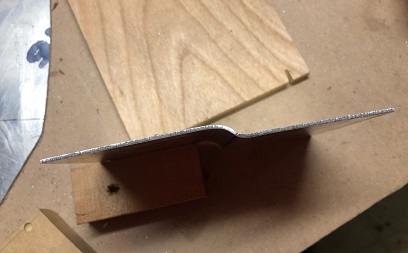
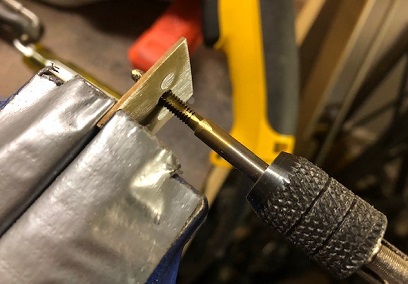
Figuring out the bend on the inside bracket was a little bit of a challenge. Well, not the figuring out of it with the formulas... but figuring out... the bends are so close that they over-lap each other. Usually there is a space between the two bends. On these two... before the one bend totally flatens out (for the 90 degree bend) the other begin. Scratching my head as to how I was going to do it. Then... the light bulb went off. Make the first 90 degree bend... then anneal the aluminum to make it easy to make the second bend. Raise the part with a piece of plywood to the correct height. Clamp the raised part on the plywood. Clamp the bending block and then easily bang the piece over. Worked like a charm. See attached photos...
Theory above...
Practice below...
June 29, July 3 and 4, 2019 Wow WOw WOW!!!...
STOP the madness!
This entire Dzus fastener experience... it's like am I going way overboard with it? or is it just that complicated?
Figure out the total depth of both pieces to be joined. Plain stud, with all it's numerous components... or the "self eject" rivet on stud/bracket... and all its iterations. THEN try and figure out the locking spring you need for it.
Decided on the self ejecting rivet on bracket. Had one helluva time figuring out the spring attachment for it. Found that information buried somewhere on some site on the 47th page... Yeah, if you need the information, just give me a ring.
Find all that information then you want to be double, triple, quadruple sure that it's the correct stuff that you're purchasing. Not that it's a large sum of money... but you've done your do diligence now you'd like to see that all that work is right, correct, on point. Oh... wait... Add on there figuring out how to read a micrometer too. Read the .10, then there's another area of the .100, and oh by the way... then there is another area that shows the 1000. That's for measuring the depth of the pieces being joined.
July 4 - August 12, 2019 I've
STOPPED the madness!
I allowed myself to be pulled through this project at a snails (allow snails to come out of your mouth real slowly) pace. For whatever reason... it was a good thing. I'm in no rush to complete her. It's all about the learning, right?
Think about it until you know it's right. Don't accept the first thing that comes to mind. You want it simple and light weight. Think things through... until you meet all the requirements as best you can. And then throw that question out to the Gods a few times... "Is this the right path?". Ask that queston until you're sure it is...
As separate thought:
It's been sooooo long to get through this entire "how to attach the door to the turtledeck" thing. I've thouoght about this alot more than you can imagine. Yeah... investing one's thoughts into how to attach the hatch to the turtledeck. What can I say, most of the build has been like that; hours thinking the entire process of the piece over and over and over again. It's rather... um, medicinal?
I've been working on it since my last post. Just haven't written anything. It works... the door attach, not, not posting! It actually works GREAT! All I need to do is fasten the attaching plates onto the turtledeck. Before I do that I'll need to seal the turtledeck area around the mounting area. Also... figure out what to do with the aluminum plates; figure out how I want to finish them, and the hatch cover itself. All good questions of which I think I have the answers to.
January 31, 2020 It was in the back of my mind..
along with a lot of other things.
It seems like I've been kind of fooling myself for awhile now... knowing but not quite acknowledging it.
Finally following through on my "this part is finished" when in actuality... it's not finished until it is mounted onto the fuseslage, or whatever area it's being mounted to.
I just finished up on this same theory with the throttle mounting plates... now I'm back on finishing the turtledeck. Left to do; mount the turtledeck to the fuselage, and finish up the locking part of the hatch to the turtledeck. oh yeah... the flooring on it too.
Back on the mounting to the fuselage. I had already made and welded on several tabs to the upper longerons. All I thought I had to do was mount a few more then drill and attach a few anchor nut plates. Upon closer inspection... the existing tabs are too close to the edge of the turtledeck. The flat flooring that I have one the turtledeck is further away from the edge than I had planned.
Plan "B"... fabricate and mount the new tabs. Rough measurements showed that they need to be approximately 1 3/4" long. Decided to craft these out of a length of 5/8inch x .070 4130 strip stock. CAD'd up the length along with the location of the screw hole for each of the 10 tabs. Drilled holes for machine screws, match-drilled rivet holes along with counter-sinks the rivet holes... THEN cut the tabs apart. Rounded edges (filed and sanded to 150 grit). Out to the fuselge where I had clamped the turtledeck in place. A measurement showed that the tabs were close to the right length but wanted to bring the mounting holes further towards the middle of the flooring, so decided to cut them down to 1.5inches.
Tabs are now cut to length with the paper patterns burned off... ready to be aligned and welded onto the fuselage.
February 1 - 7, 2020 Mirrored? MIRRORED?...
look at that word... mirrored.
Is mirrored even a word?
(in my best Andy Rooney voice... and I don't do impersonations)
Did you ever write a word and say... that can't be how you spell it?
Not much to write home about this week...
Worked on mounting the turtledeck to the fuselage. As previously mentioned, most of the tabs were too close to the edge of the turtledeck vertical walls and needed to be re-made. This week I set about aligning and welding on those tabs.
Started off moving along real nice until I discovered a few of the existing tabs were in the way of where I needed to weld on those other tabs. So... I spent close to one and a half hours grinding off, filing, and then sanding those existing tabs.
Next day back to welding on the four remaing tabs. Popped (easier said than done) the turtledeck back on the fuselage and bolted the tail-end stringers to the tailcone. Align and clamp the turtledeck onto the fuselage for match-drilling. Back off with the tailcone so that I could drill the holes for the bolts into the tabs so that I could match-drill them now instead of later. Drilled holes... "popped" the tailcone back on and match-drilled its holes.
I wasn't able to get to two of the holes, even when I used the 90 degree angle attachment on the drill. Marked those holes for free-hand drilling. To be done on Saturday.
Alluding Side note: I'm not impressed with the location of some of the tabs for the tailcone. When welding them onto the fuselage I wasn't as precise as I could have been... Soes when you are looking at the match-drilled holes on the bottom of the tailcone they's ain't mirrored. Such is the life of a scratch-built biplane. At least mine.
February 8, 2020 I'm already focused on the belly...
Not much to write about the turtledeck...
Well... maybe a little more than "not much".
Drilled remaining two holes. Checked for fit. Reamed out the five tab holes at the rear of the tailcone... ready for monadnock clip nuts. Riveted on all (10) anchor nut plates... that's (20) rivets. T/D is ready for mounting. BOOM!
May 15/16, 2020 More design and construction...
finishing up the turtledeck.
Trying to wrap my head around how to make the flooring for the turtledeck.
The turtledeck will be attached to the fuselage before covering. I'll need to get to the inside of the turtledeck to sew on the fabric covering... and THERE is the challenge!
The storage in the turtledeck is a little over 24inches deep. I'll need to make the flooring in two parts. Because the size of the access holes (in the bottom of the turtledeck) I'll need to create each of the two pieces in two pieces. The ultimate challenge: attaching the flooring after I've sewen on the fabric covering with the turtledeck attched to the fuselage already. I'll need to attach the rear flooring first... and attach by reaching up through the bottom (where the forward flooring will be) and screwing in the machine screws to hold it down. The forward flooring can be reach at through the front door.
With the storage sooooo deep, I'll probably have a canvass bag that I'll put everything into so that I can easily take things in and out of the storage space just by grabbing the canvass bag.
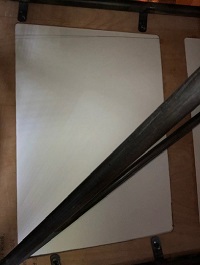
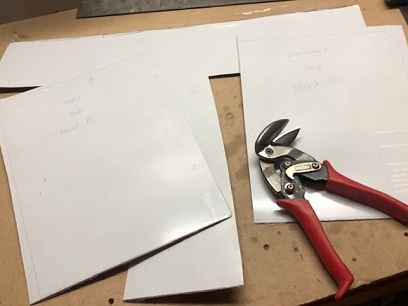
Okay... with a plan in place I now need to take the measurements and make the inserts. The first night... yeah, it wasn't as easy as I thought it would be... I took what measurements that I could then drew up the two inserts. The next day I cut them out as two pieces each (like I will when making them). They were A LOT off... with all the measurements (notes) I had on the sheet of paper, I used some of the incorrect ones (that's one reason why I make paper patterns). okay, not a problem... used those pieces and a few additional pieces from the poster board to create the four points of the shape. Did that with both of the inserts. Took those "patterns" and created new patterns which fit perfectly.
Now all I need to do is cut them from either 1/16inch plywood or .040 aluminum... drill, glue overlap (I'll show you later) and test fit to the turtledeck (not necessarily in that order).
May 17 - 22, 2020 They're just waiting...
for their baths.
Spent the week making the flooring for the turtledeck.
As mentioned above... it's a little blind seeing the inside "shelf" area where the flooring will sit. The above poster board fitting seems to sit squarely in the flat area of where the two 2-piece floors are to go.
I decided to make these out of aluminum (.040 6061 T-6). The main reason... easier to put the connecting hardware on the aluminumg (rivet on anchor nut plates to the aluminum as opposed to?). Just thinking now... of making a few aluminum "pads" that I could attach anchor nut plates to that I would glue to the underneath of the flooring. Yeah... yeah...
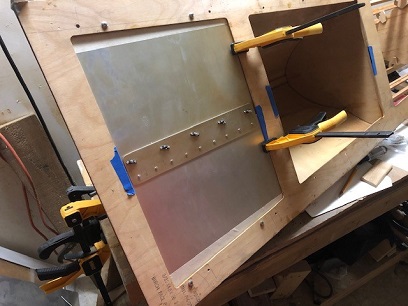
Back to the past week. Spent quite a bit of time making these six pieces (two 2-piece floors with the connecting panel). Several steps (what on the biplane isn't several steps) from start to finish. Cut the patterns of each of the two floors in half to make them in two pieces. Cut out the blanks. Re-cut one of the blanks because the small gouges in the back of one panel (which I didn't cover with protective film) wouldn't come out with a lot of sanding.
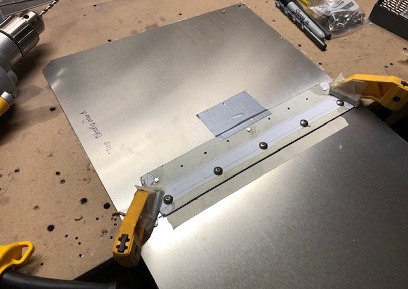
After re-making the panel I cut the two smaller adjoinging plates (that I would rivet on to one side of the 2-piece floor and put anchor nut plates in to attach the other side of the 2-piece floor). Cut both of those to length. Match-drilled the hole for the rivets in both the plates and the correct 1/2 of floorings. Counter sunk... the WRONG holes. I counter sunk the holes in the adjoining plates instead of the floor pieces. I probably could have used them anyways... because they aren't structural and you wouldn't see it or know it BUT I would know it. so... RE-made the two plates. Match-drilled the holes for riveting to the flooring. Then lined them up to make the holes for the anchor nut plate nut holes... followed by match-drilling the rivet holes for attaching the anchor nut plates. Then counter sunk the correct rivet holes on the correct side of each of the two floor pieces. Wew!
Cutting out blanks.
Front floor pieces fit.
So do the back ones...
Match-drilling rivet holes in plates.
The stack of flooring pieces.
May 23 - 29, 2020 Thru-hike...
for pilot/builders.
Spent the week working on the flooring for the turtledeck.
I've been watching documentaries at night... after working on Big Ass Bird. The other night I decided on watching "Six Million Steps - A Journey Inward.". There's so much that can be compared to scratch building a biplane... or, at least I can see a big comparison. Maybe it's the "A Journey Inward" that I'm comparing it to?
The build, like the thru-hike, as the summary of the movie states... "Life stripped to its core Life as a journey in the truest sense of the word Life as transformation". We all have our "Six Million Steps" in life... or, at least we should.
Work on the flooring... thinking things through (alliteration), making, re-making, finishing, re-finishing. A facinating learning experience in its own right. Mentally going through the process of putting the flooring in and the steps that need to be taken before the fabric is applied to the turtledeck (or at least how I think I will be doing it) and the process of installing the flooring after Big Ass Bird is complete and ready for me to install the flooring of the turtledeck. All documented in the preceeding BLOG posts.
This past week was spenting cleaning off the pieces I just made (pulling off the protective plastic, cleaning off the left-behind glue, etc). Needed to use some MEK on it to clean that glue off.
I had a few brain-farts while finishing up the attaching plates. The first time I counter sunk the holes on the attaching plate instead of the actual floor piece. Re-made that attaching plate. THEN, when I went to counter sink the holes on the attaching plate where the rivets were for attaching the anchor nut plates... I counter sunk the wrong side. DAMN! Another re-make of the plate.
Okay... once all these flooring pieces come together I'll then need to mount them to the plywood floor frame of the turtledeck. I've been thinking about this for a while. Originally I was going to use a few clipnuts on the turtledeck frame and screw into those... THEN I had this bright idea to cut small tabs out of the same aluminum I made the flooring (pretty thin), rivet anchor nut plates onto them and glue those to the underneath of the turtledeck framing. BRILLIANT!
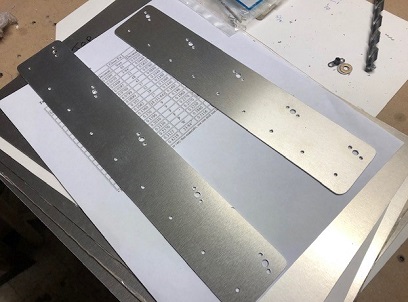
Quite a few steps as compared to just slipping on a clipnut... but, I liked the idea better. Drew up the pattern on DeltaCAD. Printed ten of them out. Glued patterns on the aluminum and drilled out the centering holes and match-drilled the holes for the anchor nut plate rivets while still on the larger sheet of aluminum. THEN cut them apart. Used one as a pattern for locating and drilling the holes in the frame of the turtledeck. THEN riveted on the anchor nut plates. Oh yeah... did the alodine on these also.
Oh, get this. Reading a recent thread on the biplane forum and saw where one of the guys taps the anchor nut plate. They're a SOB to screw a screw into even when you have access to using a regular screwdriver. It's going to be a tough reach to get at most of the screw heads for this turtledeck flooring so I tried tapping out the threads on the anchor nut plates. Works like a charm now. There's still resistance, but I can at least screw the machice screw into the plate without stripping the heads.
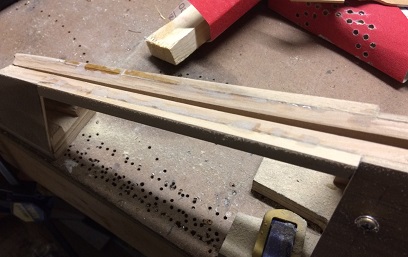
Pattern for match-drilling holes for tabs.
Tapping out 8-32 anchor nut plate.
Tabs for mounting the flooring.
In between and after all of this I was practicing the art of sealing the aluminum with alodine. (I need to locate some place to dispose of the used alumiprep and alodine. Some place in Philly?)
After all of this time... I'm wondering where I am on that "Six Million Steps" journey.
May 30 - June 5, 2020 Bored with your progress...
add some additional hours each week...
A thought popped into my head that if you're getting bored with the build (I'm not) because things aren't moving along fast enough... you're not seeing any real progression, you need to spend more time on it. Things will start to get completed within a reasonable amount of time. You'll accomplish small goals... victories that you need.
From the looks of it I'm putting in the past two months I've put just under 70 hours a month on the project; 140 in two months... and I'm happy with that. Am I finally listening to myself and moving forward with things faster instead of pondering forever about them. I'm not thinking so... I think I'm just thinking things through at a faster rate. I'll never just press on regardless. The flooring for the turtledeck: well thought through... visualizing it from start to finish with all the nuances in between. I'm happy with and the way that it turned out. And my continued mindset of... "good enough, isn't good enough", and re-making parts over, and sometimes over, again.
Finishing up the installation of the flooring for the turtledeck took a lot more time than ya'd think. Match-drilled the flooring to the turtledeck in the garage workshop... took the turtledeck down into the basement workshop and prepared to glue the mounting tabs onto it.
Before glueing them on I wanted to (I needed to) seal the frame of the turtledeck that the flooring would be mounting to. The last time I used a sealer it was L-26 (or something like that from System Three). It was the wrong product for me to use. It turned like glue just about right away. (maybe I was using it wrong) Took a look on the forum to see what others were using to seal their projects and saw a lot were using System Three's "Clear Coat." Stayed like liquid for a reasonable amount of time and worked great for others. Figured I'd give it a try so I purchased some from System Three directly (I didn't realize I had already purchased some a while back).
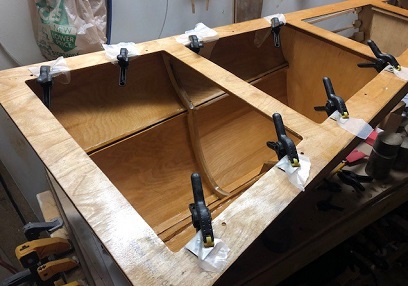
Normally you wouldn't use these spring clamps on a glue joint.
I waited until the glue was pretty well set... and
this isn't a structural joint.
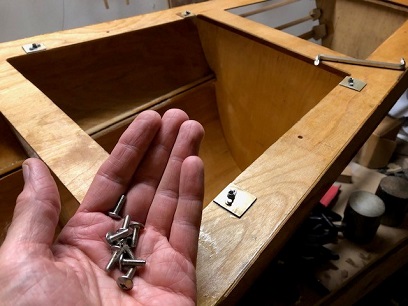
I used these screws to hold the tabs in position while the glue dried.
Wasn't sure if I was going to be able to get all eight out!
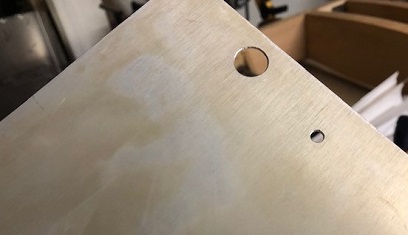
Thinking this through just a little bit I realized that I needed to allow the head of the machine screw that was attaching the turtledeck to the fuselage to pass through the flooring. Otherwise the flooring would sit on top of this screw heads. Took a measurement and saw that the heads on teh 10-32 screws were 7/16th of an inch so I made the relief holes 1/2inch (I might increse that to 9/16th).
Still needed some cleaning up of the hole when I took this photo.
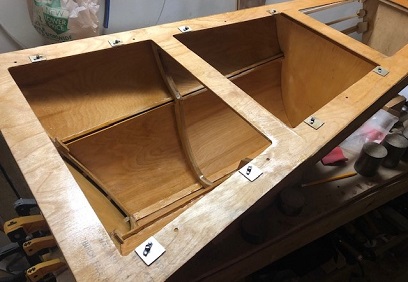
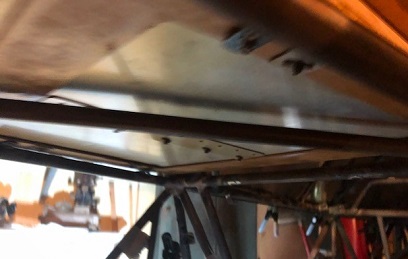
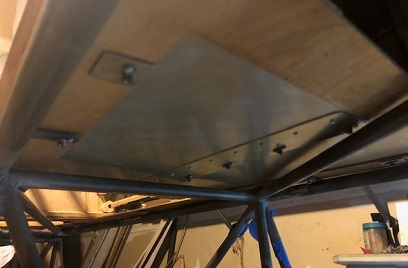
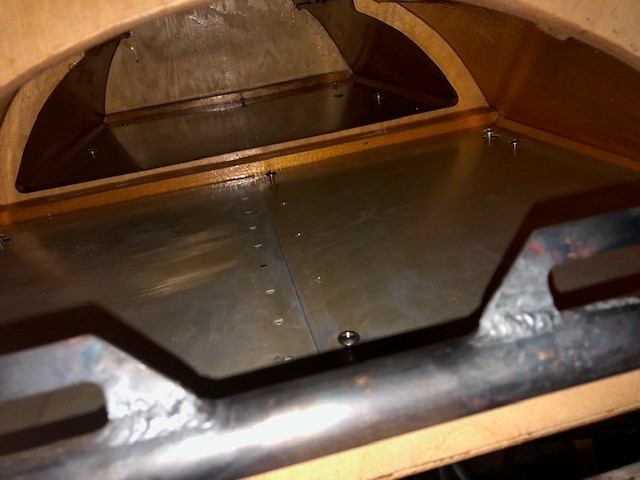
Now to test my theory and see if all of these pieces will go together.
Front floor locked in place.
Rear floor locked in place.
View of the inside. Pretty snazzy, eh?
The first test of the flooring I realized that the holes in the tabs to connect the turtledeck to the fuselage were too small (the anchor nut plate was just to the one side of that hole opening making it a pain to screw in the machine screw). So... I drilled out all ten anchor nut plates that were mounted on the tabs... enlarged the holes to a #3 bit... riveted back on new anchor nut plates... and tried it all over again. Oh... I reamed out both the anchor nut plates on the fuselage tabs and the mounting tabs for the flooring. Makes it sooooo much nicer to screw a machine screw into it... I do it just enough so that there is still resistance to it.
Man am I ever so happy with the look of it... and how it all came together.
June 12, 2020 Let me just throw...
these pictures up on here.
Clear Coating... a week of.
Took my time in Clear Coating the turtledeck after I cleaned off all the globs of L-26 and then sanded it all. Top-side first. Then the bottom-side next. Then the areas that I missed the first two nights of doing it.
I think it's ready...
July 13 - 14, 2023 Three years...
and where did I leave off? Oh yeah...
A short break from the Upper Wing Center Section... worked through fitting up the cabanes... not without a learning curve.
Getting back to finishing up the locking mechanism for the turtledeck door/hatch. Had it all figured out when I last worked on it. With the hiatus of two years I needed to reacquaint myself with it. Spent time searching for the plans I had drawn up and the "Skybolt" catalog (Skybolt is the company that owns Dzus fasteners...) that had all the dims (or so I thought) of the centers on the fastener and the spring.
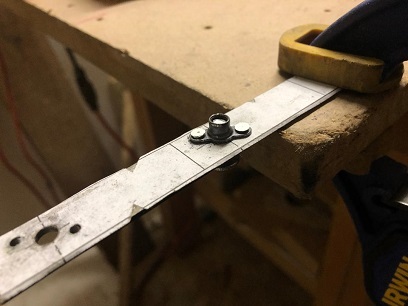
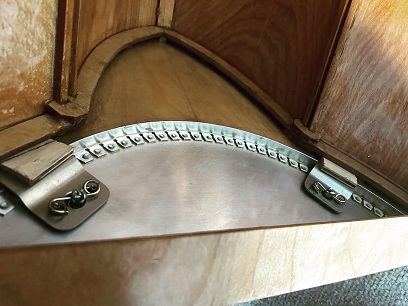
Found what I needed finding (other than the dims) and then started "playing" with the parts and pieces I hed already made. Figured out then riveted on the spring side of the Dzus fastener to the plates I had made. "Played" with those pieces for about an hour.
The concept works. Locked the Dzus fasteners to the springs. I like! But, decided I wanted to re-make them (the one center hole was off-center, and I discovered that I wanted to make the length of them about 1 1/2inches longer. And that is where I sit now.
Locking plates with temporary shims to hold it in place.
Just about ready...
July 13 - 14, 2023 Three years...
and three days!
Just a little bit more work to get thing adjusted and in order...
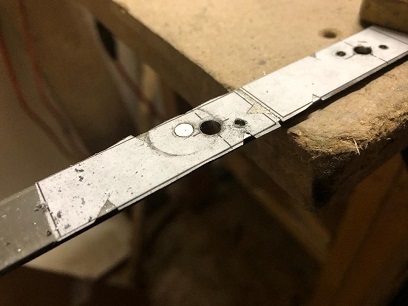
Actually I wasn't happy with the plates that held the Dzus springs so... what do you do? Re-make them. Not only once... but twice. NOW we're talking!
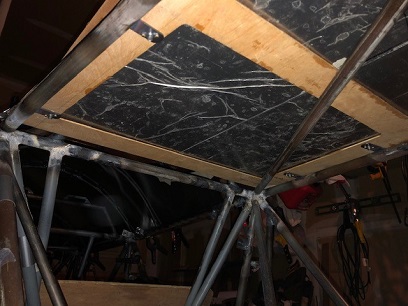
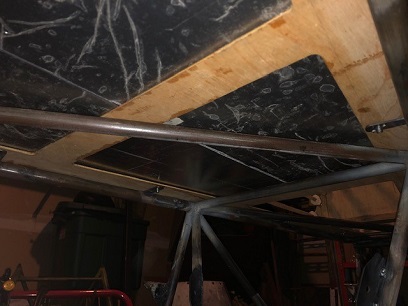
Glued 1/4inch thick plywood backing plates onto the spring plates (the wood took up the gap that the end of the plates fitted into and allowed me to glue wood on wood). After the glue set up over night glueing together wood filler and spring plates, I slid the plates into place and locked both Dzus fasteners to see if my idea worked. And... it works like a charm! Positioned and marked the location of the plates so that both were center. Mixed some T-88 and slathered it onto the plates and into the gap on the turtledeck, made sure I placed wax paper in the areas that I didn't want glued (mainly the turtledeck hatch), then locked the Dzus fasteners for the proper clamping pressure.
Next morning before my first cup of coffee I went down to check on the progress and BINGO!!! I'm loving it! Be-U-Tee-Full! And by the way... it was four, not three days.
July 20, 2025 Two years...
and where did I leave off? Oh yeah...
Seems like a reoccurring theme here. Leave off and start another project only to find myself coming back again and again.
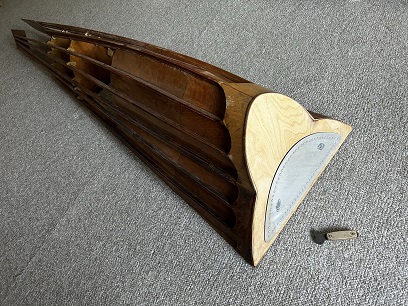
I'm a little peeved about this one though. I make the tail-end section for the turtledeck. Packed it up for the move to Colorado. AND. I can't find it. I know it's somewhere, but where???
Started to make a new one. And of course... I'm not finding any sitka wood or ply that I would like to use. And I'm not really wanting to re-make something that took me soooooo long to make and was VERY happy with. I have the first one I made that I wanted to change and decided to make the second one. (yeah... just rambling)
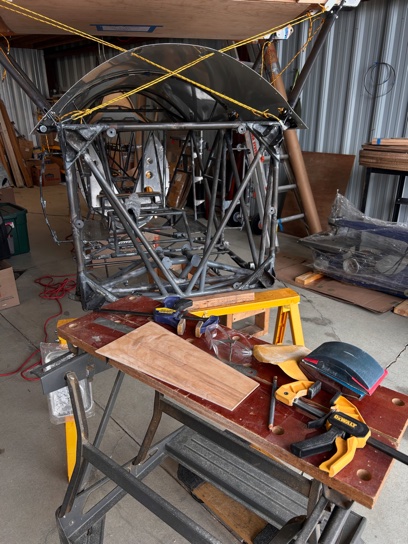
I'm at the airport still putting things away and organizing it... I have the time so I decided to begin the process of re-making it.
Cut the bottom piece for the main section out of 1/4inch leaving a little extra wood around the edge so that I could sand down to the line... for a smooth line. Last year I sold my tabletop sander in Mantua soes I had to hand sand it. After about an hour and a half I thought "Looking might fine"". Tried it out on the tail end of the fuselage and saw that it was too short by a few inches. Not sure what the heck happened there (scratching head). So there goes about an hour and a half worth of work. Didn't have enough 1/4inch ply to make another one so I picked up a piece of 1/8inch (like I had used for the forward section). Cut that close to the line (and of course it is the correct length this time) and then spent the next hour and a half sanding that piece by hand.
I'm not too happy with my first time back on Big Ass Bird. Felt like a wasted day at best. I'm really disgusted with not finding the piece I had made. I'll take another look in the boxes that I have in the garage to see if I can find it.
I also need to go and pick up a nice table top sander... similar to the one I had, which had a belt sander and 6inch disc on it. I see that the Home Depot has a few in stock. Time to swing by there and pick one up.
August 30, 2025 Found...
IT!
Beautiful! Went back to the garage and looked through ALL the boxes packed in there from the move... all the ones that were left from not needing in the apartment or not needing at the hangar. I looked in all those boxes again, and just as I was about to open and look in the last one... I said "Wait, let me check one of those boxes again." On that I had looked through at least three or four other times. This time I saw more than a leaf blower. I saw something that was wrapped up inside of a towel. And... yes, the shape of it looked like the tail-end of the turtledeck. And in my best Elvis impersonation, "Thank you. Thank you very much."
YES! okay... enough on that subject for now.
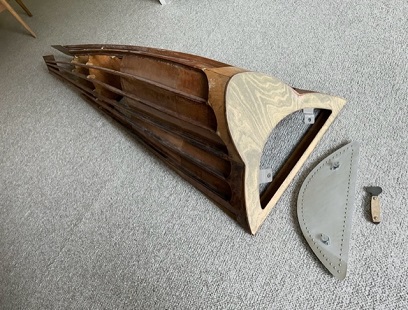
With the found piece in hand I headed back to the airport to attaching all the parts I've made so that I can see where to begin again. Placed the "lost" turtledeck end-piece in place. Pulled the 12' sona tube with the stringers out and began to attach the aluminum stringers. Sides went on like greased butter. The bottom, not so much. I now remembered that the fuselage slipped off the front "dolly" when moving it from the trailer to the hangar (1800 miles and nothing happened to it... give me a few minutes and BAM!). That slip allowed what I thought was one belly former to touch the ground and bend slightly (that's the one I know about). Apparently the most forward belly former touched also. So...
To get to the "problem" and fix it properly, I want to lift the fuselage up high, heat it with the torch to bend them back into place. 1. I need something that will allow me to lift the fuselage up (either an engine lift, or two car lifts). This will allow me to raise the fuselage to either set on higher saw horses or allow me to attach the front landing gear. I'm leaning toward the front landing gear which means that I need to attach the wheels/tires. "Hello Harbor Freight... I'll be seeing you soon."
Set about getting the wheels onto the tires and I need one new bolt. One of them is buggered on the end and won't screw into the brake assembly. So... I ordered up 10 of those puppies (one for the replacement and nine extras, which is one more than replacing all eight). Waiting for that order to be delivered from Aircraft Spruce. [side note] No matter what I put into the cart with Aircraft Spruce, shipping is more than the cost of the items. It was something like $7.50 for the (10) bolts... and $8.60 to ship. I was going to order up a few cap strips in both 1/4inch and 5/8inch... the total, with the bolts for the material was something like $29.00, shipping was going to be $36.00 dollar (don't quote me on these... just giving you feel for the stupid amount of money for shipping nowadays.)
I felt pretty good about today... It doesn't look like much was done, but I'm sliding into an understanding of where I need to begin again, or at least I have decided on a direction to go.
I'll have those bolts in a few days. I'll stop by Harbor Freight and pick up some sort of jack or lift to raise this puppy without needing to wait around for someone to help, or borrow someone's tools. Oh yeah... I need to find a place for O/A for the welding tanks. And while I'm at it, find a place for sheets of aluminum so that I can get some additional stock for fine-tuning the fit of the skins on BIG ASS BIRD.