Mantua, New Jersey
Original Site:
September 2004
E-mail: usav8or@yahoo.com
The Radial Skybolt's Fuel System.
April 3, 2020
I need to start thinking...
about this stuff.
Actually I have been thinking about the fuel system, the electrical, the brake, etc. etc. etc.
I have the lengths of aluminum fuel lines. I bought these when I bought the stringers. I figured I'd let them ride on the freight cost of the long stringers which went ground... instead of incurring that charge again for just a few long lengths of aluminum tubing that is what, 3/8" or 1/4" in diameter?
Right now I am debating on what type of fuel selector valves I want to purchase. I'll be purchasing two selector vavles; one for the upper wing tank to drain directly into the main tank, or directly to the engine, the second with connections from the main to the engine... and the upper wing tank to the engine. The second selector valve with the option for the upper wing tank to the engine will be a 'back-up" system if there is an issue with the fuel from the main (that is if it is caught before I drain the upper into the main.) Got all that?
But then I'm thinking (after reading keeping it simple in Tony B's red book) of needing to keep this thing VERY simple. All of the "nicer" fuel valve selectors come with three clicks; right left and off. Buy one of these and limit it to an on/off?
April 10, 2020
Fuel tank valves...
figuring it all out.
Decided on the type of fuel vavle I'll be getting... and purchased two of them.
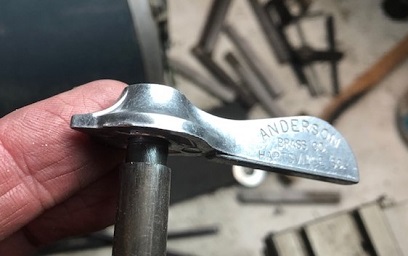
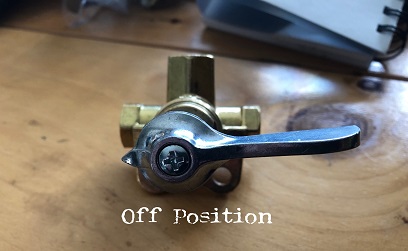
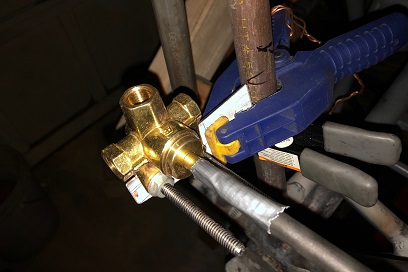
I bought the Weatherhead valve (not the homebuilt speacial) with the Delrin internal parts. They're pretty much a basic unit, old style, but they have the Delrin guts which, I'm told, won't get brittle or wear-out. They cost the same as the homebuilt special (approx. $29.95 2020 year price).
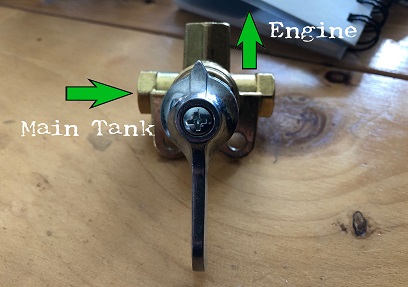
They arrived the other day and I checked them out. They have a positive click when they are in each position. The center outlet on the valve would be to the engine. Both of the others would feed in from a fuel tank.
Main Tank Fuel Valve Selector
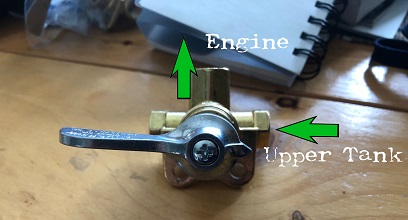
Upper Tank Fuel Valve Selector
A two valve system.
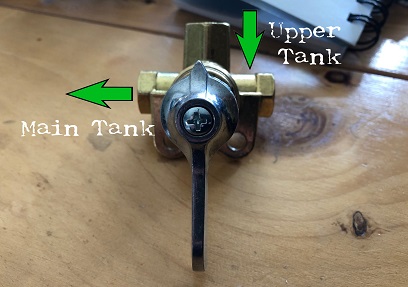
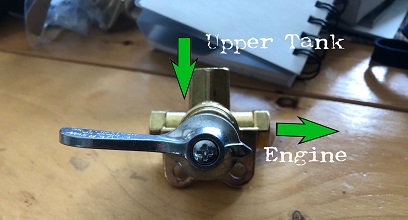
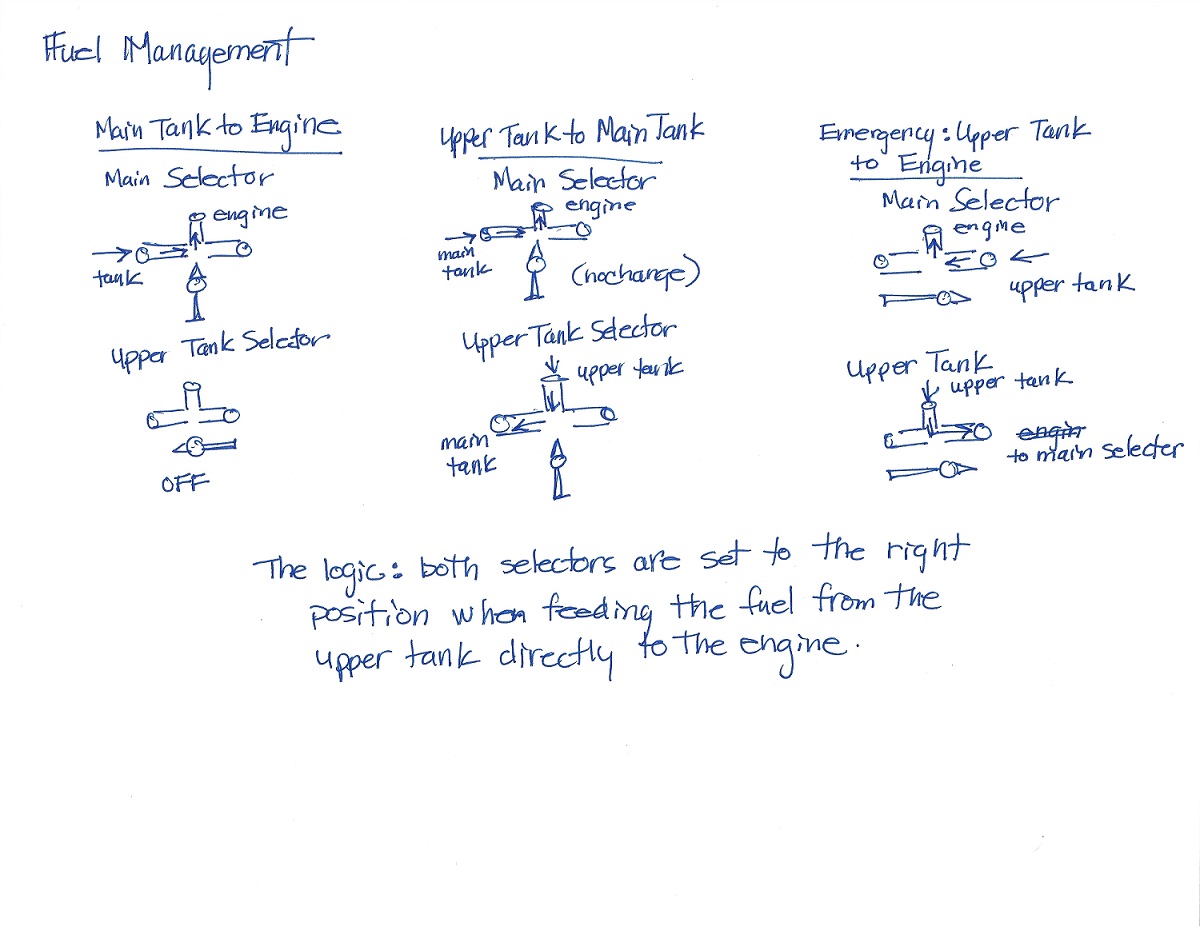
The main tank fuel valve will be used for main tank to the engine. An option (which isn't going to be used unless the fuel isn't feeding from the main tank) is to have the fuel feed from the upper tank to the engine. A little logic has both of the fuel knobs turned to the right to feed the upper tank to the main fuel valve and with the main fuel valve to the right... it feeds that line direct to the engine.
One hundred percent of the time the upper tank will feed into the main fuel tank (knob in the up postion for the upper fuel tank control.)
The Logic Behind It All:
Click on image for larger graphic.
April 11 - 17, 2020
Fuel tank valves...
still figuring it all out.
Happy with the progress I've been making with the fuel selector valves.
I wasn't so sure of what to do as far as: 1. locating the valves close to the firewall and running and extention from the valves to the selector knobs in the rear cockpit or 2. mount the valves in the cockpit and run the fuel lines to and then back to the firewall.
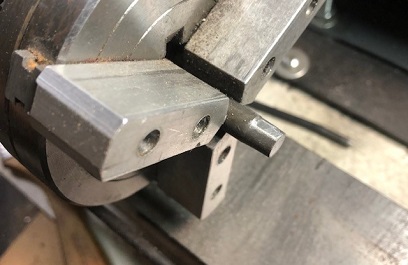
Tried wrapping my head around what I would need to do to the extention tube to attach it to the fuel valve... thinking that I needed to mill a round piece with a flat side (just like the accepting hole on the selector knob.) Unable to mill anything I would need to put a piece of 4130 on my micro lathe and then notch that. So... I threw the question out to the biplane forum and... got an answer back within minutes.
Randy, the second guy who joined the forum... had the answer: Take a tube (I figured it to be 3/8" x .025) and slide it over the shaft on the valve, put two roll bearings in at 90degrees... run that tube up to the cockpit, weld in a plug on the other end, notch and tap it for the screw that attaches the knob.
Randy is the MAN! Great! Not much time to celebrate... On to figuring out the location of the fuel valve and turn knob. Figuring that everything needs, but not wanting it, to stay inside of the frame of the biplane, I found a not-so exceptable place for the valve and the selector knob...
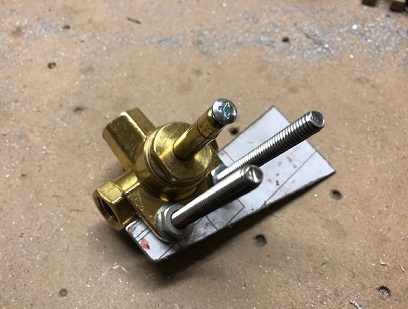
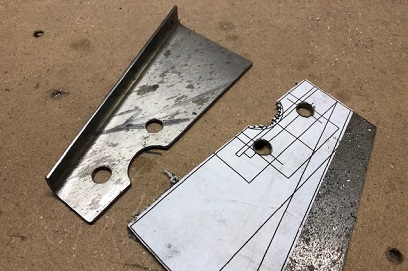
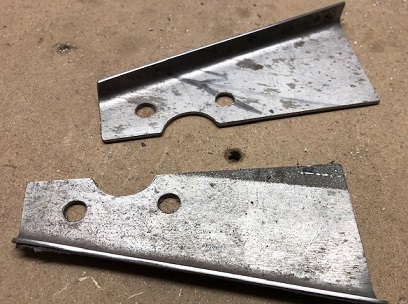
First iteration is flat.
Second iteration with angled bottom. Obviously not the
correct bolts!
Third iteration is angled with the bottom bent over.
Bend in the bottom is to give it a little more stiffness.
A few days later, an additional post on the thread I had asked the question about the mounting of the valve, was a video. Not sure what made me watch all 10 minutes of it, but I did. And, in that video I saw that he mounted the valve and the selector knob outside of the fuselage box where I had wanted to but didn't. That location works to keep the fuel valves and extention tubes out of the way of the front passenger. (Yes!)
With that information I spent some time sitting in the rear cockpit to figure out the best location of the selector knobs and the fuel valve close to the firewall.
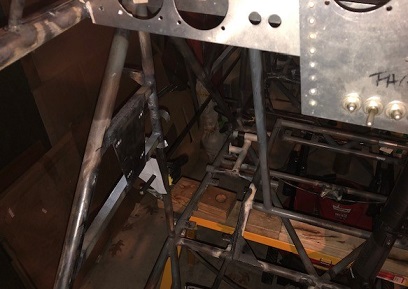
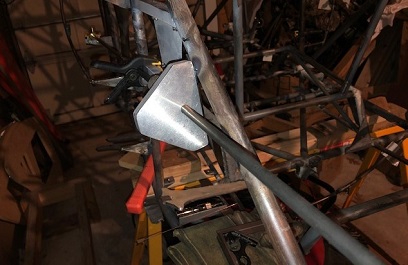
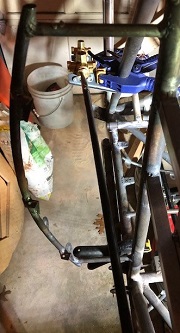
For the port-side, which is for the main tank, I'm locating the fuel valve approximately 8.5inches up from the lower longeron, angled up to the selector knob which is approximately 13inches up from the lower longeron and located past the throttle quad (pictures to come.)
Location of fuel valve on the port side. Again, obviously not
the correct bolts!
Kinda sorta in the right location. Knob will be located
approximately one inch further toward port.
Some additional tweaking of the two brackets and I'm ready to weld on the brackets and figure out the design and mounting of the fuel knob plate.
April 18 - 27, 2020
Repeat... repeat... repeat... Fuel tank valves...
still figuring it all out.
Still happy with the progress of the fuel system, or should I say, the mounting of the fuel valve(s), and selector panel(s). With that said... MAN, is it taking forever to figure out the best location of the fuel valve(s), and selector knob plate(s).
Each location I place the combo of valve and panel I need to visualize what I have in those locations. One place I thought was great, but while looking through all the posibilities with the combination in that location I realized that I have the trim system handle in the way of where the panel was to be put. I've been spending hours, days figuring it out. Sitting in the make-shift cockpit to see if the new location is accessible when flying too... I didn't want to look like an after thought either.
The decision to keep it outside of the fuselage box to keep it away from me kicking it or hitting it was priority... after the fact that it needs to be visible. The shape of the selector knob panel I originally started with is a far cry from what it needed to be. The problem I ws having at first wass that my mind was locked into having that first panel (a rectangle that was 8" long x 4" wide) There is just not that much available realesate in the cockpit for that.
The rectangle iterated into a half-circle, one for each of the selector knobs. And that iterated into a modified triangle. The reason for the half-circle and triangle was to cut down the edges of the panel so that it would fit between the fuselage box and the rounded skin. A square shape was limiting my already limited selection of places to put the panel.
I think I have the right location figured out. And with that location, I need to remake the brackets... which I've done. I am also re-visiting whether or not I'll want two fuel valves. I had enough of a problem figuring out the location of the one selector panel. If it doesn't fit close to that one... I'll forgo having two fuel valves, instead I'll have the third click on the selector have the upper wing tank feed directly to the engine.
Received the parts I ordered the other day; 3/8 x .028 tubing, rolls pins, nut/bolts, etc.
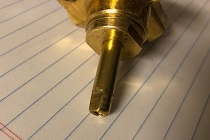
So here is what I'm doing. Mounting the fuel valve close to the firewall (port side). Attaching the 3/8 x .028 tubing to the shaft on the fuel valve with (2) roll pins at 90 degrees. Running the tube up to the cockpit where I will have the selector knob. To attach the knob to the tubing I needed to make an insert that fits into the top end of the tube. The end of the insert that gets inserted into the knob needed to be tapered and have a flat notch (done). I'll attach the insert using the same roll pins; (2) at 90 degrees.
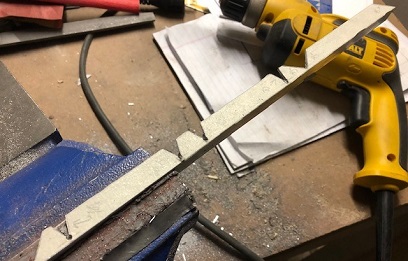
The final placement of the fuel selector panel is in front and below the throttle quad (gas and gas... makes sense). I printed out the design of the panel which will be made of an aluminum "L" channel, notched to create the sides of the panel, and a piece of .040 aluminum for the face plate. I've notched two lengths of "L" channel resulting in one that I am very happy with. All I need to do is trim the length of the one side 1/16th of an inch and then I'll be joining the two loose ends by riveting on an "L" bracket, of same material.
April 28 - May 1, 2020
Still repeating... Fuel tank valve and panel...
still figuring it all out.
Did a lot of pondering and believe it or not... a lot of actual work on the biplane project this week. Side Note: Ya know what... this biplane is too personal to be calling it a project... it's offical right now! this minute! (May 2, 2020 at 7:57AM EST) that I will be referring to the biplane as "Big Ass Bird III". I might refer to it as BAB3 for shortness of copy. Okay... back to what I accomplished over the past few days.
Still trying to figure out the best location for the fuel selector... not an easy task when there is a seat up front. If there wasn't I could just locate the fuel valve under the tank, run the extension straight up the middle and have it snap dab in front of me... but there is a seat up front. I don't want to have the fuel system inside of the fuselage so on the outside it goes and there is where I've been pondering it. In and out of the cockpit trying different locations.
I won't bore you with the many iterations that I've climbed in and out of the cockpit trying, but it comes damn near close to what I thought of early on. Placement behind the throttle made sense, but the looooong handle of the trim handle was there. After hours of experimentation I tried that location again... and by cutting down that looooong handle just a little bit, I have plenty of room to fit the fuel knob selector panel. YES! (and yes, I mocked-up the handle to make sure)
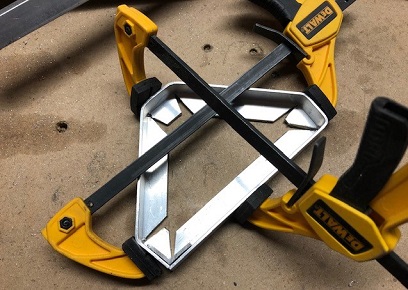
All during this time I was making the selector panel; made up of aluminum "L" channel for the sides, and the face plate made out of .040 aluminum (as mentioned in my last post). Fashioned the "L" channel into a corner piece (actually a large "L" channel than the one making up the edging... needed the longer legs on it for rivet placement), clamped and match-drilled the holes that were on the side/edge piece into the two legs of the "L" channel that would secure the two ends.
Took four rivets and riveted on the channel that would secure the two ends... pushed the shape into its triangle and got damn near close to perfection (comparing it to the pattern) as one would come by doing everything by hand. Mixed up some T-88 glue and glue on the face plate to the sides... and let it sit over night (checking every 1/2 hour, for a few hours, until the glue started setting, to make sure that the face plate didn't slide partially off of the sides and be permanently attached in the wrong place... thus, starting the entire process of making the panel again)
Next day, drilled the 3/8inch hole in the top of the panel, and it's all set for installation (other than the mounting holes).
"L" joining bracket in lower-left corner.
Final panel with original paper pattern on top. DAMN close!
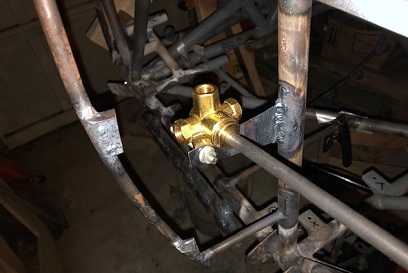
With the location of the panel figured out... the location of the fuel valve followed suite. By the way, I went back and used the origial fuel valve brackets that I made. Ha!
Okay, with everything made I aligned and tacked on the fuel valve bracket... welded it up, which turned it in slightly. "Tapped" on it with my dead blow hammer and put things right. With the valve pointing in the right place I could then determine the final location of the selector panel. Slid the 3/8inch tube over the shaft of the valve... threaded the other end of the tube through the hole in the selector panel. Squared up the face of the panel and clamped the flat mounting bracket (after I had drilled the holes for mounting the panel) and tacked welded it in place. Test fitted the panel onto the bracket... I need to cut one of the tacks and tweak it slightly in the one direction and then it's ready to be welded up.


 Tried wrapping my head around what I would need to do to the extention tube to attach it to the fuel valve... thinking that I needed to mill a round piece with a flat side (just like the accepting hole on the selector knob.) Unable to mill anything I would need to put a piece of 4130 on my micro lathe and then notch that. So... I threw the question out to the biplane forum and... got an answer back within minutes.
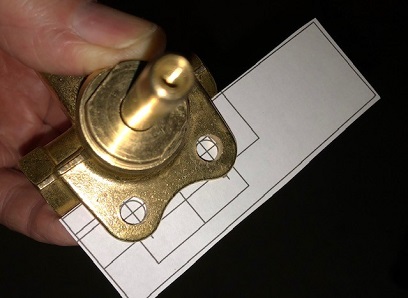

 I think I have the right location figured out. And with that location, I need to remake the brackets... which I've done. I am also re-visiting whether or not I'll want two fuel valves. I had enough of a problem figuring out the location of the one selector panel. If it doesn't fit close to that one... I'll forgo having two fuel valves, instead I'll have the third click on the selector have the upper wing tank feed directly to the engine.