Mantua, New Jersey
Original Site:
September 2004
E-mail: usav8or@yahoo.com
Building the Skybolt
aka Radial Engined Skybolt..
January 23, 2016 Things start to snowball...
the closer you get to flying it...
I purchased a few insturments... quite a while ago. Didn't think much about them... or what I would be doing with the instrument panel. Sure... I saved images of instrument panels I saw on the internet from TravelAirs, Moncoupes, the Mystery Ship, and a lot more... but didn't put much think about the panel itself other than to look at those photos and think... one day...
I guess I'm getting closer to needing to think it through. I'm getting to the point where I need to start re-building that Jake too... and purchase all the parts I need to crank it over.
Looked at ebay the other day thinking I need to purchase a magneto switch; one of those old style switches. Saw one that needed work and no bids on it. Decided to place a bid of $25.00 on it. The starting bid was 99cents. A few days go by and no bids... I knew better. Six hours before the end of the auction someone out bids me.
Okay, I'll bite... if I can't have it, this guy isn't going to get it cheap. $30.00... $45.00... 60... 75.. 95... and it was still climbing with no end in site (I've seen these on ebay where you could by a "NOS" for $249.00). Said the hell with it and did some yard work (it was this past Sunday). Came back in and saw there was still a little over an hour left before the end of it and I figured I'd have a little more fun. $125.00... $145.00.. 165.. 180... This pushed it up to $182.50, plus $10.00 for shipping. That's $195.00 for something that had seen MUCH better days and would need a complete overhaul. Either that guy had to have THAT ONE... or I smacked his ass by pushing it up to $182.50.
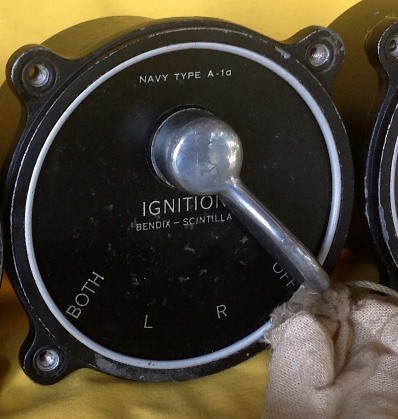
Saw another one, a Navy Type A1-a magneto switch, that was NOS and it had a starting price of $25.00. Put a bid on it... but then saw one, another Navy Type A1-a magneto switch (NOS) that had a "Buy Now" price of $215.00. I didn't feel like playing around and decided to purchase this one even though I had a bid on the other.
So... I ended up with the NOS beaut for $30.00 more than that POS.
August 17, 2013 Things start to snowball...
the closer you get to flying it...
I'm not sure what happens when I go on ebay ??? Maybe it's like a gamer, once they start playing. Hours will go by without them noticing it.
Well... hours don't go by for me, but I tend to buy off of ebay in spurts. I'll think of something that I need for the biplane project, find it, win it... and then continue to look for more items to buy.
Apparently it's happening again. Bought the above mentioned mag switch and the same seller had more NOS (new old stock) products that would look nice on my instrument panel. Thought... what the hell. Place a bid on another item and logged out.
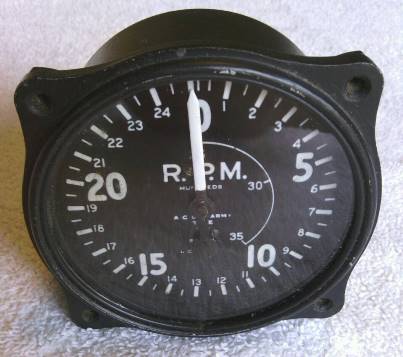
Yesterday, after work, I go back onto ebay to see how that RPM gauge was doing. Saw it was sold... and thought, DAMN, wished that I had been notified about me being out bid 'cause I really wanted it. It would look sooooo sweet sitting on that panel.
Now I'm thinking... here we go again, now I need to start looking for another one very similar to this 'cause I'm now not going to be happy with one that I buy from Aircraft Spruce. So... I'm looking for a while... come back to the RPM gauge auction that had ended and looked at it a little bit closer...
It was me. I won that auction ! Funny... I didn't recall seeing an email saying that I had won it.
Here's what I'm thinking for the instruments:
Front pit: airspeed, altimiter and compass
Rear pit: airspeed, altimiter, compass and DG, turn and bank, rpm, g-meter, turn and slip, fuel gauge, oil pressure, oil temp ?
August 18, 2013 yeah...
it's snowballing...
Told you it snowballs...
Here's something else I bought. It's an OLD oil pressure gauge. Almost mint ! We'll see if it works...
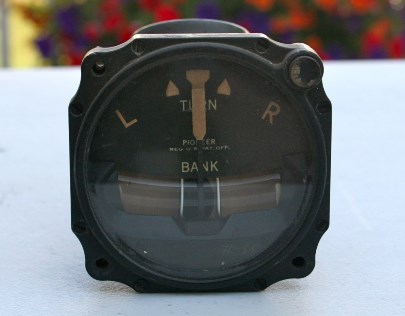
August 18, 2013 This one...
needs some help...
An old Pioneer, turn and bank.
Got a great deal on it... couldn't pass it up.
June 7, 2014 The instrument panel...
is shaping up.
Started working on the shape of the instrument panel the other day. Decided a while back that it wasn't going to be the usual rounded style. Saw an angled-squarish looking one that was in a Curtis Cardinal ? and a few square ones elsewhere. Kinda liked the old look of it (turns out that sizmo, from the biplane forum, made a carbon fiber one for his screamning, high-tech Acro Sport S2).
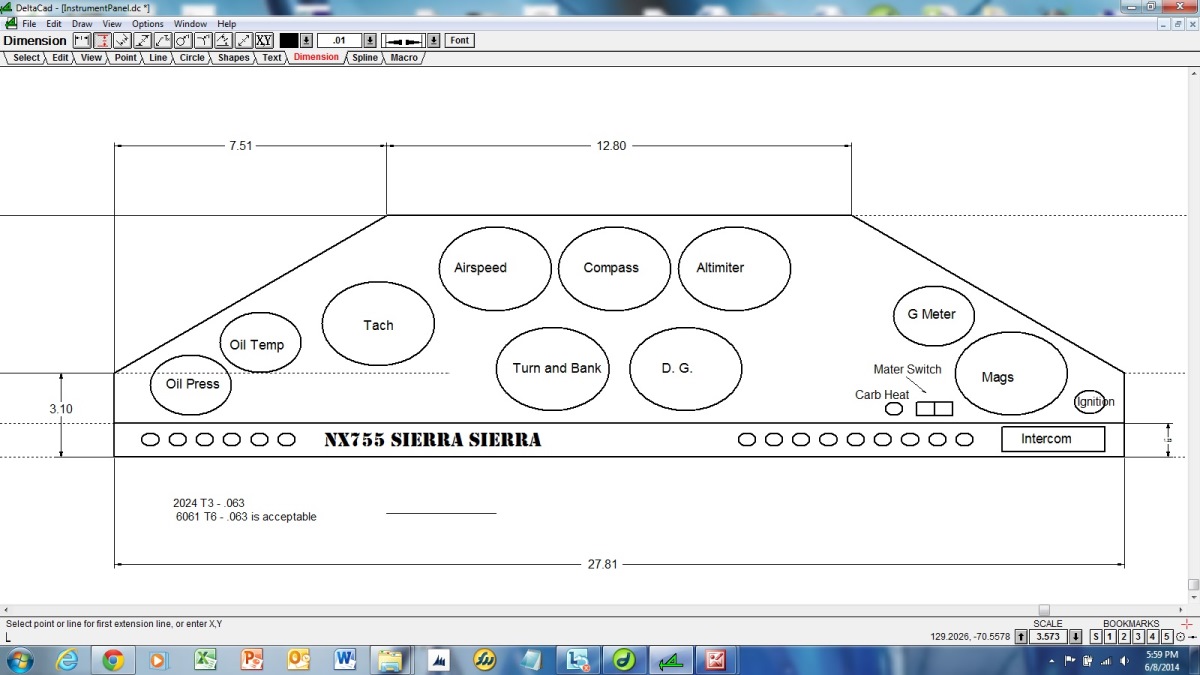
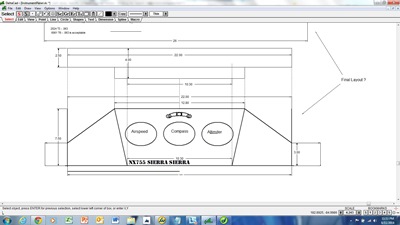
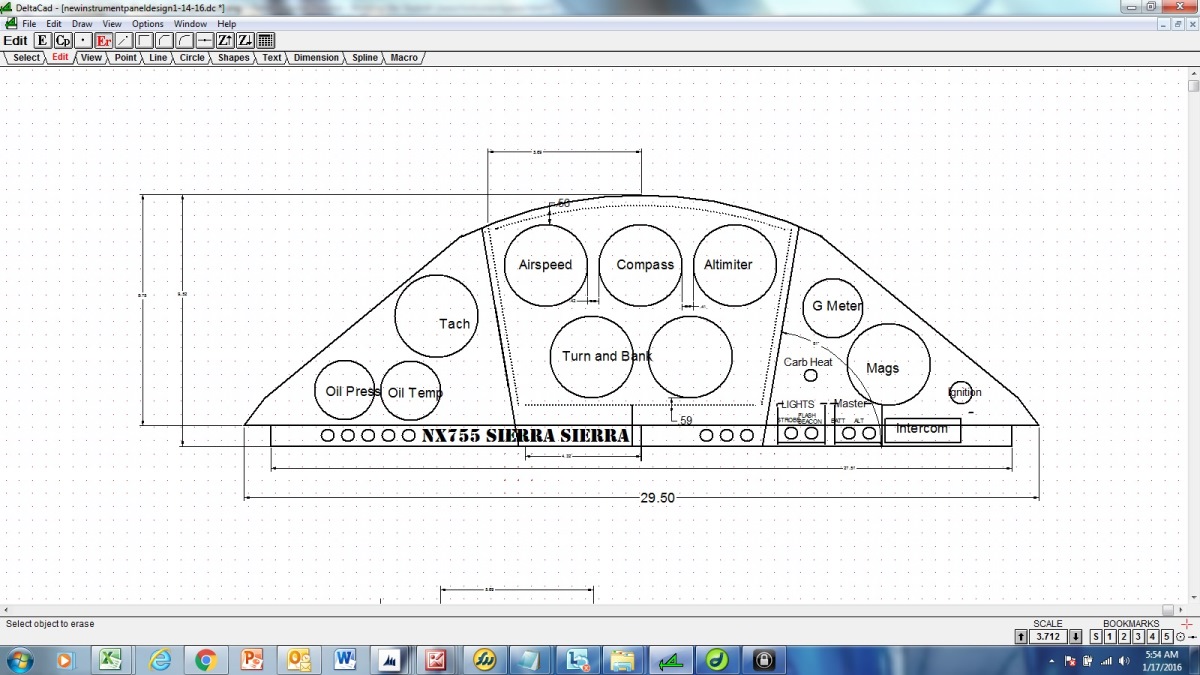
Drew it up on DeltaCAD. Here it is, or at least how it looks so far. My panel has all the instruments. The front pit has just a minimum amount; airspeed, altimiter and compass.
After working on the project tonight I took the measuring tape out to confirm the height and depth of the areas that I would be housing the instrument panels.
Measurements look good... just need to make a prototype of the two to make sure everything fits. Grabbed the display board on the way out tonight so that I can make these prototypes up over the next few days.
June 8, 2014 Calculations...
and cutting.
Had some time between chores to work out the instrument panel.
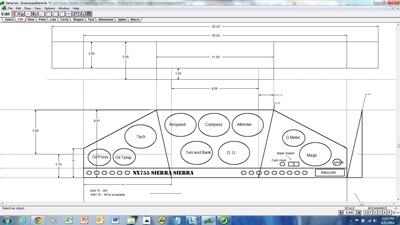
Played around with the layout of it some more... and made a few adjustments. I think this is the final version of it. I'm sure that I will be tweaking it as I go along...
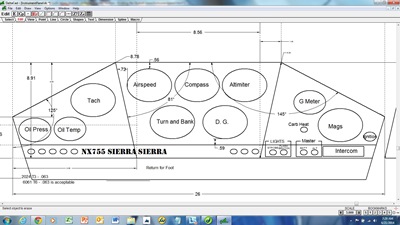
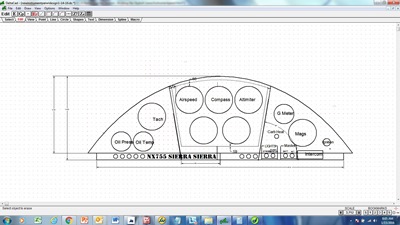
Rear instrument panel. (Click on image for larger view.)
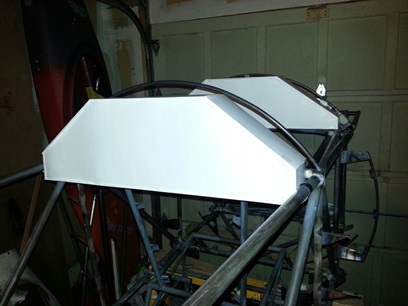
With the layout figured out it was time to make a mock-up so that I can do a test fit in the biplane. Here's a rough of the back instrument panel. Time to see if my calculations were correct !
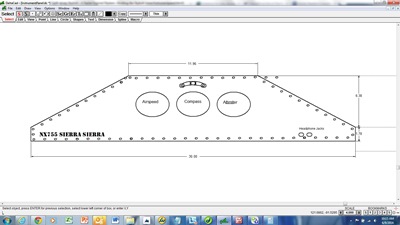
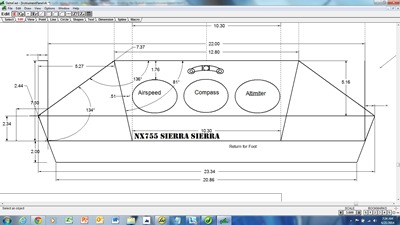
Front instrument panel.
I still need to make the white model for the front panel.
As you can see from the above image, I've been thinking of adding a few rivets to the front of the instrument panels. Instead of a blase, flat panel... add a little depth to them with a few old-school rivets.
June 9, 2014
Close to two hours... and I have the front pit's mock-up made. 'nuff said !
June
10, 2014 RE-Calculation...
and
MORE cutting.
Tonight I wanted to check out the fit of the instrument panels
I mocked up over the past few days. Turns out that the front
panel needs major changes done to it. I didn't take into account
the stand-offs for the former at that same station AND the
width of the panel comes to the outside edge of both longerons.
Didn't like how it covered the front hand-holds. I took a
few measurements and will draw them up in DeltaCAD. The front
instrument panel was pretty much dead on. I'm going to cut
the width of it so that it won't rub on the longerons. Other
than that it fit like a glove.
June 11, 2014 Success...
doesn't always come as a result of being successful.
Over the past few days I've been working on, working out, the look/design of the instrument panels. What I want and what I'll will end up making are two different things.
I tried making what I wanted out of white display board. Worked on it several hours (that's AFTER working out the details on DeltaCAD) and I came to the conclusion that it ain't gonna be easy getting it to the point of where I would be happy with the look AND finish of the panels. It was a surprisingly fast decision to make following on the heels of the 300+ hours spent getting the custom turtledeck to the point of where I was happy with it.
Don't get me wrong about me making the decision to make the panels other than how I REALLY want to have them look (does that sentence make any sence???). They'll still have the same "feel" of the original design without the complexity of metallurgy. (and yeah I know... that's not using the word metallurgy correctly)
Here's to making things easier... not saying that these instrument panels are going to be easy to make... they'll just be easier.
Center areas of panels will be raised, or should I say the sides will be recessed. I wanted to originally angle the metal on the front back, but that just threw in a hole can of worms of headaches.
June 20, 2014 The downfalls of...
three work places.
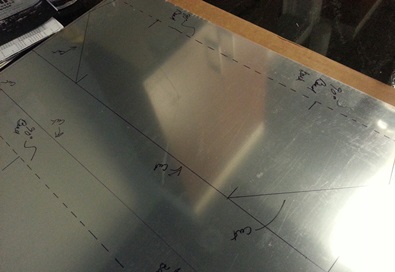
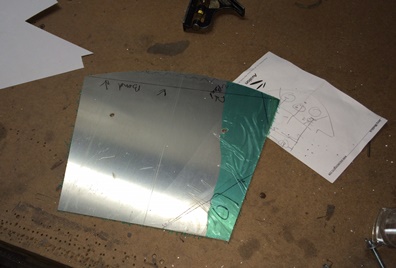
With still another slight change to the look of the panels (I angled the sides of the front panel to match the angle of the stand-offs it fit between. With that being done, I decided to do the same to the back pit... to make them match) I started working on laying the patterns out on the 6061 T6 .063 aluminum sheets that I have.
The only problem... I only brought back the 12inch x 48inch sheet to Lombard. I left the other one back at Woodstream Court. So... I could only layout the larger, back panels for both of them. At least I didn't leave them all behind at Woodstream. Now if I only had one workshop/area I wouldn't have this problem... which in and of itself would be a limited space problem.
Not much of a change. Here's the update. No photo of the marked up aluminum (as if you really wanted to see that).
June 25, 2014 2024 T 3 for, what ?...
heel trays ???
Got to thinking about the aluminum I have and what I was using it for. Turns out I'm not going to be using the 2024 for much other than my instrument panels. If I use the 6063 T6 I'd have to use the 2024 for something like the heel trays or maybe the battery box. Doesn't make much sense to save the "good stuff" for something like that.
Spent the last hour marking up the .o63 2024 T3 aluminum that I have with the shapes of the double instrument panels.
January 26-27, 2015 Parts...
and their many iterations...
Does your finished biplane look like your initial vision of it ??? ahhhh... somewhat, I guess.
I guess... if you have plans that show you how to do everything and you follow it to the letter it does. Otherwise...
Take for instance the instrument panels. My initial vision
was followed by several iterations. I guess I won't know how
they'll finally look until I'm finished with them.
We've been having crappy weather over the past few days and
I've been sitting around at home, on Lombard Street, playing with
the look of the instrument panels. I had looked through a
number of photos of Pitts Model 12 cockpits on 2wings.com a few days
ago and I wasn't liking the squared-off look, but I like the
kinda straight angles in some areas. That got me to thinking
and got me to playin' with the initial panel designs on my
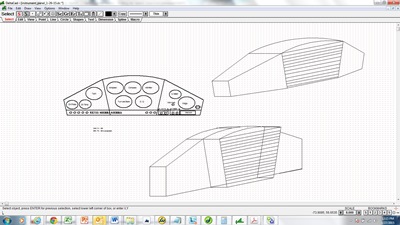
DeltaCAD program. As of today I have them looking like this.
First I decided to curve the top portion of the panels and keep the center as a raised surface coming forward. Didn't like that so much so I angled the aluminum coming off that front raised panel and... I'm liking it a lot more. The CAD isn't a perfect representation but it gives me the look and feel of what it will turn out to be.
Just so there isn't any misunderstanding... the image in the top-right corner is what it looks like as of "today".
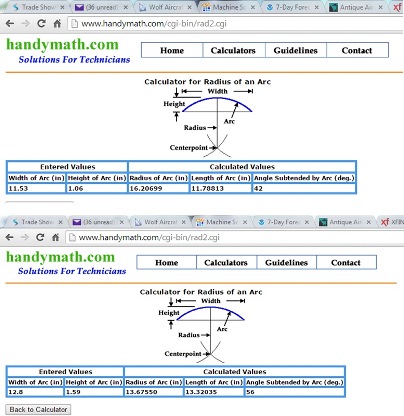
After deciding on the look of the panel... in order to make it I needed to find out the length of the arch that I have on both of them. Here is the calculator I used:
April 4, 2015 Instrument panels...
and their VERY many iterations...
Oh the hours I've put on DeltaCAD for the look of the instrument panels... and now more hours of playing with paper cut-outs.
Just not real happy with the look of the final version of the instrument panels that I had drawn up on DeltaCAD. The curve to the straight just didn't really look like it did on the computer screen. Thinking I'm going back to the curved or maybe the straight top and straight sides. Guess it'll be one of those...
So with the change I'll looking for the full curve of the "top" of the panel. I've got the old pattern from when I made the former for the front pit's curve but the rear pit's former... not so much. Haven't been able to find it and spent a lot of time looking for it then trying to trace the curve of it off the existing former. The trouble with that is... I now have the seatbelt support for the passenger now in place and that juts back through the former. DAMN ! I had this all figured out before putting that support in and now I've gone and changed my mine.
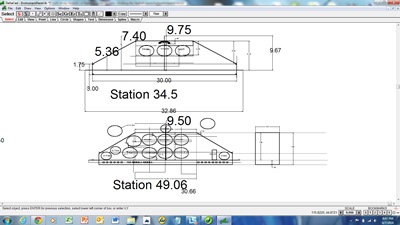
It's Easter morning and I'm spending time on it again. Took station 49.o6 stringer from one drawing and overlayed it onto the back pit instrument panel on the instrument drawing I had drawn up. Same size... just continues the top curve on the piece.
Still may have that center section come forward on its own a bit... (need to hook up the control stick for movement first... might be a good idea)
March 27, 2015 Instrument panels...
to Hell with them ???
One thing I did... was take a hard measurement for the rear instrument panel tonight.
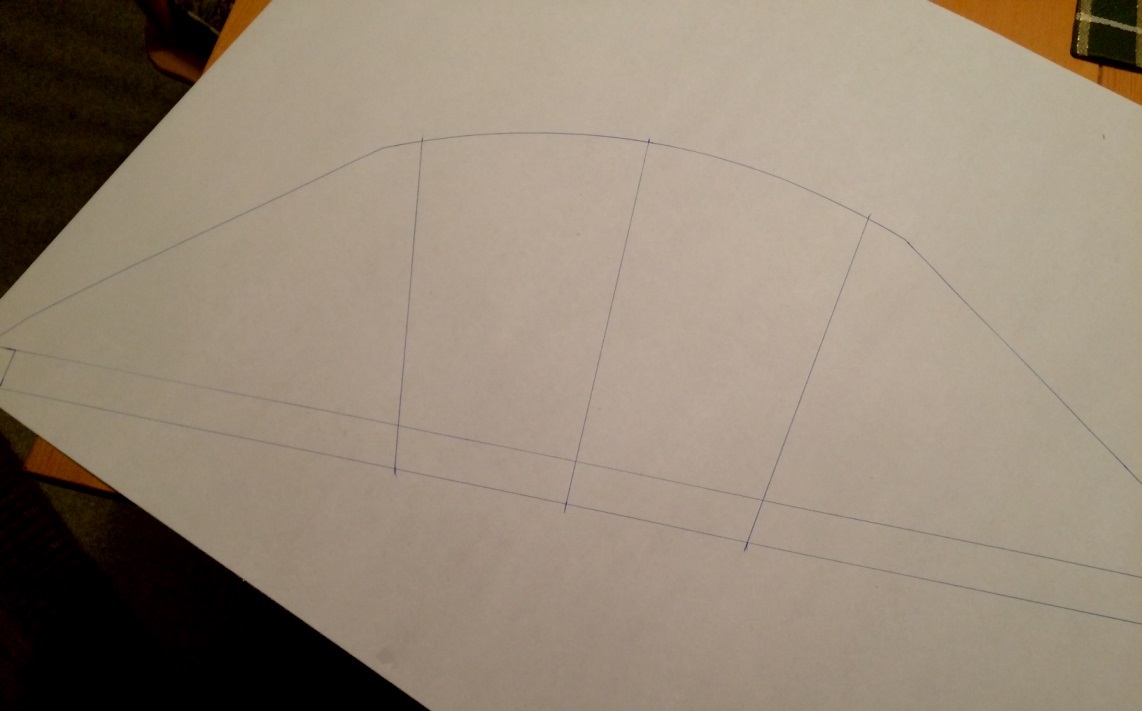
Took a sheet of 1/16inch ply and wrapped it around the forward pit's and the rear pit's front formers to get a "real" shape of the curve. I'm leaning towards that curved top/angled/curved bottom-sides sides look still/again.
Tonight I found myself wanting to toss this task to the side and move onto the guts of the biplane again. I've been working on the guts for so long... I'm not sure, but maybe in the back of my head, somewhere in that deluvial sluge, I'm thinking that there is more I need to do with the guts before moving onto the "finish" pieces. It was kind of un-nerving. It was like I didn't have the paitence for doing it at the time. Like it was wasting my time. I didn't like the feeling...
I need to get around to thinking that "yes... I'm getting closer to finishing the biplane and I need to start putting the finishing touches on it."
January 14, 2016 Instrument panels...
to Hell and now back again.
Oh my... it's been some time since I last looked at the instrument panels. And it doesn't look like I was all that pleased when I left them. I don't remember that thinking, though.
I'm back now, though. With the initial patterns for the sheet metal in place, I have the shape of how they need to curve... and I see now that the sides come in as you progress back (which I could see before but it wasn't as obvious.) The shape of the panel's face will determine the shape of the back as well... I'm thinking ? Maybe not ? Would it be easy to make it larger ? I'm thinking that it wouldn't be easier at all. (As I'm thinking this through... for the small amount of size difference I'll be making one helluvalot of extra work for myself making the back larger than the front face.)
With that said, I still need to settle on the shape of the face. I've been leaning towards this look. The standard curved shape with the center section slightly raised. Gives maximum area for gauges with a custom look.
Update: January 15, 2016: Just purchased the "U" channel to make the build-up of the center sections on both the front and back pits. And... the "L" channel for attaching the cuved top to the front and back pieces.
January 15, 2016 Instrument panels...
I just can't let it be...
I'm looking, and looking, and... the look of the instrument panel just wasn't running on all seven cylinders. Something... just something about it was a little off to my liking.
A little (lot ???) of re-working and I think I have it (as he has said before). Started working on the front pit's panel too.
Final for rear pit ???
January 16, 2016 Instrument panels...
the push forward...
With the over-night cooling off period... I've confirmed the look/shape of the back pit's instrument panel. Made one modification... When looking at the instruments on the CAD I saw that they were just a wee bit too close on the center section so I opened it up 1/2inch.
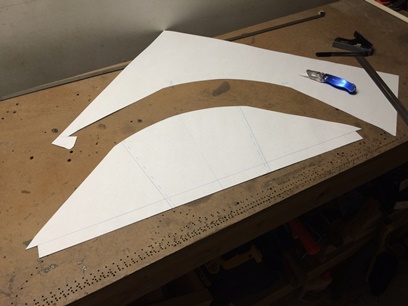
Had one false start on cutting out the display board pattern. Ended up cutting the one on the reverse side (DMAN !!!) and having to re-draw it and start the cutting process over again.
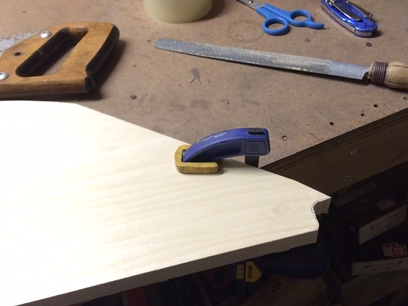
Went out and purchased a few pieces of wood to make the jigs (both front and back) from. Transferred the shapes and cut and sanded to the lines. THEN transferred the pattern on to some .o63 6061 T6 aluminum and rough cut it to shape.
All I need to do now is route the shape, measure for hole placement, draw the holes, cut the holes and deburr. THEN it will be ready for me to attach the aluminum "U" channel (which I still need to cut and drill) that will raise the center section 1inch, and the aluminum "L" flange that will be used to attach the sides to the front and back. Whew !!!
Final, Final, Final shape.
Click on for close-up.
January 17, 2016 All those hours...
paying off...
I felt it... yeah, I felt it... Hesitation. Not sure why. Maybe it's because I want to be absolutely sure that this is the shape I want. It came down to me realizing that I thought long about this, with several itirations. It's about as absolute as I can be at this time.
Needed to get past this hesitation and moving on the project. Made the final, final decision that this was the shape and started working on it again.
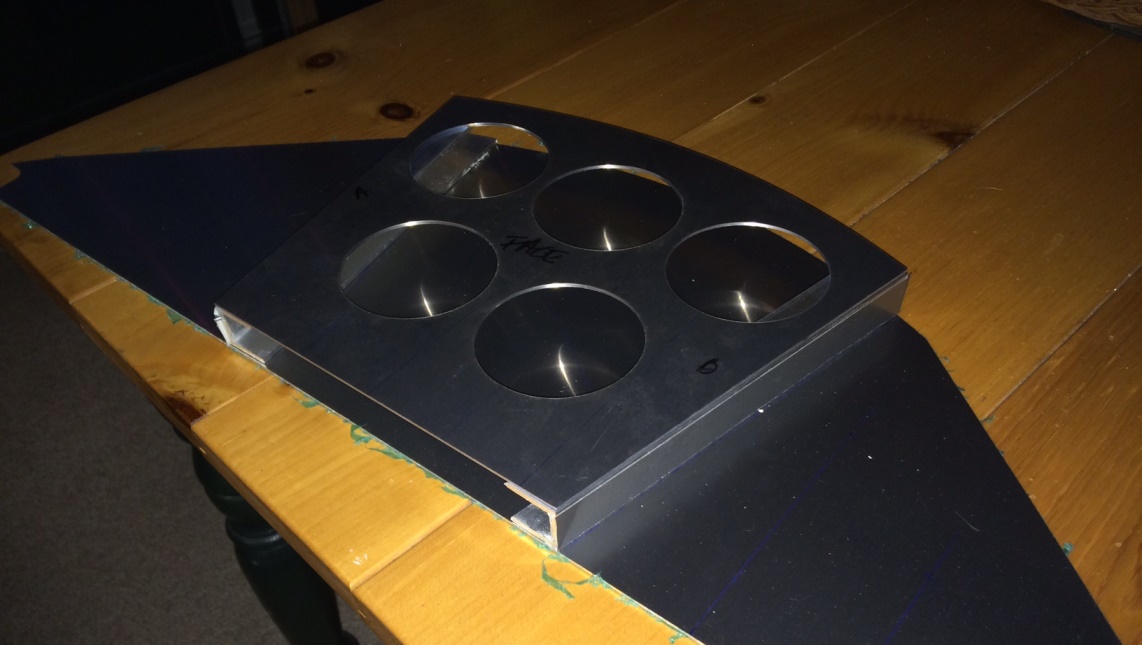
Went down to the basement workshop: measured and marked the holes for the 1/4inch bolts to secure the aluminum to the wood jig. Took the blank and match-drilled to the jig and started routing. Well, a little bit more than "JUST" started routing. Took my time and eased into each stroke of the router. If there were larger piece of aluminum hanging over the jig I'd either hacksaw them down to a closer size or nip away at it with the carbide router bit... However I did it... I took my time.
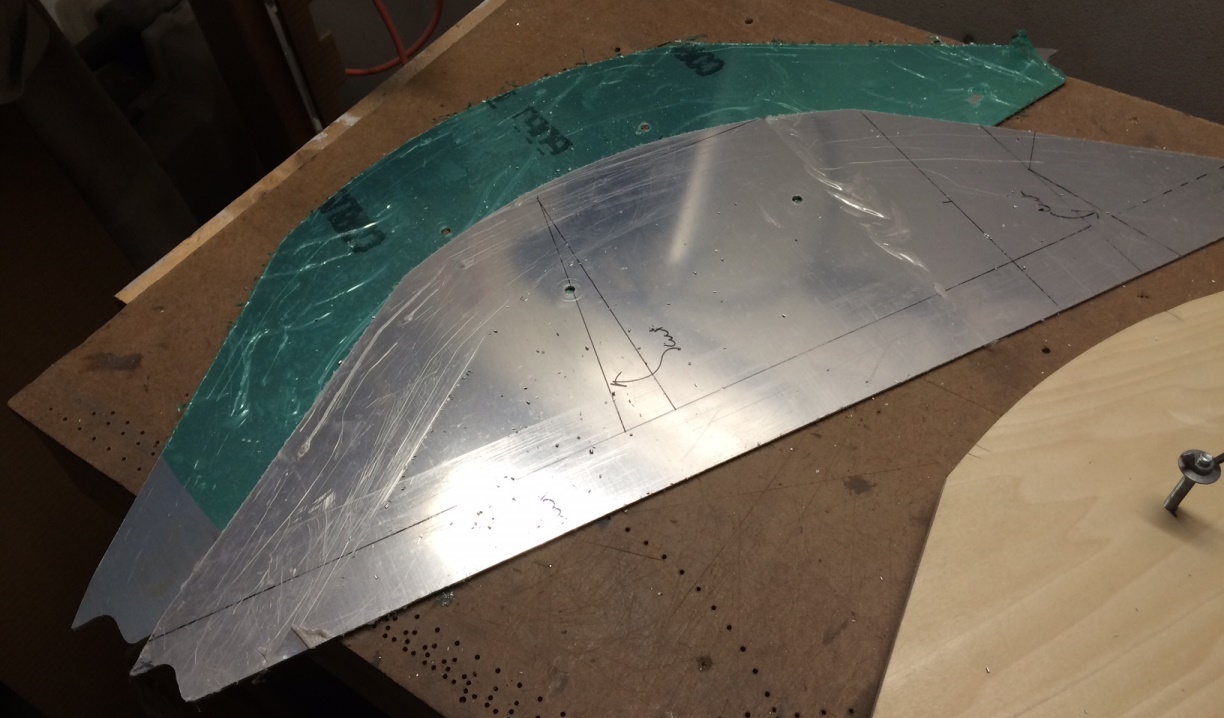
With one routed to shape I cut another blank out of a piece of 2024 T-3 (It's the only stuff I had laying around that was .063... I think I was going to make it all out of 2024 T-3. I'll use the better 2024 for the face of the panel.). Match-drilled it to the wood jig and routed it just like I routed the other piece. With all the work that I've done over the past few days, it was a quick and easy job of making a set of matching panels. All I need to do now is slightly sand the edges of the two pieces and they're ready for the next step of making an instrument panel.
Front and back panels for rear pit's instrument panel.
Click on for larger image.
January 18, 2016 More of the same...
and some other stuff.
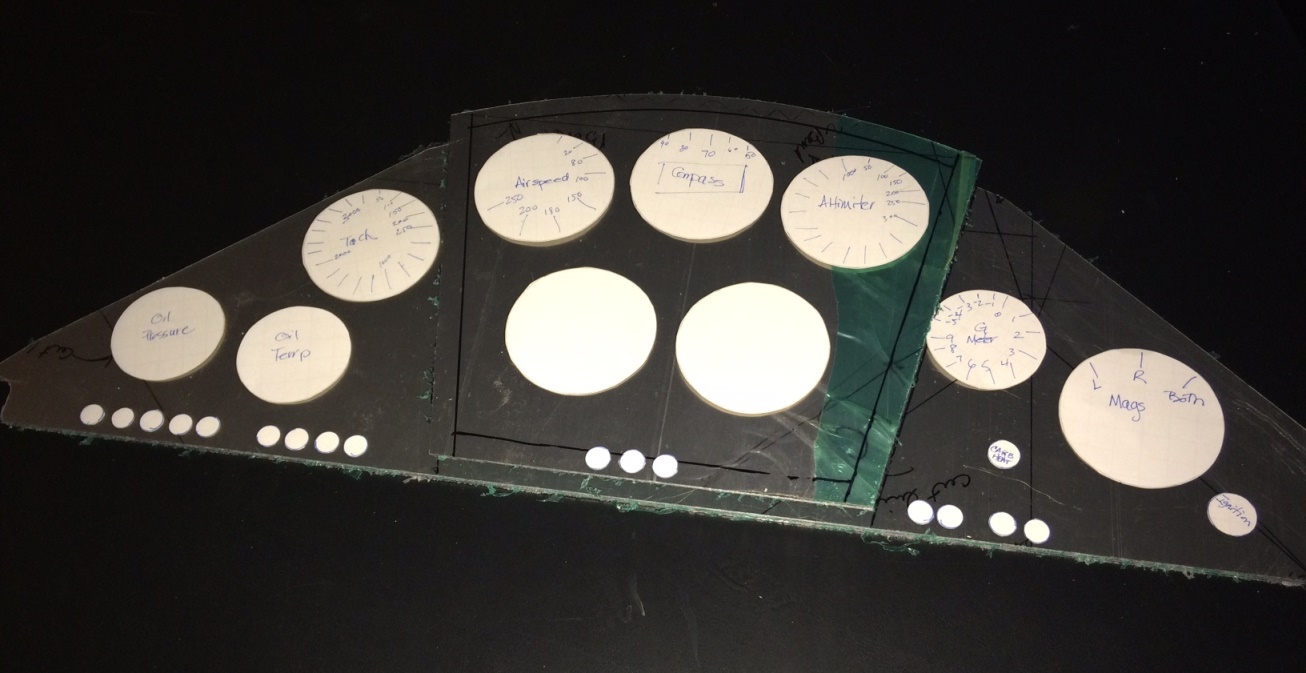
Routed the face plate for the smaller, raised section on the back instrument panel tonight; measured, marked and routed.
Although I drew this up in CAD to make sure that it would work... I felt like playing around with the instruments so I cut out a few 3 1/8inch, 2 1/4inch, 7/8inch and 1/2inch circles and pushed them around on the face of the back panel. They all fit and so far... no change in the look from when I drew it up on the CAD.
Click on image for larger photo.
January 19, 20 and 21, 2016 A fast, slow...
is how it goes.
Time to cut them holes...
Spent the 19th in front of the TV measuring the holes for the back pit's center section. Shouldn't have taken me all night... it didn't take me all night... but I took all night. Maybe a half-hour of time. Actually I did more than just measure the holes... I did more research on how to cut those holes; Tony B's books and the biplane forum.
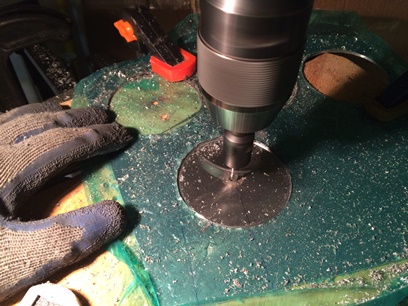
Basically there were three options that I saw... buy a $199.99 punch for the two size holes, use a hole saw cutter or use a variable circle hole cutter. $199.00 to punch 12 holes is a whole lot of money for a tool (maybe I can borrow one). My experience with a hole saw cutter is that it ain't that precise... and I need precise. I also need it a little (not a lot) larger than the size of the instrument for easy fitting. So... it came down to me using my adjustable circle hole cutter.
From my experience in using it in the past, it ain't gonna be fast. Slow is better but I'll need to make that slow as fast as I can or it will take forever.
The first two holes... took forever; an hour for each one. A note next time my time on the erase board says "Brutal". I was thinking "I need the patience of Job." What I did was let the cutter drag along the line of the circle not really letting it get up to speed. And what I noticed was I was cutting more of the "wedge" on the inside of the cut more than just a straight-line cut. That's where all the excess material was coming from.
Day two: Decided that I would let the cutter get up to speed (I used something like 215rpm) and then ease it into the cut allowing it to cut at a faster speed and then lift the cutter when it started to slow down. With this method I was able to cut the time for each hole down to 1/2hour. I also used more cutting fluid and cleaned/sharpened the tip of the cutter more.
oh... I covered both sides of the piece I was cutting with that film I have. This stuff scratches easily...
The aluminum "L" and "U" shapes came today. I knew what to expect with the "L" shaped aluminum... but the "U" shape, DAMN they're THICK ! You wouldn't think that 1/8th inch was thick, but it's THICK ! After thinking about it for a long time there are only two things that I can do; use them as is or... go out and buy some square, aluminum tubing. Buying that tubing would mean that it would only be 1/2inch deep instead of 1inch deep. I think I'll try using the "U" shapes I have. I've cut them to lenght. I'll now file down the legs and at the same time test glueing a section of the "U" to a piece of the aluminum. It's suppose to work on metals too... we'll see. BUT, I still want the "riveted" look. If the glued up piece works I'll drill holes for the placement of cut down rivets and I'll glue them in too.