Mantua, New Jersey
Original Site:
September 2004
E-mail: usav8or@yahoo.com
The Empennage... looking to build the tail section..
January 21, 2014 Thinking things through...
its a skill you learn along the way...
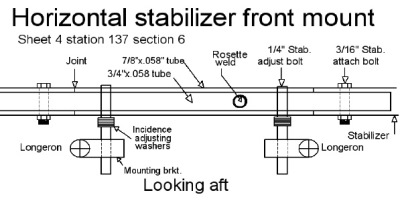
Spent some time today (a few hours actually) looking over the plans and the "Skybolt Manual". I read where there might be an issue over time with the forward attach on the horz stabs.
The "Manual" was exlaining that a "fix" some were doing with the forward mount for the horizontal stab would be to slip a 7/8inch x .o58 tube over the 3/4inch tube. They explained that there was a constant tension being exerted by the brace wires on this area. The tension, over time, tended to make the holes in the 3/8inch vertical tubes oblong. This would, over time, give some play in the area thus a possibility of binding the elevators ???
I'm a little confused on how this is to be slipped over the tubing unless I'm suppose to drill the 3/8" hole through "double-walled" tube (7/8 slipped over the 3/4) ??? It states that these two tubes need to be rosette welded together.
Thinking this through...
thinking... I'll drill an oversized hole where the 3/8inch vertical bushings will be, maybe add a few other lightening holes. Rosette weld this into place. This will allow me to adjust that 7/8" tube left or right (or cut it down if necessary) when I butt the two forward spars of the horz stabs in place.
That's the plan, at least for now...
January 25, 2014 STILL Thinking things through... ???
Still... thinking this thing through. Wondering what others have done... so I threw out the question to the Biplane Forum, as usual.
Got a reply back from Bill. Suggested, what I was kind of thinking, that I could put some bushings inside of the "H" tube. But then he also posted a photo of part of the S-1 plans which shows a sleeved tube with a fish-mouth weld on a doubler tube.
I'm thinking, if that is what has always been done with the S-1, and there isn't a problem with it, then maybe it's best to move forward with that design ???
January 26, 2014 I'm through...
with thinking...
Stopped... thinking this thing through. Decided to do it the way they show in the Skybolt Manual; a full 7/8inch x .o58 tube sleeve. My reasoning to do it this way, over the Pitts way, is that the entire length of the tube is being "supported". That's it... that's my reasoning.
Was about to order the tubing for this but figured I probably had some of it laying around somewhere. Found a nice long section of it and cut a new 7/8inch x .o58 AND a piece of 3/4inch x .o58 (new piece of the orginal 'cause I drilled the 3/8inch holes into the first one). I'll rosette these together then drill the 3/8inch holes through both. I'll be moving forward again after completing this.
oh yeah... the snag to today's work session... Halfway through cutting the tubes to size the cutting wheel on my pipe cutter broke. Out to the Home Depot for another one. At least it was a quick fix... not like I had to order a special tool on line and wait for delivery.
January 28, 2014 I'm getting on with it...
Finally !!! Again !!!
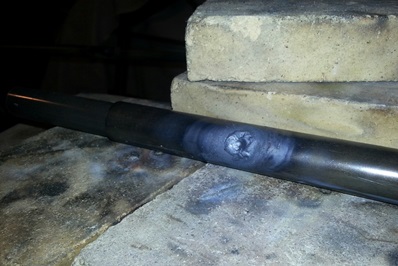
Found the time to rosette weld the tubes together...
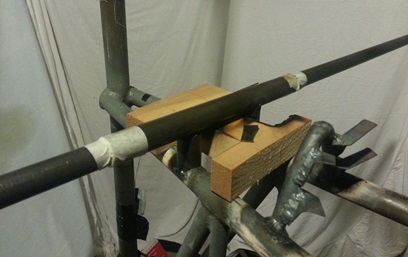
Figured out where to drill the rosette hole. Drilled the 3/8inch hole. Aligned the 7/8inch tube on the 3/4inch tube and rosette welded them together.
After the cooling off I'll be able to finally mount these to the fuselage and get on with mounting the horizontal stabs.
A little thing like this takes some thinking through to get it done. Not just the actual work but deciding on what to do. Oh crap ! I still need to drill the 3/8inch holes for the vertical tubes !
More concerned with the quality than the look.
January 29, 2014 Sometimes it's back to baby steps...
better known as taking forever.
Some things seem to take forever to complete until they're finished.
First thing... check the sleeved tubes for straightness. Ahhh... yep, slight warpage from the rosette weld. Heated the opposite side and let it cool. Nuthin'. Heated the same side for a while longer; quite a while longer. Better. Not perfect, but a lot better.
Got the drill press ready to drill a few hole in the sleeved tubes. I usually fight with keeping the tube clamped down into whatever I've set up to hold it in position. The reason I'm fighting with it is because the bit tends to catch the wall of the tube when it's coming out the other side. Yup, just like all the other times... it caught again... both times (two holes.) I'm not looking for precision holes... working towards excellence. But this is always a thorn in my side... having to fight with it like I do.
With both holes drilled I checked for final squareness and alignment between the two holes. One hole almost dead on square... the other one slightly off (I'll adjust before welding into place). Both looked in line with each other (took a straight edge to check the holes and inserted 3/8inch tubes and eyed them up also.)
what to do... Still need to square off the two 3/8inch tubes I'll be welding into the sleeved tubes. I'll chuck them in my lathe to finish them off. THEN it's ready to be attached to the fuselage.
Just about there...
January 30, 2014 Put me down for 1.1 hours...
better known as taking forever.
Just get on with it ???
again... one of my biggest challenges is working with the environment that I am in; aka... small space. Today... I wanted to find the location of rear attach for the horz stabs. Okay, put the starboard stab in position. And that is where "okay" stops.
With a nice large work shop I'd have an easy time of putting it in position, making sure that it is level/square, marking the 54inch measurement from tip of stab to center of fuselage. Not so easy in a one-car garage...
Scooch the starboard horz stab around the fuselage while balancing on one foot then stepping over a few parts from the "Wood-Low Biplane". Get it close to in position. Climb under the stab with the measuring tape to tape the end of the tape measure to the point of the horz stab. Carefully craw backwards away from and under the stab. Adjust the stab so that it falls on the 54inch mark. Take a square from the centered monofilament line that I have "snapped" from the center point on the firewall to the tube of the vertical tail. Play with that until the mark on the stab aligns with the monofilament line.
Okay, with that completed, I do everything again to check and make sure everything reads the same and is correct.
NOW I'm ready to tack on the vertical tubes for the rear horz stab attach. Putting down 1.1 hours.
January 31, 2014 Put me down for 2.1 hours...
better known as doing things twice.
I continued work on the rear attach of the horz stabs. After an hour and a half of making sure that everything was aligned correctly I set about getting the welding rig ready to tack it on. Turned both the O and A on, adjusted the pressure and took a step back... RIGHT INTO THE REAR ATTACH TUBE (actually the long tube that I have going through it for alignment). DAMN !!!
DAMN !!!
Took a break from it to have some dinner. Thinking through dinner that I wanted to at least get this accomplished tonight... tacking on of the rear attachment for the horz stabs.
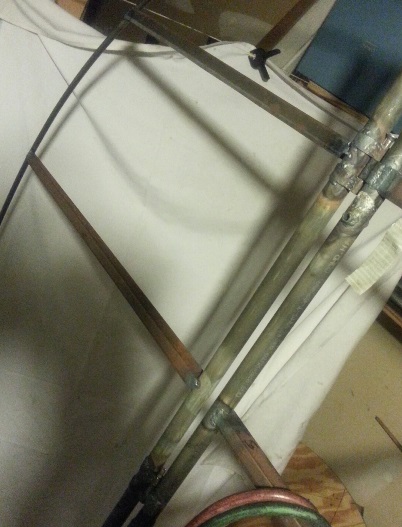
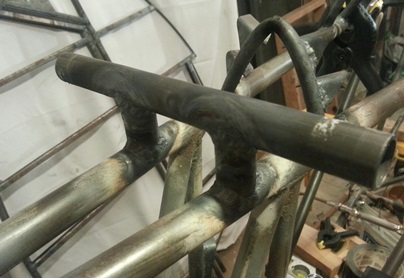
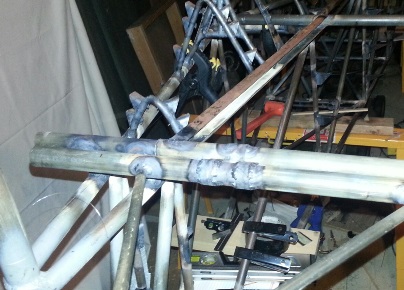
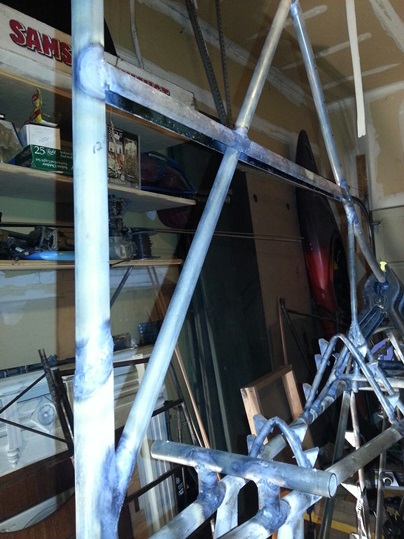
Took a look at the attachment... the tube that I had centered and taped on the tube had been torn from it's position from the fall. Re-measured and re-aligned the tube in the tube. Then re-aligned the tube in position on the fuselage. Got it almost dead on level (by using an H-shaped wood support) and threw a few tacks into it. I'll do my usual overnight, cooling off period so that I can check everything again tomorrow to reconfirm that everything is where it's suppose to be.
Here's a photo of the work.
February 1, 2014 Put me down for 2.2 hours...
better known as doing things two more times.
It's JINKed I'm tellin' ya ! I had to re-align the piece two more times.
the day started...
I needed to take that H-shaped wood "leveler" out of the way so that I could weld. Okay... sawed it nearly through and decided to push one side to break it the rest of the way. Only thing... I pushed UP and broken the tack welds on the attachment. DAMN !
Second time... I noticed that the attach tube was a little off center... a little more than a little. Apparently... yea... Apparently I used the wrong centering mark the last time and it was off center buy about an inch. That's unacceptable. I take the dead blow hammer to it and it's a bugger getting it off. Like, why wasn't it tacked that good the last time ? So... I got it off, centered it with the right line, tacked and then finished welded the entire attachment; verticals and horizontal.
With fingers crossed I'm saying it's finished.
And here it is !!!
February 3, 2014 Seeing more than measurements...
and marked lines.
PROGESS !!! Not just a string of hours... showing nothing more than a few measurements. But... actual progress !
of course...
More measurements, but I ended up with metal fitting up to metal.
Re-checked the measurements I had for the port horz stab. Everything checked out a-okay. Laid the port horz stab on the rear attach. Squared it up. Re-check the location of the forward spar on the stab and then made the mark of where to cut the rear spar tube on the stab.
Took the stab off the fuselage and then for shits and giggles... placed it back on to confirm that it was how it was suppose to be. Check !
"Squared" up the cut line by rolling a sheet of paper around the cut mark and aligning the straight edge of the paper with itself. Took the entire horz stab down to the basement workshop and cut off the majority of the tube/spar close to the cut mark. Vised up the stab and took a grinder to get most of the excess metal and then finished with a metal file. "Reamed" the insde of the cut with a round file and tried it on for size.
And here it is !!!
February 4, 2014 The end is near...
as far as work on the horizontal stabs go.
I'm just about there with the tail feathers... NICE !
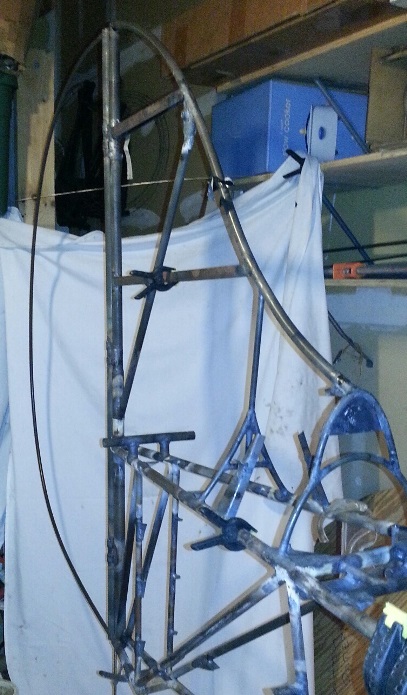
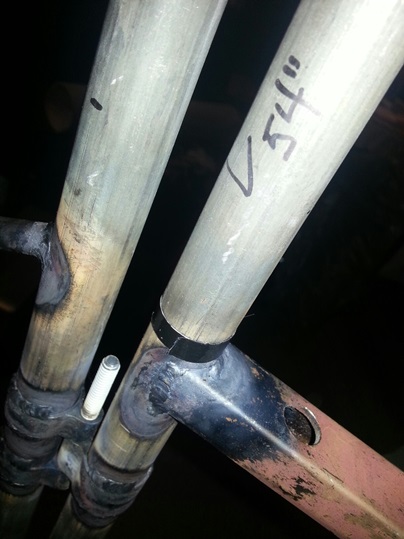
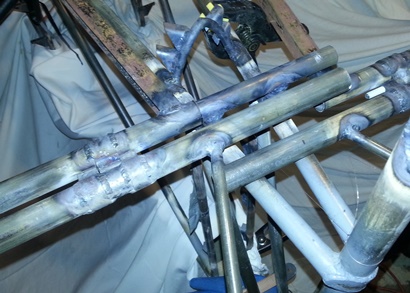
Measured, and re-measured, cut and filed the rear spar on the starboard horizontal stabilizer tonight. She's really starting to look like an airplane with these stabs on her. Tried sliding both of them on at the same time to get a look see but was unable to. The spars on the elevators are still too long. The photo below shows both; one is on the attachment the other is just laying there.
Tomorrow I'll work on the front stab attachment and then I'll be near finished with this part of the puzzle.
Starboard stabilizer attached. Port stabilizer laid in position.
February 5 and 6, 2014 With the right support...
they're not only good, they're good looking welds.
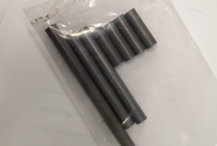
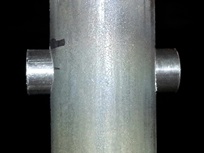
A photo of some of the vertical tubes for the horizontal stabilizer front attachment. Four of these are 1.25inches and I also had two 3.5inch pieces chucked in a lathe and squared up.
These were done at the Andrea's family business. The micro-lathe I have hasn't been doing the trick so I asked her if someone at their place would do it. THAT's why I had the larger ones cut also. Wasn't sure which direction I would be going with it, so...
Time hitting the plans and asking questions... about the elevator horns. Got my answer. Discovered that the holes I drilled into the horns were 3/4inch, not 7/8inch. I'll need to open them up with a unibit (stepped bit) before aligning and welding on the tube spars.
Guess it's time to get these puppies welded to the front attach and keep things moving forward !
The 6th...
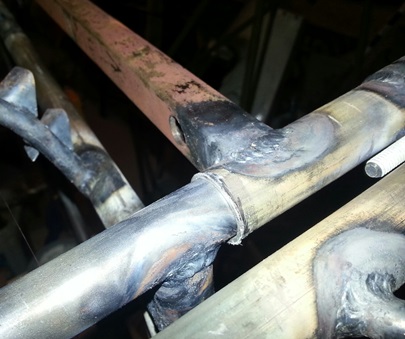
Aligned both 3/8inch tubes in the horz stab front attachment tube... tacked and finished welded them. Took about an hour. No problem.
The longer, cut tubes you see in the above bag had been reamed to 1/4inch. I decided to ream the smaller ones (the ones I used) after I welded them into the attachment tube. I had fits trying to keep the longer ones from turning in the vice (marking them as they turned). It should be an easy task to ream them now with them welded into the larger tube.
With the tube cooled down I took it down to the basement work shop and reamed both out the 1/4inch. No problem at all...
Horz stab front attachment.
Still need to clean off the scaling.
March 4, 2014 Oooops...
not yet !!!
Thought I was going to position the 1.25inch x .375inch bushing for the flying wires on the vertical tail and then weld them up. Not so much...
Looking over the plans before heading out to the garage work area I saw that I still needed to weld in the 5/8inch diagonal tail brace. I can't have the diagonal going all the way to the base of the tail post because I have that little do-hicky (sp?) that the turtledeck stringers attach to/end up at. Glad that I did this now before cutting the stringrs to size.
Just a lot of grinding and cutting to get it to fit. Then a little bit of welding to get it attached to the vertical tail. Here's the results. NOW I can align and weld in those bushings.
March 5 and 6, 2014 Finally...
I was able to use a piece !!!
Last night I knocked out attaching the upper, forward bushing for the horizontal stabilier flying wires. It wasn't a matter of just holding the one and a quarter inch bushing one and a half inches from the center of the vertical tail's upper metal rib... oh noooo... It was a little bit more involved than that.
The Skybolt Manual suggested that a gusset be made and installed in that area so that there would be more area to weld the bushing into place. Also... it'd be easier to square it up to the fuselage too.
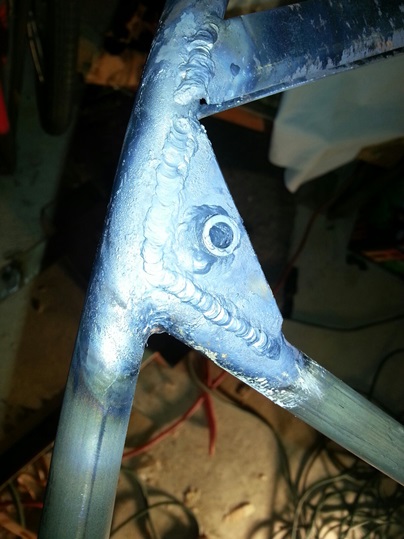
I had a length of 5/8inch retangular tubing sitting around (one of those pieces of scrap that you shouldn't keep but keep just in case...) and was finally able to use a piece of it. Drilled a 3/8inch hole in it, held it up to the leading edge of the vertical stab, where it was suppse to be, and drew the shape. It took two tries to get it to the shape I wanted it (the first one I cut the bushing hit the leading edge and I wasn't too keen on two pieces of tubing possibly rubbing against each other for the life of the biplane), tacked it and then welded it up.
Wasn't real happy with the look of the welds (good welds, just not good looking) and prettied them up. After some quick work on making those welds look better I got to working on the bushing in the vertical tail post.
Marked the hole locations and used a centering bit to get things going. Took a quarter inch drill bit and using a drill block, drilled a straight hole through the vertical tail tube. Opened it up to 3/8inch with the unibit. Inserted the 1 1/2inch 3/8inch bushing and centered it on the tube. Welded up both sides... BAM !!!
June 12, 2014 Tonight's progress...
hinges on a few things.
During the entire drive home tonight I'm trying to think of what to do next on the biplane.
Things like bending the upper wing fuel tank... shearing the aluminum for the instrument panels... things like that need to be done, but it ain't gonna be done in my work shop. I'll need to take these somewhere to do on someone's bigger machinery.
Guess I'll show up and see what catches my fancy.
First thing I did after turning on the shop light was to check and see if the instrument panel blanks fit... they did. I'll be modifying the front one so that the sides follow the angle of the former stand-off that it will be sliding in next to. Other than that... I'm happy with the fit. (time to start cutting aluminum)
Looked at the plans to see what was still hanging loose... what had to be done on the build. Their ain't a lot of major stuff to do other than the wings. Most of the stuff to do is putting what I have done all together.
As I purused the plans my eyes fell on the rudder. I've had the vertical tailpost welded in place for a while now. Have all the bits and pieces I needed to attach the rudder... so why not ???
The hinge pieces I made oh-so-long ago needed some finishing up; had to clean up the insides of them (clean out the metal lip from when I cut them to size) and the side that gets attached to the tailpost needed to be cut in half. All this stuff was pretty much routine... just took some time.
After cleaning and cutting I postioned them on the front spar of the rudder than began to adjust the height of each and fit them to the tailpost. Top one done... okay... Middle one fitted up... okay. Bottom fitting... not so much. Ya see, the upper tailpost tube is 7/8inch. The lower portion of it, since the upper piece is slid inside and welded on... is a one inch tube.I adjusted the curve of the hinge to allow it to wrap around the one inch tube. Started to line things up when I decided that I'm going to need to get a 4foot piece of 1/4inch threaded rod so that I can align the ones on the vertical tailpost THEN have the ones on the rudder trail in line. Looks like I'll need to come back and finish up the job... then on to the next piece of the puzzle.
Two point two hours... and I'm done for the night.
June 14, 2014 back-and-forth...
BACK-AND-FORTH !!!
The goal for today... was to check the alignment of the hinges on the rudder/tailpost and then weld them on. Anything after that would be gravy.
Finished mowing the lawn and headed out to the fuselage that was parked on two saw horses in the garage. Just as I thought... my duct tape job of holding the forward spar of the rudder onto the tailpost had failed. Didn't fail by much, but it was hanging off kilter.
Spent a little bit of time re-aligning it. (oh yeah... had stopped at the Home Depot to pick up a 3foot length of 1/4inch threaded rod to hold all three hinges as straight as an arrow) Tack welded on the sections of the hinge that attached to the tailpost. Finished up with that and bolted the hinge pieces on the rudder in place then tacked those on...
It was just a matter of finish welding those pieces. AND there were quite a few to finish weld.
NOW the time consuming part of today's work session... making sure that the rudder frame trails behind the tailpost and vertical stab. back-and-forth... back-and-forth... back-and-forth... backand-forth... backandforth... backandforth backandforth backandforthbackandforthbackandforth
Can you tell... it took a little bit of time to make sure it was as right as I could get it? Once I got it to that point and had it tacked I left it for my "cooling off" period. I'll come back next time to check to make sure it's where I want it. I'll then finish welded it and get on with the rest of the build.
Looking DAMN good !
June 17, 2014 Sometimes you just need to...
walk away.
The attachment of the rudder and all that went into that... looking at it again and it DOES look GOOD !
Looking at the tacked rudder frame and it DOES look GOOD !
Not wanting to start something and leave it half(ass)way done... I need to tackle the metal ribs that attach to the rudder. Not a problem... I've been here before with all those metal ribs I welded to the horizontal stabs.
I use a 7/8inch wide flat piece of 4130 as a level. Clamp it up so that it's just under the second rib down on the vertical stab. A lot of cutting, notching and trimming but I finally get it to the point where it fits and I can tack it into place. I use the same piece of 7/8inch flat stock to level up the upper rudder rib. Take a measurement from the first one I tacked. It's measures the same at all points BUT it's 1/8inch off of the 12inches it should be. Not a problem and I ain't gonna grind off the ones on the vertical stab to move them all 1/8inch down. Take a look at the photo below and tell me if you can see that it is 1/8inch different than what the plans say...
I'm burning through daylight and I only have the one fitted and tacked on. I have an appointment at the vet's for Ammo (my pup) at 7:40pm and I'd like to get these finished up and tacked... if I can. I begin working on the second rib; the upper most rib on the rudder. I'm cutting, notching, trimming, and grinding away at the rib. Test fit then cutting, notching, trimming, and grinding some more then... test fit then more cutting, notching, trimming, and grinding. Look down at my watch and it's getting close to the time I need to be leaving. I fit it up again and it's close. Is it good enough... naaaaaa.... good enough is never good enough !!! More cutting, notching, trimming, and grinding... I have to make the decision that if it doesn't fit this time I'm just going to leave it until my next session. I hold it up to the front spar on the rudder and the trailing edge and it FITS.
If it didn't fit, I had the mindset that I wasn't just going to accept where I was at with the fit... tack it and say I'm done with it. I was going to walk away from it. Call it a day and then continue working on it next time. As it was... the final fit was where I had wanted it to be and I tacked it.
Okay... so I was a little late to the vet's for Ammo's appointment. I called when I was on the way to let them know I'd be a few minutes late. It's all good...


 A photo of some of the vertical tubes for the horizontal stabilizer front attachment. Four of these are 1.25inches and I also had two 3.5inch pieces chucked in a lathe and squared up.
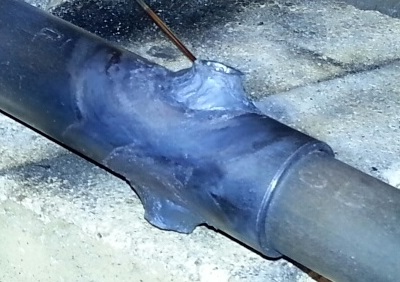
 Marked the hole locations and used a centering bit to get things going. Took a quarter inch drill bit and using a drill block, drilled a straight hole through the vertical tail tube. Opened it up to 3/8inch with the unibit. Inserted the 1 1/2inch 3/8inch bushing and centered it on the tube. Welded up both sides... BAM !!!