Mantua, New Jersey
Original Site:
September 2004
E-mail: usav8or@yahoo.com
more work on the...Radial Fuselage.
July 10, 2014
Same stuff ???
not so much...
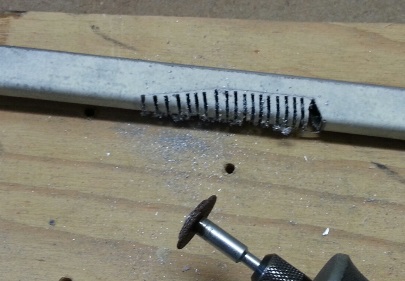
What can I say about tonight's work on the biplane ? It's a repeat of what I did the other night on it; match drilling the stringers to the stand-offs.
But... I don't think that it really is. I learned something last time that I'm applying to today's work. and come to think of it... I learned something last week that I'm applying to today's work. and... I learned something on January 6, 1994 that I'm applying to today's work. It's always a better way of doing things... or at least I hope that it is. Sometimes I don't get it right and it use to piss me off, but over the years I've learned that I've learned from the mistake and the results are a better biplane and a better person.
Early on, the mistakes gave me hesitation when moving onto the next big project. But, I found over the years that if I've learned everything that I could about it in the beginning there was nothing to fear. If it came down to it... Failure breeds learning, or should I say more learning.
oh yeah...
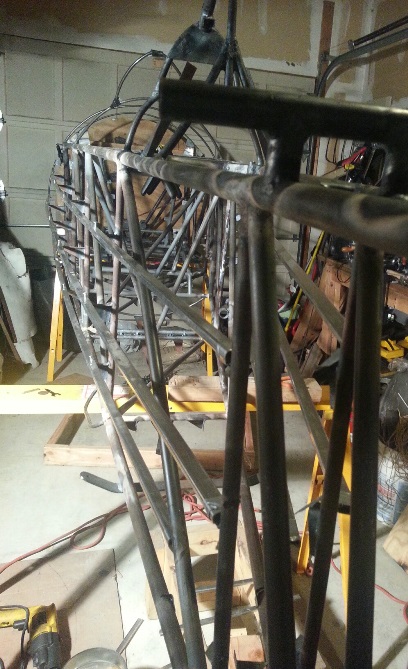
My work tonight... a shot of the three port stringers, drilled and mounted.
July 12, 2014
There ain't no luck involved...
when building your biplane.
50/50 chance and I didn't get it right ?
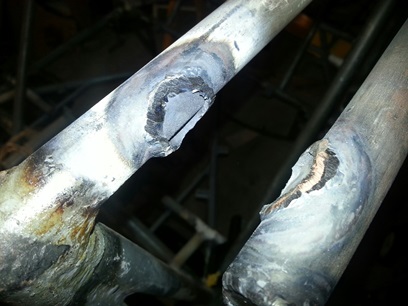
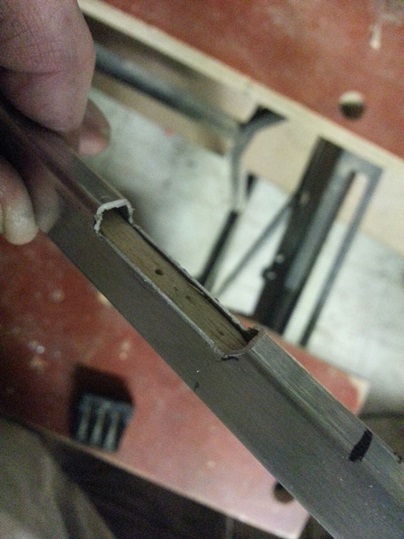
Not so bad when you're only taking off the stringers to flip the fuselage on it's side to align and drill the belly stringers... Yeah, that's what I did today, not only flip the fuselage on the wrong side, but flipped it on its right side (port side) to work on the stringers.
First one (center one) was just like the previous six. It was, no problemo. Started clamping on one of the outer stringers and when I got closer to the tailpost there seemed to be a little resistance to me aligning the stringer on the second to last stand-off. Took a look and saw that the forward bracket for the tailwires was in its way.
okay... so I thought, and decided that there was one of three things I can do.
1. Cut the bracket off and be done with it. And... that AIN'T and option.
2. Readjust the end-point of the stringer so that the bracket and the stringer don't touch. Tried that I didn't like any of the ending options.
3. Notch the stringers to fit. If they hold up, great. It's my answer. If it doesn't... back to option two and be happy with it.
Luck would have it and option three worked out for me. I still need to clean them up a bit and then insert a length of wood in that opening to strengthen it. There is no real stress on it, but I'd rather give it some guts now rather than have it possibly kink on me after the fabric has been applied... making an unsightly line.
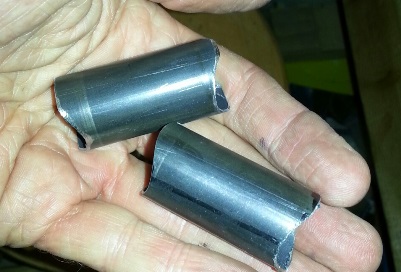
With the notches made in the outer two stringers I was able to finish attaching all three belly stringers. well... actually, I need to now drill the screw holes in the rear attach points for all nine stringers. And I'm gonna do it now... not leave something half completed just to get on to another part of the project. I'm in the "stringer attach" mind-set. No sense in having to get back into it at a later date.
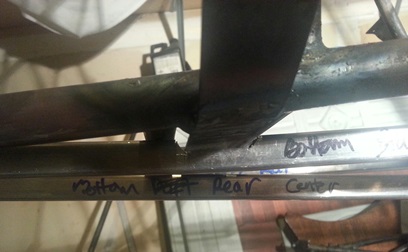
Here's a shot of the belly.
July 15, 2014
Getting everything done...
ended up being three of nine stringers.
More work on the stringers. As mentioned in a previous post, I need to drill the holes in the back stringer attach tabs and then match drill the stringers to them.
On the way home tonight the heavens opened and the rain came down. Made getting back to Woodstream Ct. a long drive. I was finally able to start working on the biplane a little before 7PM. I found myself thinking, as I walked into the garage, that I wanted to make sure that I completed the work on all nine stringers. Wasn't sure what that was all about... and made a mental note that I'd work on the project at hand and when it was time to go... I'd go. No rushing to get anything done... just get it done right.
Measured and cut the three belly stringers to their final lengths. After marking and drilling the holes in the rear mounting tabs I match drilled the stringers. Also did a slight modification to the notches I made in the port and starboard belly stringers (put a 45degree cut on them instead of the 90degree.) Still need to add the wood fillers to these...
After finishing up these three stringers I took a look at the cell phone (to check the time) and saw that I had been working on it close to two hours. Time to call it quits and get back to Lombard Street to have dinner with Andrea
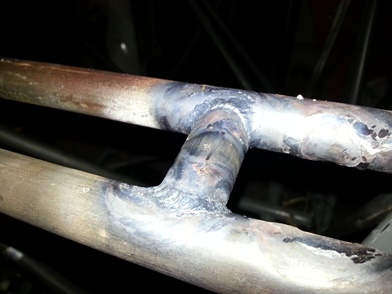
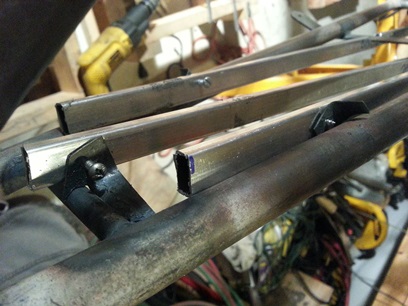
Close-up of the rear attach points of the belly stringers.
No... I'm not attaching them with these screws.
July 16, 2013
Getting it done...
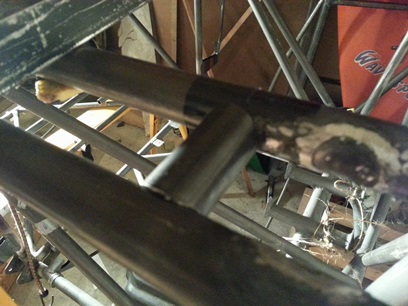
All of tonight was the same as last night... attaching stringers. BUT... It's worth noting that I finished up attaching all the stringers to the fuselage tonight. The focus was on the rear attach points.
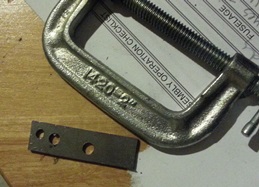
These were a little bit different than the other stand-offs. I couldn't get to them with the drill, or should I say, I couldn't get the drill in a position so that the bit was square to the surface of the attachment. I tried using a 90degree attachment for the drill and still couldn't get in there.
Not sure what took me so long, but I figured out that I needed to use a jig for holding the drill bit in position. It wasn't anything fancy. All it was, was a piece of .o40 4130 with a hole drilled in it. Probably 2inches long x 1/2inch wide... enough to allow me to clamp it down. Kept the centering bit from wandering.. and the drill bit from wandering.
July 18, 2014
Stepping back...
Working on the project today... getting fustrated. Fustrated... not with the project, but with what to do next.
I've been so use to building the main structure that when it comes to putting the "finishing" touches on the biplane, my mind is wandering aimlessly...
Started off with taking an assessment of what I need to do next. I've been wanting to mount the throttles for a while now. Been looking for something I saw somewhere that would give me an idea of location. Can't find it and I'm now finally saying to hell with it and jumped up in the cockpit, sat down and figured it out by putting it where it would go naturally for me. which is... about 8inches down from the upper longeron. At full throttle, the knob of the go-fast lever falls just in back of the cross-tube in front of the pilot's cockpit.
Jotted down the location and numbers I needed for that. Stepped back... and just looked at the fuselage and thought of everything I still needed to do with it... Wrote down a short punch list. Here it is in no particular order:
1. Pushrods for elevators
2. Trim/Servo connections (still)
3. Seatpans/backs
4. Attach the throttle quads
5. Attach the flying wire attachments
6. Firewall
7. Oil tank (make or buy?)
8. Battery box
9. Attach tailwheel
10. Main tank
11. Engine ring
12. Cut and bend instrument panels
13. Bend and weld up upper fuel tank
14. Complete the upper wing center section.
15. Heel trays
And THAT's the short list.
Made a list the other night of most of the tubing I have laying around. It's not a whole lot. Need to compare that to what I need to buy for the trim/servo and the pushrods. Get that ordered up along with thos all too expensive bearings.
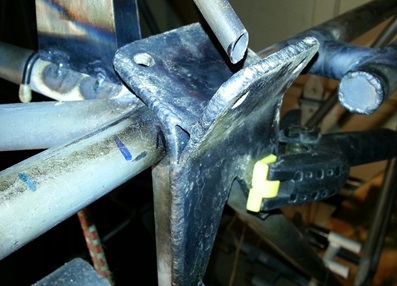
okay... Made the decision to align and fit up the two rear flying wire attachment brackets. Knew the one former was in the way of it and that I need to cut it back. Held the fitting up on both sides and marked the spot on the former that would clear it (knowing all too well that I would still need to cut it back further). It took a bit of time to cut it back since I had already tacked the stand-offs in position. (another aside - I knew that I would have to take THOSE stand-offs off and had already tacked on new stand-offs - follow that ???)
Clamped them in positon... they're ready for welding up. One thing to note. Curtis shows the fitting on a fuselage that has two vertical tubes coming up at 45degrees. It ain't like that on the "R" fuselage. I'll need to shift the fitting slightly back so that it hits the the 90degree vertical and the 45degree behind it. It's the only thing that I can do with it. No other options.
Before tacking and welding on the rear attach I wanted to get the front flying wire attached ready for welding on. I still need to weld the front and back plates on it together. BUT, before I do that I want to drill a pilot hole in the one (since I do have the paper pattern on it still and before I burn it off from welding the two together).
With the drilling of the pilot holes... it was time to pack it up for today. Clocked another 2point1 hours on it.
July 22, 2014
Did I just say that ???
There's one thing that I don't really like doing on the biplane... and that's welding THICK metal. Not with the AandO system that I have; it's for thin-walled tubing.
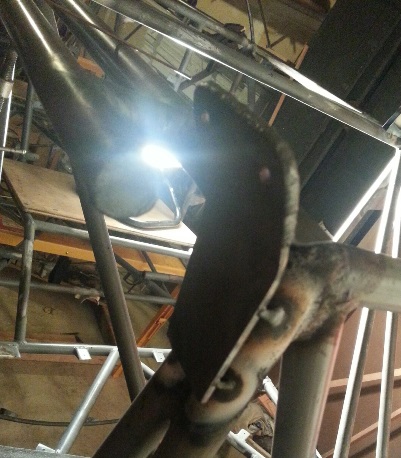
The goal for tonight was to weld up the two two-piece, forward, upper wing fittings. Just like the rear ones, they're a two-piece affair. I also wanted to tack both the forward and the rear fittings onto the fuselage. Decided, or more likely it just happened, to tack the rear fittings onto the fuselage first. These are the fittings that Curtis shows on the plans as attaching to two downard facing 45degree angled tubes. In actuality one is vertical and the other is at a 45degree angle. I need to keep it as close to the original location that is on the drawings (no dims are given... just the general area) while at the same time having it placed where I can get a number of good welds onto it. Decided that I would located the rear of the fitting at 24 3/4inches. Clamped the first one in position. Tacked it on. "What the hell, since this is all heated up, I'll just weld this line." Finished welding the back-vertical weld on the first one. There is one heck of a lot of heat going on there.
Aligned and tacked the port side fitting as well. No finish welding done on that piece.
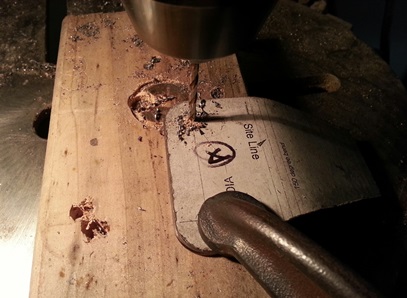
Time for welding up the two-piece front fittings. First I needed to burn off the paper patterns that I had glued onto them. Afer buring them off and allowing them to cool... I sanded them down to get all of the left-over residue off of them. Aligned and clamped them together and started heating them up to run the bead.
Ya know... I'm going to have to ammend my original statement about welding thick metal. Welding these two thicker pieces of metal was a joy. I guess the welding I don't really like is welding a thick fitting to thin-walled tubing. It's time consuming and there is a pretty good chance that I'm not happy with the look (pleasing to the eye look) of it.
July 24, 2014
Accomplishing something...
without accomplishing anything.
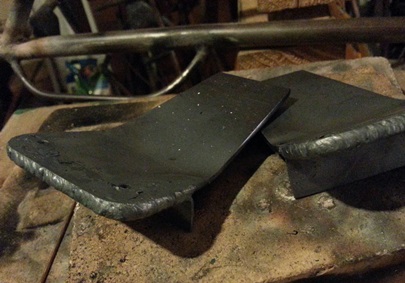
First things first... as the saying goes. Needed to match drill the front plate, of the two-piece front flying wire fitting, to the back plate and then drill undersized (needs to be reamed out to 5/16inch.)
DONE !
Next, I wanted to tack them to the fuselage so that when I started to spin the fuselage around for welding I'd have the front and rear fittings tacked and ready for finish welding. Well, I never tacked the front fittings to the fuselage so the rest of the plan fell through today.
The issue I had was with the stand-off (7/8inch x .o35 tubing) for the foward part of the upper side former. I mis-calculated the placement of the stand-off and now it is about 1/4inch TOO close to the firewall; the fitting is hitting it and it still needs to move back about 1/4inch.
No problem... I'll just re-make two more 7/8inch x .o35 stand-offs. File the curve on both ends. Align. Tack. Finish weld... and procceed with plan "A". Not so much... The new stand-offs are so close to the original stand-offs that no matter how I filed and ground the new stand-offs I couldn't fit them into the space unless they were WAY too short.
That was my night !!! That's it !!! Good thing is. I had to find that out at some point. The bad news is... why did it ever end up happening... It's because I should have allow more room for the stand-off. Simple as that !
Next time I work on the project I'll tack a few pieces of flat-stock to the top and bottom of each of these "formers". I'll then cut the existing stand-off out and slide the new one, into the new location, and weld it on. Lesson learned... allow a generous amount of space when welding additional bits and pieces that are close to other critically placed bits and pieces.
Nothing to really show for my work today... but some days are like that. It doesn't seem like you've accomplished anything... but you've accomplished something. May not be wanted you wanted... but it's something.
July 29, 2014
A constant...
reminder.
Real busy over the weekend... no time to run over to Woodstream Court to work on the biplane. DAMN !
Tonight... I knew what I had to do. Or, at least I had a plan. Needed to grind off the front stand-offs for the two upper, side formers I had welded in some time ago.
Took a few measurements and wrote them down so that I wouldn't forget them. Then I started workin' on them. I find myself mentally reminding myself that I'll get as far as I can get with the project tonight and that'll be it. And... that'll be fine.
Worked on it for 1.5hours and I'm pretty close to completing the re-do on them. Next session I'll file them down a bit more, but not too close to the actual tube as I don't want to disturb the original tube. Like any other boo-boo... it will leave a mark. Another one of those things that happen sometimes when you're scratch building a biplane. Something that someone else will look at and say "What the heck happened there???" and I'll look at it and say... "Yup, one of the many learning experiences with the build."
First one ground off. Ready for filing.
July 31, 2014
A very small piece...
of the many parts and pieces.
Got a late start on the biplane tonight. Got to Woodstream Court by 6:30 but HAD to wash the car. It's been a while... and a few pigeons sat over it last night. Not a pretty sight.
Tonight's plan was to cut and grind two new stand-offs for the side formers I've been reworking. I eased up on the cut-to-fit size... kept on checking it. Nothing for a loooooooooong time, then, BAM ! I could push the damn thing three inches past where I wanted it. DAMN !
Second one... I eased up easier on the cut-to-fit size. Looks like I learned from the first one 'cause the second one fit pretty damn good. I had did the cutting and notching on it... almost never fails... if I try and do it the quick way I end up doing it the sure, slow, steady way eventually. Might as well just start off doing it that way. Made a pattern from this for an easy cut of the third one (second keeper).
okay... so I got two of these cut and filed and fitted up. Kind of depressing when I think of it. One point two hours and I have this to show for it. I've been here quite a number of times and I keep moving forward with the build.
I was going to tack these on but is it worth the time to set up the welder just to tack them on ? Heck... I'll leave it for next time and then finsih weld them.
August 5, 2014
It's usually more...
than just what you're working on...
Other than cleaning up the tubing... It was just a matter of aligning and tacking and finish welding the two new stand-offs onto the fuselage. A little bit of a pain turning the fuselage upside down...
These two stand-offs were pretty much on automatic... not a lot of thinking to do about the welding off them... which gave me plenty of time to dwell on what the heck I'm going to do with the new engine mount !
August 14, 2014
Investigating that...
"something doesn't seem right" feeling...
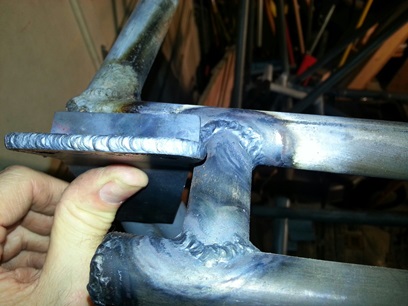
The two front welds that I've been working at filing down only needed a little sanding and then I took the torch to them to burn off any excess primer that I had on there. Found the two brackets that needed to be attached... aligned and tacked them to the fuselage.
I still need to work on how and what I need to do to attach the engine mount to the front of the fuselage. That's why I only tacked these to the front/sides. But as I tacked them, and I've thought this before, it's odd why Curtis made the bottom of these fittings the way he did. They really don't align with the way that the vertical tubes are. Not happy with that fact, and not wanting to go down a road I'd have to back-up on... I pull the roll of plans out of the tube and start investigating it.
After a few minutes I discover that I have two sheets that have two different brackets on them; the ones that I had made and another set that looked familiar. But I couldn't quite put my finger on why they look familiar. It took a little while, but I finially figured out what was going on. (I must have discovered this years ago... but had forgotten about it)
Curtis originally drafted up brackets for the original Standard Skybolt frame; three different ones were made for this (these are on drawing 403 dated 9-02). THEN there were brackets designed for the Radial Skybolt frame (I guess after he decided to create an entirely new frame for the R version); two different ones (these are on drawing 210 dated 3-4-03). These are the correct fittings and show the correct locations.
The brackets that are drawn up for the Radial Skybolt work, but if I were to do it again I'd modify the lower part of the bracket designed for the Radial version and mate it with the upper version of the one designed for the Standard version. Make sense ??? Didn't think so... You'd need to have the plans in front of you to understand this.
I'm away from my plans... I'll update this with better information when I have a chance to get back there to look at it.
oh yeah... here's a photo of the forward fitting.
September 9, 2014
My photo reveals more...
than what I had intended.
A post to the biplane forum revealed something other than what I asked...
Posted a photo of my completed tail spring bracket welded on the fuselage. Got a reply from navybipe about how it was welded on the fuselage and that the Starduster's plans say not to weld it on like that. He said... it may be okay, but just a heads up about it. That threw up a red flag... so I posted that question on the forum.
Got back several comments, and an inbox email, about it. It all focused in on the fact that the Standard Skybolt, and other similar biplanes, have additional fuselage structure/tubing in that area; both a cross support and vertical side tubes. (this prevents any bending loads when stress is placed on the bracket) Nothing on the Radial Skybolt plans show this, but there is a pretty glaring "opening" where this would be missing from the structure.
I made the decision to put the additional tubes in there, similar to what the Standard Skybolt has. It won't be the exact same as I am not cutting off the stab wire attach bracket. I'll locate the tubes just behind the stab wire attach bracket.
Spent tonight cutting and notching the three tubes for this additional support. All I need to do now is weld them on.
Before (this is the photo I had posted)
After
September 11, 2014
Same spot...
different size tubing
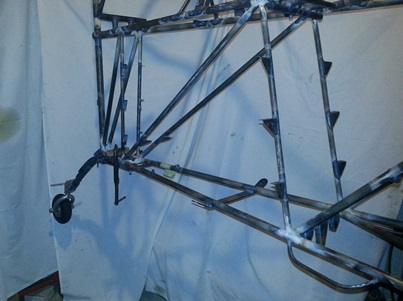
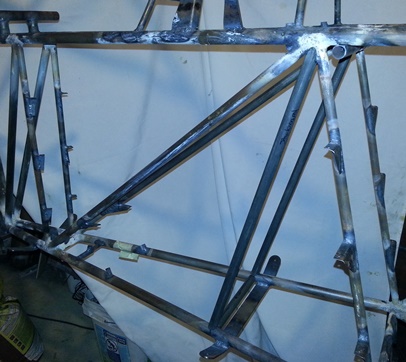
Over to Woodstream Ct tonight to finish up on the stuff I'm doing on the stab wire attach bracket area... As mentioned before, from what I gather, a few tubes need to be added to that location to keep the longerons from bowing with stress from the stabilizers.
There's tubing in that area on the "Standard" Skybolt's plans but not the "Radial" Skybolt plans. Discussing it with the group I've decided that I'll be adding those tubes to that location. Not that I need to, but based on many other designs... this additional support is incorporated into those airplanes.
Because the stab wire attach bracket is already welded on REAL good... I decided to off-set the cross tube so that I could get a full weld on it and then place the verticals from that point up to the closest cluster. Tonight, looking at the tubing I cut the other night... those 5/8inch verticals are intersecting 1/2inch tubing on the upper longerons. Doesn't make any sense in beefing up with 5/8 behind the 1/2inch so I switched the 5/8 out with the 1/2inch and shifted the tubes forward (not quite a paradigm shift...), while still keeping the 5/8inch tube behind it welded in place.
The thought of having this welded up tonight was pushed back a day because of this.
The phone's camera took a crap on me... this is the shot of have from tonight's work session. (not sure why, because it only happens in the garage) You get the idea... Still needs to be finished welded.
Moved the vertical tubes in front of stab attach.
September 13, 2014
I shouldn't have played with it...
but, you know, I just had to.
I knew I was low on acetylene (C 2 H 2) but wanted to get back working on welding on the additional tubes... Even if I didn't get them finished, I'd at least try to.
All looked good for a while and then, DAMN !, a yellow flame producing nothing but soot. Almost got all the lower tubes welded... I need to pick up that new cylinder this week some time. Wanted to last week but didn't get the opportunity to. (problem is... they're only open from 8AM until 4PM)
I've been thinking, and this lead me to my next project today, that these additional cross tubes may interfere with the belly stringers. Located the starboard side stringer... bolted it in place at a few of the rear stand-offs and BAM !, just as I thought, the rear tube interferes with the stringer. Not by much, but still enough where it will be rubbing oh so slightly. I unbolted the stringer from the fuselage and started playing with it to see what kind of bend I could get with it... and BAM ! I put a kink in it. DAMN !
so... From this little experiment I discovered that the new, rear cross tube indeed interferes with the two outer stringers. I'll need to notch the two stringers out a bit more in the back end of the notch to avoid hitting the rear cross tube AND I still need to put the additional support in that notched area to prevent any more of that kinkage going on. oh yearh... I'll need to re-make that one starboard stringer (that's what the extra three are for...)
Moving on... I started taking a hard look at the actual set up of the control linkages... and what I needed where. It's basically set up with 3/4inch x .o49 tubing with a bunch of expensive bearings (by the way... only use aircraft quality bears, none of them off the shelf bearings that you THINK are the same) Located all the 3/4 x .o49 tubing that I have and it ain't much; a length that is 69inches long and a length that is 30inches long. I need four pieces... one 18inches, one 33inches and two 44 1/2inches. Looks like I need to buy a seven foot piece to move forward with this part of the project and about $700.00 of rod end bearings.
Well... I need six to make the elevator controls work (about $360.00 worth). The others are for (I think) the ailerons. ???
okay... I'll need to place an order for that length of tubing this week. Now all I need to do is slide the idler arms, and walking beam reverser in place so that I can get an accurate measurement. The tubes I welded on for attaching these pieces are pretty large; two take a length of 1/2inch tubing and the other takes a length of 3/8inch tubing. Needed to ream all of them of the crud build-up from welding them on. The 3/8inch, not a problem. I have the exact size reamer and the length of it was just right. The 1/2inch tubes... another story.
I have adjustable reamers so that wasn't the problem. Getting all the way into the tubes on one of the connects was the issue. I ended up using a pair of plyers (very carefully) to turn the reamer past the area that the reamer handle won't turn any more because of interference from the lower longerons. Now... this isn't an issue I caused, 'cause they accepted a 1/2inch tube prior to welding on. It's the post welding crud that fouled things up this time. It's all a part of the build...
September 19, 2014
The direction ?...
A little fuzzy.
There are so many little things to do.
No clear direction right now? I want to finish the welds that I've started on in the area around the stab wire attach brackets. STILL need to get over to Airgas for the refill.
That's a no go, so... I finished reaming out the tubing that hold the Idler Arms in place. Attached the Idler Arms and Reverser to see about measuring the push rods. That ain't gonna work until I have the actual bearings so that I can see how much room to allow for the bearings. Let's just say the fuselage is set up for measuring right now.
I need to think through, and about, all the additional mounts I need to make so that I can fabricate and attach to the fuselage; fuel pump mount, etc. BUT, I need to get the items before I can actually make them, right ??? That ain't gonna work, so... moving forward !!! Re-working the port and starboard belly stringers... as mentioned above, I kinda kinked both of them while playing around with them. Ya see... one of the two, new cross-tubes in the stab wire attach bracket area interferes with these two stringers. Well, tonight I figured out what additional material needs to be cut from the stringers to make them work. Taped the old ones to the new blank stringer material for match drilling and marking of the notches. Forgot the small drill at Lombard (actually... didn't forget it, just didn't realized I needed it). These are ready for drilling and notching. I'll then finish them off with inserting the wood stiffners in the area of the notches and be done with them. oh...
I think I might add two additional stand-offs on that cross-tube to keep them from rubbing the tube. (just a thought right now)
(what to do??? what to do???) I've been wanting to work out the front connection on the turtledeck... why not do it now ? Was thinking of welding on a piece of 5/8inch (stand width strapping material?) 4130 to the cross-tube at the leading edge of the turtledeck. Dismissed that as I thought about it more. Unless I just put a few short legths of welds on it, it's gonna curl up like a potato chip. My other idea was to make a few tabs, just like the other tabs I've used throughout the build, to attach the front edge of the turtledeck.
Found a few of these tabs laying around but decided that since I had to make two more... I might as well make all four. Spent the rest of tonight making those tabs. I'll weld these puppies on... once I pick up that cylinder of acetylene.
September 25, 2014
I finally have the additional support...
I didn't know I needed.
Glad I didn't just read the plans.
Had my plan today.
Picked up a new tank of Acetylene today. I've been wanting to do that for weeks but haven't found the time. Today... I did.
Tonight I planned on welding the rest of the stab wire support tubes (as previously mentioned... they're not shown on the plans). Put the AW203 tip on the gas welder and it heated that cluster up nice... got it done. The tip, no matter how much I filed it, still didn't give me a real nice flame. It worked... just wasn't nice hearing that whistling noise.
Welded up the lower tubes, the undersides where I couldn't reach before... when the fuselage was sitting up-right. Now I'm happy with the support in the stab wire area !
With some extra time left I started working on one of those two belly stringers that wrap around the new stab wire support tubes. Already had both of them mated up with the new ones (taped in place) so all I needed to do was match-drill a few holes, cut to length and then make that notch in them. Got one done before my time ran out. Even had time to figure out what size piece of would would work to help stiffen it up. Turns out to be a 1/4inch piece of cap strip. When I finish notching the other one I'll mix up a batch of that snap-crackle-pop T-88 to coat and glue them in.
In addition to stiffening them, I'll be adding an additional stand-off at that location to help support some of the load that the fabric will place on them.
September 27, 2014
Final notches...
a few pieces of wood...
and I think that's it for the stringers.
Spent all day over at the house on Woodstream Ct... only spent two hours on the build. Yeah... other things to do, but I did squeeze in time for a little movement forward.
Did a dry run of the above notched stringer. Turns out it needs to be a little deeper and angled back about another 1/2inch. Made the marks. Made the cuts. Made another dry run... and it's lookin' good. Did the same to the port side belly stringer. Looked good too, so I cut the 1/4inch x 1/4inch pieces of cap strip to insert into the stringers. Mixed up a batch of T-88 to coat and glue in the wood to give a little extra support for these notched out area.
That's it. One point nine hours...
Spent some additional time looking at sway wires for the upper wing center section. Still not convience what I see on the plans is what's suppose to be.
Looking at JimW's photo it looks like I'll need to have a fitting similar to the back one (a set of ears instead of just one ear).


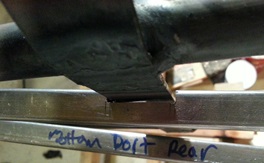 Luck would have it and option three worked out for me. I still need to clean them up a bit and then insert a length of wood in that opening to strengthen it. There is no real stress on it, but I'd rather give it some guts now rather than have it possibly kink on me after the fabric has been applied... making an unsightly line.
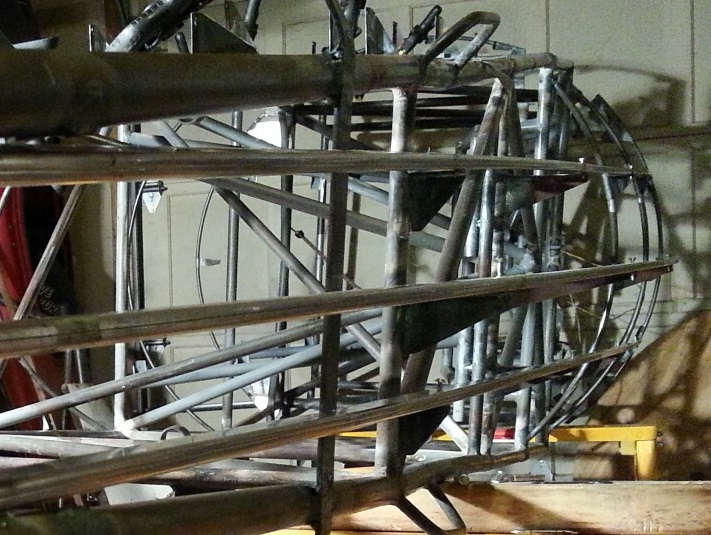
 Not sure what took me so long, but I figured out that I needed to use a jig for holding the drill bit in position. It wasn't anything fancy. All it was, was a piece of .o40 4130 with a hole drilled in it. Probably 2inches long x 1/2inch wide... enough to allow me to clamp it down. Kept the centering bit from wandering.. and the drill bit from wandering.