Mantua, New Jersey
Original Site:
September 2004
E-mail: usav8or@yahoo.com
more work on the...Radial Fuselage.
September 30, 2014
A question...
to JimW's answer...
I found the answer to my question... kind of stumbled on it. I guess the scratch-built biplane Gods were looking to see if I had the balls to keep with the project.
I remember seeing something JimW wrote about changing the holes to 3/8inch instead of the 5/16th. I wanted to be sure of the change in size since I would be... ya know, I'm not actually sure why I looked. I still wasn't sure of the hole sway wire/strut configuration yet... Anyway, I decided to look for it, for shits and giggles I guess. I found the thread he wrote back in 2009 (pretty good memory, eh?).
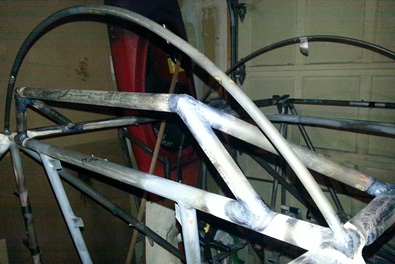
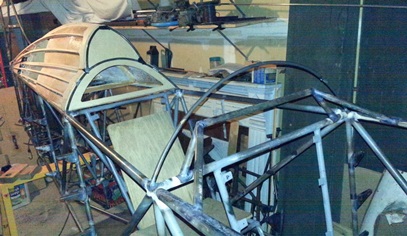
I was reading over the thread, and there on the first post was a photo of Jim's frame with a set of two-earred front bracket !!! DAMN ! That's the answer to my question. I'll need to confirm, but it's gotta have the same bends on it as the rear bracket.
JimW's fuselage.
Okay... got my answer. Got my work cut out for me tonight.
Decided to remake both front sway wire/strut attach brackets. It'd be more of a hassle re-working the existing than to make all new ones. Believe me... I know.
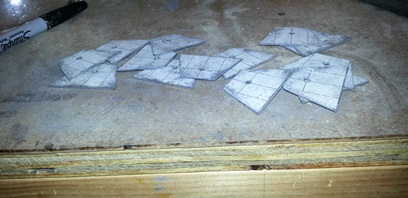
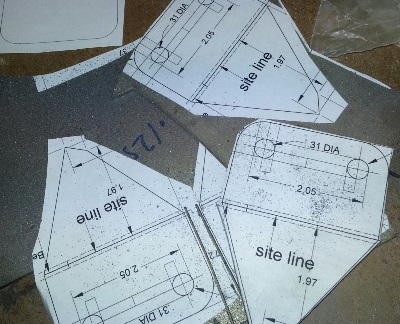
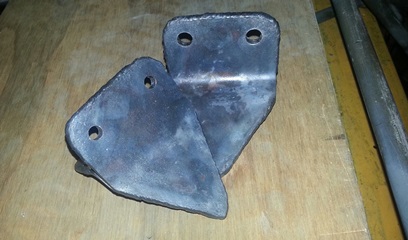
Found me a small piece of .125 4130. Lined the new patterns, that I worked on and printed out earlier, on the piece of metal and glued them down for cutting out. About two hours later I have what you see below... four new 1/2-brackets. Two need to be bent to 150 degrees and two need to be bent to 120 degrees... then welded together with an additional "V" strap on top of the two halves. In a few days they'll be ready to weld onto the fuselage.
By the way... they'll be 3/8inch holes, not 5/1inch holes. Those .31 hole indications are from the old bracket CADs.
October 2, 2014
A closer look...
at JimW's answer...
.
Taking a closer look I saw that the front brackets on Jim's fuselage were similar in length to the back ones... Which meant that two of the blanks I cut out the other day are two (yeah I know too... but both of them are also) short.
Nothing shows the length (on any of the sheets in the plans), or even what the shape is to be. I decided to make it similar to the front bracket halves I had already cut out but with one change. I'll be making the upper section of the bracket similar in length to the brackets on the back.
with plan in hand...
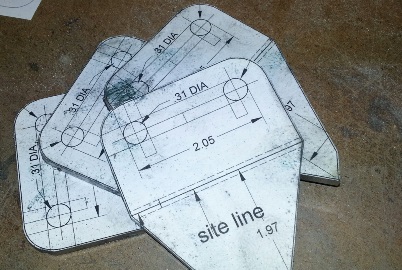
Drew them up in my DeltaCAD program. Printed them out today. Went to Woodstream Court tonight and cut them out. Had time so I filed and sand the areas that will get the bend (the rest gets welded so why take all that time to file and sand smooth, eh ?). Then... drilled under-sized holes in the four halves.
They're ready for bending and welding up now.
October 4, 2014
Thinking about...
my question...
.
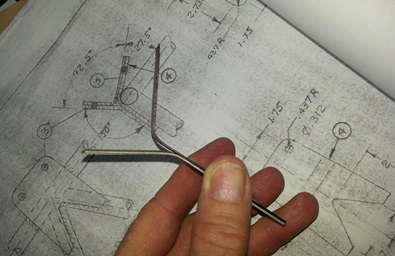
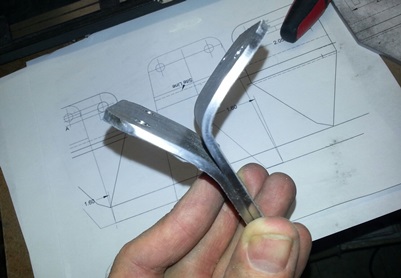
I'm a little leary of making the bends where I show that they are on the print outs... but looking at my back brackets, it appears that the site lines are correct. I'll do a test with two test pieces made of thinner material to confirm.
First thing I did was cut a few pieces of .o32 4130 to the approximate length of my brackets. Mark them where the sight line was and then bedn them to shape. Held it up to the image of the rear bracket and it looked great. Held it up to the actual rear bracket... and it was looked great too!
Done with my experiment, it was time to get moving on the actual bracket halves.
I didn't quite remember it being as hard as this bending .o70 material. But then again... I may have left it a few inches longer and trimmed to size afterwards. I don't remember doing that with these, but it's possible. If I were to do it again, I'd leave an extra 2inches in length then cut to size.
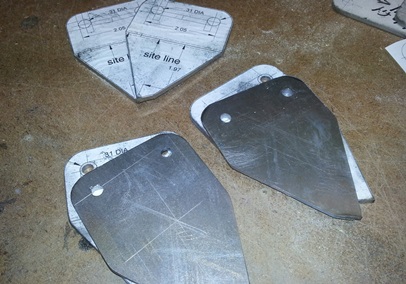
It took a pretty good pounding, but I got it done.
There were a few scratches that needed to be smoothed out... which took quite a while to do. But it's something that NEEDED to be done. I still had some daylight to burn and I had the correct tools so I decided to start welding these puppies up.
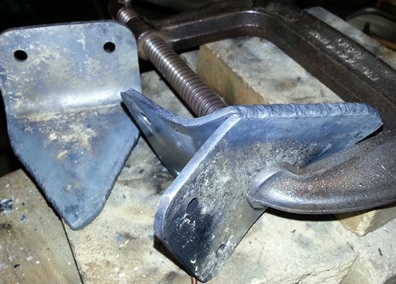
I need to get a new set of welding tips. With that being said, the 205 that I need for this job is working pretty good. Matched each pair together. Clamped with a big ol' c-clamp then fired up the A/O. As always, with a few pieces of THICK metal, it takes some time just to heat them up. Once they were up to temps the puddle flowed and it was just a matter of feeding that 3/32 rod into that sweet spot.
Got both of them done before my time ran out today. I'm real happy with the results and the amount of time I put in on the project today.
I have the pieces of .o70 that get welded to the top of these. Ready for bending and trimming... next time.
October 7, 2014
Two (yeah, I wanted to spell it like that) many...
thoughts ???
I'm getting tired... but not getting tired of making these small pieces... I'm getting tired of... but not getting tired of building my biplane. Sometimes I think... I've been buidling this so long that I've got to get it finished. But, all of the time I'm thinking... I really enjoy building this biplane.
enough of that... Didn't accomplish as much as I wanted to tonight. Thought I would have gotten both of these front brackets welded up and ready for welding onto the fuselage but that didn't happen. Instead, it took a while to grind the pieces to size and then heat and bend the plates that weld onto the two ears of the front sway wire/strut attach brackets. And then there were so many different weld lines on the piece that each time I turned it around I had another weld to make.
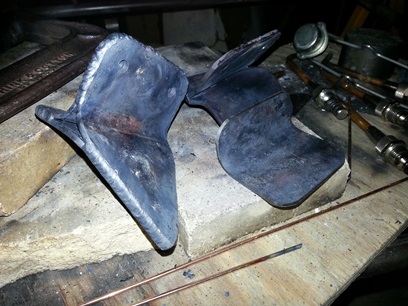
So, to answer my question... I only finished welding up one bracket. The other one I'll need to weld up on Thursday ?
Welded and un-welded brackets.
October 9, 2014
I'm attaching a bracket where ???
and For what ???
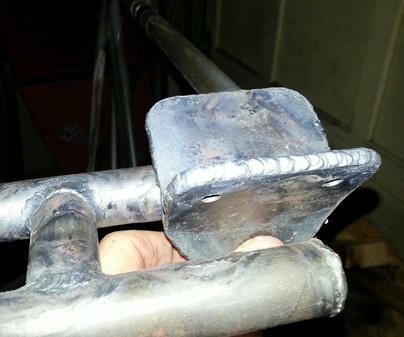
Worked on getting the 2nd front sway wire/strut attach bracket finished. All it needed was some welding up; welding on of the top plate. Used a #205 to get the job done.
Side note:I've been having troubles with getting a nice flame out of the tip of my old tips. The file I had was aluminum (and yes, it's for doing just that on welding tips), but it doesn't make any sense. These things are hot when I'm cleaning them (between welding) and it just sort of melts the file to the point of not having any ridgids. Decided to rub the tip on one of the welding bricks and then take the round wire file to clean inside of the opening. Worked like a champ !
After finishing up the bracket I did one of my 100 yeard gazes... thinking about what needs to be done and what I want to work on next. What I want to work on and what needs to be done are two different things. There are certain things I need to actually do before I can do what I actually want to do (make any sense?).
Sat in the rear cockpit... for more than a few minutes. The heel trays need to be put in... so I'll get the measurements for that so that I can mark up the aluminum sheet I have back at Lombard Street. So... I'm taking the measurements for the heel trays and I see that I don't have all the brackets I "now" want to attach the heel trays. Made a note of needing four more for attaching; two more for each tray. I've got them. Just need to find them.
Took measurements for the seat pans (again?). Need to order the material for those.. I think. I'll need to check my stock.
I'm thinking I need to make brackets for the fuel pump (not really sure if I'll be using one though) and the bracket for the battery tray (not actually sure where I'll be putting it right now though) and the supports that I need to make to raise the seatbelts above the shoulders for both the passentger and pilot. oh yeah... need to order those lengths of tube and six REP4H6 bearings for the control system NOW !
My question is, how the hell do you decide where to put these brackets before you know where you need to put them? aka... the battery. Do you make a few brackets for attaching and leave it at that? and then put whatever lead weight you need to in the back? Which by the way will need a bracket too ?
I'm not sure if it's dreaming or thinking things through. 'Cause... when I'm thinking things through now, it's finishing off the fuselage (which reminds me... I need to start on those wings) and seeing a finished product, not a finished piece.
October 11, 2014
I know where...
AND for what.
Brackets... yeah, brackets. Just these little things needing to be done before I can paint the fuselage.
I'm not sure if I mentioned it earlier, but I (for some reason) didn't account for the inside tabs for mounting the pilot's heel trays. But, you notice stuff like that when you're looking at how you'll be attaching something that you're about ready to make it. And I did...
Got a long, thin piece of 4130 to lay across the tubes so that I could clamp the new tabs to it to make sure that they'll be flush with the heel trays (at the floor height). Ground down the back of the tabs so that they spooned with the tubing. Lit the AandO up and tacked and welded them up. BAM !
The other night I was thinking through things... ya know... that 100 yard stare. Remembered that the shoulder straps for the seat harness aren't high enough (something with the fact that if the stress is from below the shoulders there will be compression when an accident happens). So I set about determining how high I want these to be. Made some notes on a pad of paper and I was ready to go.
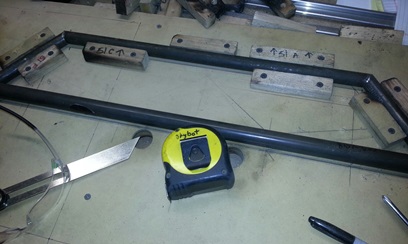
Found one of my older jigs. Flipped it and made some new markings on it. Got the 14inch chop saw out and made a few cuts. All I need to do is make a few notches on the lower end of these tubes and the back end of this puppy is ready to be welded up.
Vertical tubes need to be cut down and notched at 4 1/2inches.
October 14, 2014 Getting closer...
to hanging the un-finished center section.
I wanted to accompish a few things today; drill a few holes and see if my test piece worked.
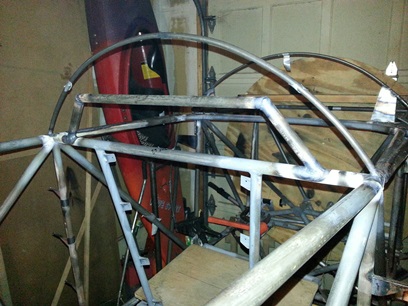
I quadrupled-confirmed the size holes for the sway wires and the strut attachment brackets. Sway wires are 3/8inch and the strut attach holes are 5/16inch. Found the right drill bits and set about drilling them through. I had 1/4inch starting holes alrady drilled into one side of the double-plates that make up the attachments. It was just a matter of aligning the 1/4inch bit into the existing hole, switching out with the new bit... and match-drilling through. It took a little bit of time, but I got it done. (still need to ream the four holes out to 5/16 though...)
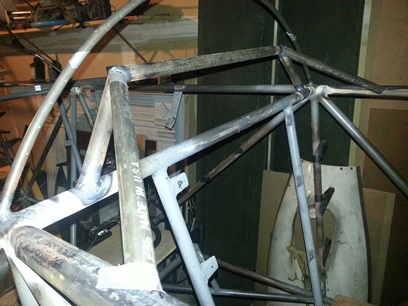
Ready for welding on the fuselage.
October 16, 2014 Does it need to be done ???
no... but, uh, yeah !
Tonight... I tacked on the two forward sway wire/strut brackets. Took a little while to get it exactly how I wanted them before tacking. AND THEN... saw that I need to adjust one of them a scooch again. It'll have to wait until next time.
Back to work on the co-pilot's seatbelt harness support. Decided that I wanted to angle the sides of the "vertical" tubing; 45degree angles instead of the 90degree angles. It' didn't need to be done... but, yeah... it needed to be done (in my eyes). Took out my protractor ? Dialed in 22 1/2degrees. Broke out the chop saw. Locked the angle in on 22 1/2degrees and made my chops.
Sounds a little bit easier/quicker than it actually was. Notched the bottom of the tubes to spoon with the 7/8inch horizontal tube they'll be welded to. Still need to make the angled, forward braces for each side and the "slots" on top for keeping the straps in place.
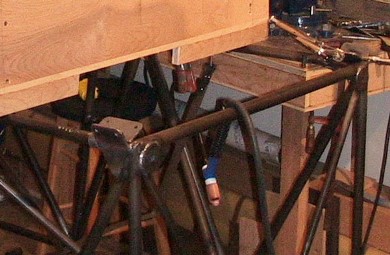
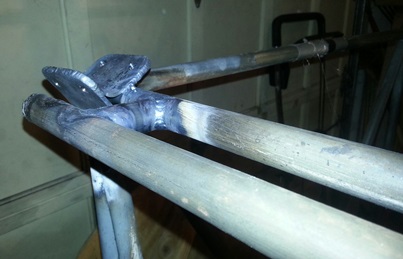
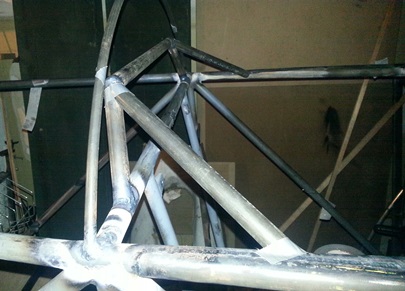
Needs to be tacked then welded then...
Tack welded on the fuselage. Needs to be schooched !
October 19, 2014 Preparing...
for a hard landing ???
Took the aluminum sheet that had the heel trays drawn up on them. Wanted to cut these out... sand and get them ready for bending up. Discovered that the throat on the bandsaw wasn't deep enough. Looked for a metal cutting blade for the table saw... strike two. Didn't want to hand cut these... I'm out. Time for the next thing on the list of things I wanted to do.
Had the co-pilot's seat belt harness support cut and ready for welding up. Grabbed the jig with the structure in it and brought it out to the garage for welding up. Nothing new to write about tacking and welding up. There was plenty of room to move around the weld for nice weld lines. Now THAT's something new... doesn't happen that often (room to move around the weld).
Next I need to notch the forward tube supports for the support. This will keep the seat belt harness support from pulling forward in the event of a "hard landing".
October 21, 2014 Supporting...
the supports...
Back to work on the co-pilot's seatbelt, harness support. Still needed to cut and fit the forward support tubes.
It's bringing back memories of cutting all that tubing for the fuselage... but doing it all by hand with an angle grinder this time (although, I did some of the clusters on the fuselage the same way).
Started off by holding a piece of 3/4 x .o49 between two points. 6inches out looked like a good place to put the end of the support. Took a measurement of 10inches and cut two pieces to length. Held the one up between the two points... made a few marks and started grinding... held it up between the two points.... made a few more marks and started grinding again... held it up between the two points... made a few more marks and started grinding again.... etc... etc.. etc.
Got it to the point of it being a real nice fit. Wrapped a piece of paper around the tube and then, with a small round file, cut the ends of the paper to match the cuts on each end. Un-wrapped the tube and reverse wrapped the other 10inch length of 4130. Made the marks for how the cut needed to be. Took the paper pattern off and started grinding away. Got it close, held it up between the two points on the port side of the fuselage... it needed a little fine tuning. Re-wrapped the tube with the paper pattern. Taped it... then nipped away at the tube until it was spot on the pattern. Un-wrapped the tube... WAA LAA !... a nice fit!
A little under 1.5hours and they are ready to be welded on.
October 22, 2014 Colored circles ???
I don't need no stinkin' colored circles...
It may not look like much, but it took a little over two hours to weld up these four clusters (they're not really clusters... not that I'm thinking about it).
Because of where they were located, I not only needed to plan how I was going to attack the weld... I had to figure out where the hell I was going to be when welding it. I was in some pretty bizarre positions... reminding me of that game "Twister". and... When I ran out of bizarre positions that I could use to get at those welds, I turned the fuselage on its side (which was the best option I had and probably should have done it for at least have the welding tonight).
Two point one hours and "game done" !
October 25, 2014 More than half-way
down the path...
I need to purchase some materials... I'm finding myself just standing and starring at the plane thinking of the things I want to do with it; the smaller projects that need to be done to get it done. It's a good thing and it's NOT a good thing.
Hours... minutues... and seconds are precious. The longer I stare at it the longer it sits without its first flight.
ahhhh... maybe it's a break. Maybe I'm just not realizing that I'm getting to the point of needing to start to put the fit-and-finish on it. The fit-and-finish being the aluminum skin in the front of the plane. The firewall. The heel trays/flooring. etc etc etc.
Mentally I keep holding off on doing those things thinking that other more basic things need to be taken care of before getting to those. And... it's turning out that I need to start taking care of THOSE items on my check list; The enclosures on either side of the pilot's seats, The firewall. The heel trays/flooring. etc etc etc.
Now that I think about it, I'm past the basics on the fusulage (for the most part), and I'm moving towards the finishing. BUT, I'm not at that finish part where... where I'm close to finishing the biplane.
I started bending up the pieces of 4130 that would keep the should harnesses in place on the raised harness support I just made. Bent one up and then thought... I better make sure I'm not making these the wrong size... whether it be too big or too little. After bending one up I walked out to the fuselage in the garage and started thinking of the things I need to do. Mentally I was running through the various check lists I have made. I confirmed the location of the forward flying wire attachments (check)... Looked at the tabs for the flooring in the co-pilot's pit (and yeah, it's ready for me to make the flooring and heel trays). Wanted to figure out the shoulder harness support for the pilot's pit (which meant I needed to re-attach the turtledeck) so I re-attached the turtledeck. Kinda-sorta figured out the tubing I need to place behind the turtledeck shell/box/storage.
I wanted to, but didn't want to start marking out the pilot's seat pan on the sheet of .o25 aluminum that I have. I need to make more tabs (I should make a few dozen of these at one time) for the enclosures I'll be making for around the pilot's seat. oh yeah... my idea for the enclosures is to make them out of aluminum with lightening holes. I'll cap the lightening holes allowing some access to the back without pulling off the enclosures?
so.... what I'm getting at/to, is that I still have a lot of stuff to do and I better get moving on it !
October 26, 2014 Putting in that extra effort...
as always.
just recently... Every time I begin working on the biplane I'm looking at what needs to be done; what can I do today that will advance the project.
okay... I've been figuring out the seat pans. Next logical thing to do is work on the area around the seats ? yes ?
There's an area on the sides and underneath the pilot's seat. This should be closed off... to keep something from slipping back there and jamming the controls. I've seen several ideas of closing it up with plastic, metal and wood. Plastic... not so much. I'm thinking if something burns I don't want it to be plastic with its associated fumes. Wood... not so much either. Where there's fire there's smoke. so... I'm thinking metal. Aluminum to be more precise. I'll bend them up like the baffles in the gas tank... even put some lightening holes (that will need to be covered) to give it "that" look.
okay... decision made on how it's going to look. now... looking at it, I see that I'll need tabs for attaching these to the fuselage. I have a few sheets printed out with these tabs on them. I'll get a sheet and make a pile of them up so I'll have them for future projects.
Cut the paper prints out. Glue them on the sheet of .o32 4130. Take the sheet to the metal bandsaw and start cutting, leaving them in rows of four so that it's easy drilling the holes in them. Drill the holes then finish cutting them out of the sheet of 4130. Take them to the grinder and grind them close to size. Finished with that step and I clamp them to the vise and file and sand the edges to size and a 220 smoothness. That's it. They're pretty much ready for bending up and welding on...
Took a re-count of how many I'll need for connecting the sides to the fuselage... I'll need (16). I made (19). Not the pile of extras I thought I had made... and I still need at least (7) to connect the aluminum piece underneath the pilot's seat. I'm four short !
Thinking a little bit ahead on this... The attaching screws will be visible when all is said and done. I'll want these to be evenly spaced and at the same distance from the edge of the filler piece. Looks like I'll need to make a jig to hold these all at a certain location so it'll look nice and pretty when alls said and done. I've always made it a point of getting things as close as possible, even when you can't see it... but now's the time to make sure that everyone see's all the extra effort I've put into it.


 Because of where they were located, I not only needed to plan how I was going to attack the weld... I had to figure out where the hell I was going to be when welding it. I was in some pretty bizarre positions... reminding me of that game "Twister". and... When I ran out of bizarre positions that I could use to get at those welds, I turned the fuselage on its side (which was the best option I had and probably should have done it for at least have the welding tonight).