Mantua, New Jersey
Original Site:
September 2004
E-mail: usav8or@yahoo.com
I've begun to work on the wing ribs again. A long hiatus from
when I stopped. This page will document, with pictures and words,
construction of the ribs.
First in building the ribs is the laborious task of cutting
out the parts; the many gussets and capstrips.
Before cutting the cap strips and gussets . . .
.
Beg, buy or borrow a small tabletop disc sander and a jigsaw.
It worked great for me. I'm not sure if I would have even
considered cutting and trimming them down with anything else.
I guess you could save a little money by cutting the gusset
out with an Xacto knife and hand sanding, but...... it'd take
forever !
As is the case with everything you'll try to do with the
build . . . .producing a fine piece in the least amount of
time.
Get the right tool for the job. You're going to be investing
a lot of time and money into your project. The small amount
you spend on the right tools isn't going to be much compared
to all the rest you spend.
There are several types of glue that are acceptable for aircraft
building. I'm not hear to talk about all of that. I'm here
to tell my story. I'll be using T-88 for the gussets
on the ribs. It has great gap filling capabilities.
For the bows I'll use Gorilla Glue . One of the guys
from the Biplane email group suggested the Gorilla Glue for
the bows and to clamp the hell out of them. I'm taking his
advise. (I've used it since on home projects and when the
damp piece mates up with the glue it expands and get gooey.
Might be a good idea to practice on something other than your
Skybolt before using Gorilla.
The reason to use the Gorilla Glue for the bows . . . . when
you bend the strips around, the pressure gets too great in some
places (you need gaps for the T-88 to work)and you end up with
a poor product. Not good while flyin akro at close to 200 mph
! Gorilla Glue works best with a joint that needs to be squeezed
together.
The jigs and templates.
Prior to putting it all together you'll need to build a few
jigs... Lower Wing, Upper Wing, Ailerons, and I suggest templates
for the nose rib pieces. Click here for a step-by-step
photo essay of the jig and building the ribs for the Lower Wing Ailerons.
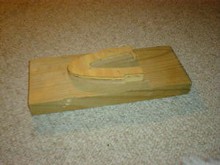
Nose Rib Template: I started by tracing the nose piece on a
block of 3/4" plywood. Cut this out on a bandsaw. Saw where
I needed to fill with wood putty to get an exact match to the
blue prints. After getting it to a point that I was happy with
it I attached this to a larger piece of wood that I could screw
down onto my work bench.
I would attach, with long brads, a slightly over-sized piece
of spruce to the top of the jig. Using my router with a lower
bearing bit I routed out all of the nose rib pieces in a matter
of hours. Everyone alike.
Nose Rib jig. When making several of the same pieces. It's worth it's weight in gold.
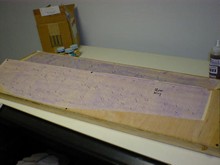
Jig made from 3/4" plywood. Copied the blue print and glued it on.
The jig that I made for the ribs I crafted
out of 3/4" plywood. Cutting one piece for the top and
two addtional pieces for the sides to keep the top piece from
bowing. I then glued on a copied rib drawing to the face of
the jig and, per Tony B's advice, nailed brads to the blueprint
in the outline of the rib. After getting the basic shape I then
fitted test capstrips and made adjustments where needed.
Some builders use blocks of wood in place of
where I used brads. For my Upper Wing I think I try using the
blocks of wood, making sure to keep them away from where the
glue will be used. I used brad for the openings where the spars
will be. I'll be using wood on the Upper Wing for this too.
When using the wood to hold the capstrips in place I'll coat
the entire piece with varnish. (Update: I used brads again for
holding the capstrips in place. It worked the first time and
I didn't have to worry about my rib sticking to the "guide.")
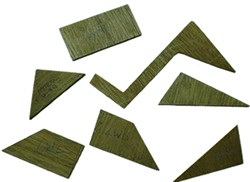
Cutting out the capstrips and gussets.
When cutting the gussets, nose blocks, anything out of wood for that matter, double check, triple check that the grain on the wood is running the way that it should
and that you want.
If you just lay out the gussets and nose blocks for a best fit to the piece of wood you are laying them out on you just may end up with quite a few piece
that you'll be unhappy with and need to re-lay these out on another piece of wood. Don't ask me how I know this. By they way, don't throw out those pieces that you've cut with
the grain going the wrong way. I'm sure you'll be able to savalage some of them cutting out other pieces for the wing.
The ribs for both the Upper and Lower Wings consist of 1/4" x 1/4" capstrips, 1/16" mahogany plywood and 1/4" birch plywood. You'll recieve full size
drawings for the ribs when you purchase the plans from Steen Aero. These can be traced onto the plywood using carbon paper. To do this lay a piece of carbon paper on top off the plywood, then lay the
drawing on top of the carbon paper. Trace the gusset shape which will then show up on the plywood.
I used a jigsaw to cut the gussets. Some use a bandsaw and still others use an xacto knife. (Looking back on it now, I would buy a bandsaw instead of a jigsaw/scrollsaw. You'll be able to use
it for more than just cutting gussets. The band saw, if you got the right one, could also be used for cutting out your metal fittings.) After you cut one of each gusset shape, use it as a pattern for
the mutitude of gussets that will need to be cut from the plywood.
If you're thinking of using a paper pattern to trace all your
gussets onto the plywood, think again. You're going to be tracing
the patterns hundreds of times. They just won't hold up to
that much abuse. Note: As I traced and cut the gussets
I kept like gussets together, aka bagged them. It cuts down
on a lot of time when you can pull the bag with the right gussets
as you go to build the ribs.
After all of the gussets have been cut, the nose blocks have been routed and the jigs have been made you're ready to begin the "building" of your Skybolt. Wait, not yet... just a few more pieces to cut out.
You'll need to cut all the capstrips for the ribs. Begin by laying one of those nose blocks into the jig. Take one of the 48" long 1/4" square spruce strips and lay it into the top part of the jig. After laying the top capstrip into the jig I then fit the lower one in, overlaying the top piece. Mark
the angle, take it to the jigsaw and "custom" cut the piece. After the top and bottom capstrips have been cut to fit I then marked and cut the patterns for the vertical and diaganol capstrips patterns using 1/4" capstrips, the actual wood like I did for the gussets. Take these patterns and mark, cut and bag the capstrips like you did the gussets.
(I wait to cut the top and bottom capstrips, for each rib, at the time I make a new rib.)
Another Note: Mark both your capstrips and gussets with some identifying marks and then mark the rib drawings with the same marks. For example: For the Lower Wing, gussets were marked
LWA, LWB, LWC, etc. LWA standing for Lower Wing A. Capstrips were marked LV1, LV2, LD1, LD2, etc LV1 standing for Lower Vertical 1, LD1 standng for Lower Diagonal 1. You get the picture.


 I used a jigsaw to cut the gussets. Some use a bandsaw and still others use an xacto knife. (Looking back on it now, I would buy a bandsaw instead of a jigsaw/scrollsaw. You'll be able to use
it for more than just cutting gussets. The band saw, if you got the right one, could also be used for cutting out your metal fittings.) After you cut one of each gusset shape, use it as a pattern for
the mutitude of gussets that will need to be cut from the plywood.
If you're thinking of using a paper pattern to trace all your
gussets onto the plywood, think again. You're going to be tracing
the patterns hundreds of times. They just won't hold up to
that much abuse. Note: As I traced and cut the gussets
I kept like gussets together, aka bagged them. It cuts down
on a lot of time when you can pull the bag with the right gussets
as you go to build the ribs.
I used a jigsaw to cut the gussets. Some use a bandsaw and still others use an xacto knife. (Looking back on it now, I would buy a bandsaw instead of a jigsaw/scrollsaw. You'll be able to use
it for more than just cutting gussets. The band saw, if you got the right one, could also be used for cutting out your metal fittings.) After you cut one of each gusset shape, use it as a pattern for
the mutitude of gussets that will need to be cut from the plywood.
If you're thinking of using a paper pattern to trace all your
gussets onto the plywood, think again. You're going to be tracing
the patterns hundreds of times. They just won't hold up to
that much abuse. Note: As I traced and cut the gussets
I kept like gussets together, aka bagged them. It cuts down
on a lot of time when you can pull the bag with the right gussets
as you go to build the ribs.