Mantua, New Jersey
Original Site:
September 2004
E-mail: usav8or@yahoo.com
The round thing you need when Earth Bound
aka The Tail Wheel...
August 30, 2014 Stress...
but no drama...
Thinking... if this was kit built, I would have just pulled this from the box. But then again... it wouldn't be a Radial Engine Skybolt, either.
No drama today. Brought the Dremel from Lombard Street and spotted the drill block in the first place I looked. Also found the cut-off discs for the Dremel in the second place I looked. How can that be ? Finding things with no problem today and having to give up on it the other day ??? Not complaining... just saying.
First thing on the list of to-dos, find a length of 1/2inch x .o58 round tubing. Needed to make the bushing for the forward attach on the tailwheel. I continued my good luck and found it right away. No reaming necessary. Rough-cut to length then work my magic with the Taig Micro-lathe. (have I mentioned how much I love this little matchine???)
Drilling the hole in the 3/4inch rectangular tubing... another story. Had started a pilot hole on the one side the other day. Today (since I found it) I'll use my drill block to drill a vertical hole into the other wall. Clamped the block in place. Started to drill and SNAP !!!... there goes the drill bit. Who would have thought ? not me...
okay, I'll have to replace that one... but not losing a beat I got the next size larger, that would work with the block, and took extra care in drilling the hole this time. I held it into place with my hand so that there would be no stress on it this time. nice... Went all the way through with no second broken bit. Looked for a 1/2inch bit with no luck so I took one of my step bit, the one that stepped up to 1/2inch, and drilled all the way through both walls from the under-side of the fuselage. Would have worked it from both directions but the geometry of the tubing doesn't allow me to fit a drill in the area I need to get to.
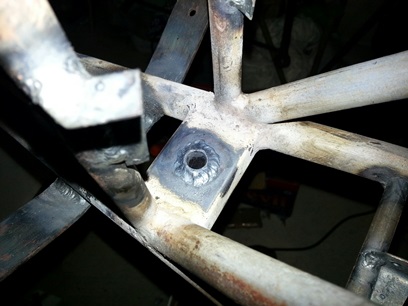
It was just a simple matter of inserting the 1/2inch bushing and welding it into place. BOOM !
Remember the "C" side of the front attach fitting, and the issues I have with it. Today I was going to make good on all that...
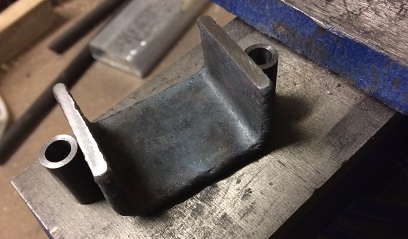
A recap of the issue: My original 1 3/4inch bracket didn't fit the 1 1/2inch tailspring I ended up buying (the 1 3/4inch bracket is the one that is shown on the plans). It turns out that the 1/2 of the backet that welds onto the fuselage needs to have the holes spaced wider than what the un-modified 1 1/2inch "cup" side ends up to be. So it was... what-to-do, what-to-do... ???
What I finally decided to what-to-do was build up the side walls of the "cup" side of things that would allow me to weld on the side tubes (used for bolting the bracket together) at a distance that would align with the old other 1/2.
I'm almost there. Cut and welded on the two "build ups". And of course it's not going to be dead on the width I need it so I need to grind down the sides a bit before welding on those tubes. Like I said... I'm almost there.
September 2, 2014 Mistakes are becoming less funny...
as I laugh one more time...
Moving right along ???
Not so much...
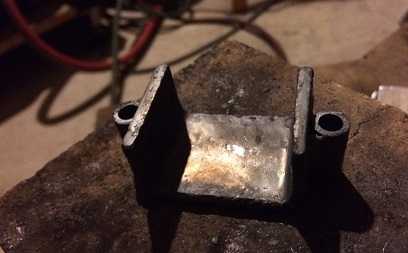
Welded on the two side bushing on the "Cup" side of the bracket. Nice ! ? Put the two halves together... Nice !!! Slipped the bracket on the tailspring... Wait. That was WAY too easy. What ? There's a 1/4inch of play side-to-side ? What ? The ? Hell ? is going on here ???
Looks like the heat from welding on the "build ups" and the bushings pulled the vertical sides out. I'm surmising this. I use to get pissed-off about something like this... a stupid mistake. I should have thought that something like this might happen and checked the shape of it before welding on the bushings. Whether a stupid mistake or mistake otherwise... I don't let it get to me. I need to keep moving forward and learn what I need to learn from that experience. Nuff said ?
I remembered seeing another "cup" I had made... an extra one ? of the right size ? Yeah. It was in the basement work shop... Went down and found it. Not sure why I made this extra one... thought that when I saw it a few days ago. Now I know why...
A repeat of the other day... cut the rectangular pieces for the build up on either side of the cup. Decided to cut them from .100 instead of the .125 like I did for the first one. Turned out that I needed to file quite a bit of the metal off last time... not doing that again.
Had time to align and weld both build-ups on the cup before calling it a night. All I need to do is make those two 3/4inch bushings and weld them into place. Remember my laser level... and I'll be ready to attach the leafsprings in place.
September 4, 2014 keep on...
Keeping on doing.
more of the same... And you know what ? I'll keep on doing it until it's right.
Made two more bushings. Reamed them to 1/4inch. Aligned and welded them in place.
After finishing up... I looked it over pretty good... I clamped it onto the tailspring... and looked at it pretty good again... lookin' DAMN good. All I needed to do was center it so that the tailwheel trails directly behind the 3/8inch bolt that holds the forward part of the tailspring in place (which is dead-center on the fuselage).
I kinda-somewhat, you-get-the-picture, put-it-in-place-and-everything-checks-out-okay looked at it. Just need to bring that laser level with me next time to get a dead-on centering of it and then... weld it on.
September 6, 2014 Finished what I needed to do...
not what I wanted to do.
surprise, surprise... it's finally finished !!!
It's Saturday... plenty of time to align this on the fuselage. Tack it in place. Weld it up... then go for a run.
Well, yeah, kinda... I'll say this much... again... it's finally finished; the tailspring-tailwheel-thing-a-ma-jig...
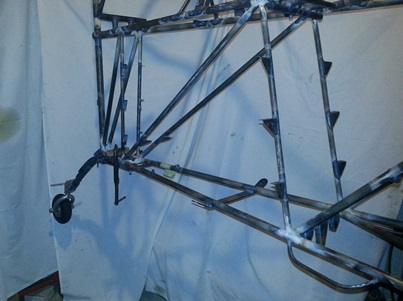
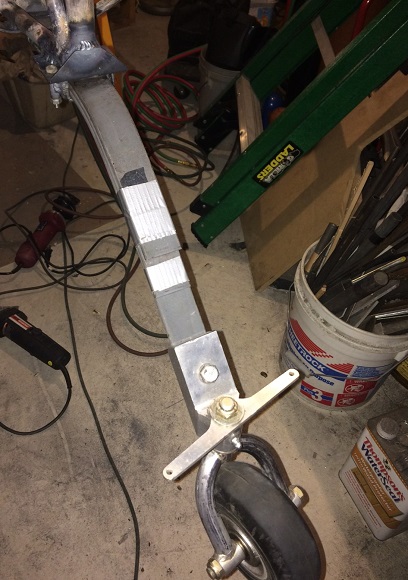
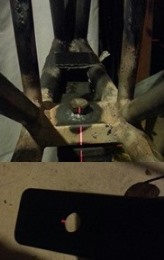
Brought the lazer level from Lombard Street. Took my time... line it up from the middle of the fuselage back to the tailwheel mounting hole. Yes... I... took... my... time... and made sure that it was as close as I could get it. Tacked it on and went to pull the tailspring off so that I could weld it up and BOOM !!! everything came off. Guess I didn't tack it on good enough. Son of a bitch. (note: photo to the left is a combo... laser aligned with forward, attach bolt on top and aligned with the center of the tailwheel attach bolt hole on the bottom).
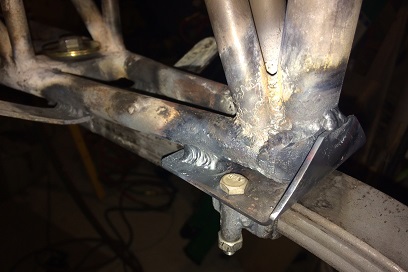
Repeat of the above but the tack held... and I welded it on. And I wasn't happy with it. It was skewed a little to the left and it dropped a little, some how. So now there's a 1/4inch gap between the top of the piece and the bottom of the tailpost. Son of a bitch.
Grab the Dremel and cut it off. Align the tailspring again. Clamped it in place so that it could move left-to-right and it couldn't drop. Tacked it in place and pulled away the tailsping. It held again. Looked at the placement of the piece; wasn't skewed and it didn't drop, so I weld it on. The top, back-side of it wasn't a problem to weld. Welding the sides, in the under-cut areas was a... son of a bitch ! My 203 barely made the weld so I pulled out the 205 which made it easier, but not easy.
It's on there for good now. Looking at these photos after the fact and I think I'll be finishing off two of the welds with a cut-back and the third, the part welded to the tailpost, with two 45's.
Like I said, the tailspring bracket is welded on, but I never got a chance to go for a run. Four point one hours on it today...
May 9- 10, 2017 Almost finished...
something I had to do.
surprise, surprise... I thought it was finished !!!
Looking for a few "hanging" things to do... while I figure out where I'll be bending the second set of side-rails. Had been thinking about the tail-spring bracket for awhile now... did I seal off the bottom of the vertical tube of the tailpost ? Wasn't sure... so... off it comes.
It was sealed. Well, now that I cut it off, I'll be remaking the plate part of the bracket... hell, I'm going to re-make both parts. Why not ?
Couldn't find the revised bracket CAD so I re-created it. Today, Wednesday, while printing the revised one at work, I found the original revised, which was better than the recent revised. Printed it out... made the entire "plate" side of the bracket tonight.
May 12 and 13, 2017 Almost finished...
something I had to do.
Almost there... for the second time.
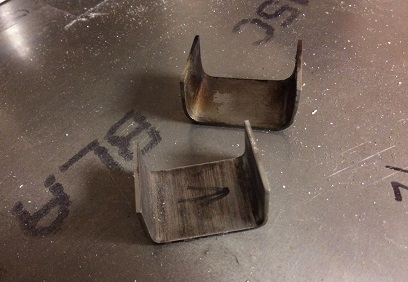
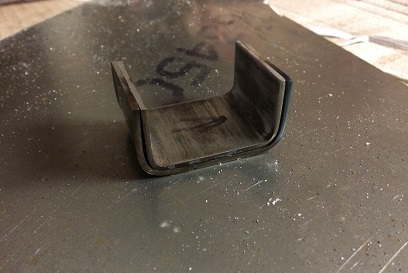
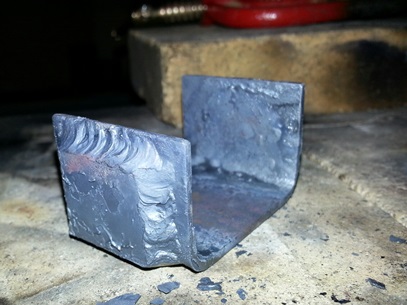
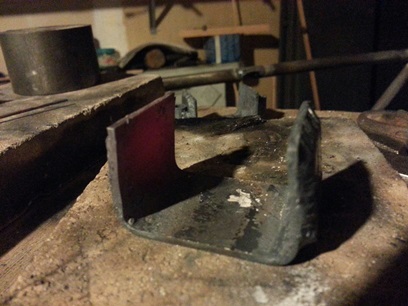
Over the past two days I've recreated "Part B"; the part that actually holds the springs for the tail wheel. Thought about doing the build-up on the sides but then decided against it. What I did is a little beefier, but heck, it's the tail wheel and it's going to take a lot of abuse.
What I did can be seen in the photos below... a double thickness of the entire piece.
May 14 - 18, 2017 STILL not finished...
something I STILL have to do.
What a pain in the ass... I've been working at aligning this tailspring up for the past few days and I'm STILL not happy with it.
Four days... quite a few hours... and still nothing to show for it.
May 19 - 26, 2017 Bitter...
sweet
I'm still working on this tail spring bracket. I love the fact that I keep working through it to get it to the point I WANT it to be. But seriously... this long ???
I've made two "Part A's" that I can recall... "Part B's", the plate that connects to the fuselage... too many to count !
The last plate I made I thought I had it... well, because the tab wire strap attachment is welded on the bottom of the fuselage the tailwheel spring doesn't sit flat on the tail post... thus making a gap between the plate and the fuselage. I don't like that gap and I've welded a large weld each time to fill it in. That weld not only is long but it is also VERY close to the holes to the point where the head of the bold doesn't sit flat unless I grind some of the weld away. Made a modification (not telling you to do it) where I'll weld on two tabs on a modified-longer plate. The tabs will be in the front of the plate thus avoiding the holes where the bolts go.
I have that newest bracket made and it's ready for attaching to the fuselage.
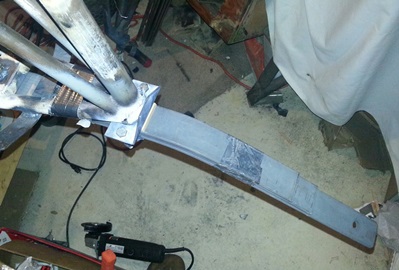
Tail spring part B aligned and welded on tail of biplane. Oorah !


 Brought the lazer level from Lombard Street. Took my time... line it up from the middle of the fuselage back to the tailwheel mounting hole. Yes... I... took... my... time... and made sure that it was as close as I could get it. Tacked it on and went to pull the tailspring off so that I could weld it up and BOOM !!! everything came off. Guess I didn't tack it on good enough. Son of a bitch. (note: photo to the left is a combo... laser aligned with forward, attach bolt on top and aligned with the center of the tailwheel attach bolt hole on the bottom).