Mantua, New Jersey
Original Site:
September 2004
E-mail: usav8or@yahoo.com
Those round things you need when Earth Bound
aka The Wheels...
September 28 and October 05, 2025 A few new bolts
and we're in bidness...
(spelled incorrectly on purpose)
Whoa! It's been about five years since I last worked on these puppies. Doesn't seem THAT long ago. I'm combining two visits to BIG ASS BIRD into one post. Why? Cause I can. AND... this free version of the BBEdit is such a pain working with it as far as placing images and creating links, if I don't make the post as soon as I get back home (or the next day or two) and I go back out to work on the BIRD again... it's just easier to make this one post. Now that I have the Alienware PC for THE FLYING LIZARD drone business, I'll upload the DeltaCAD and the Dream Weaver onto it and be back in bidness (spell wrong again on poipose)
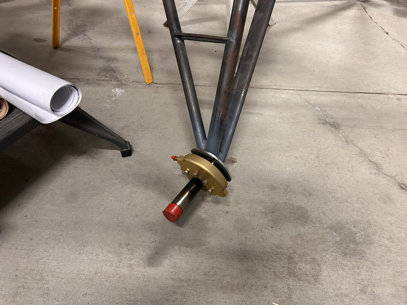
Remembered that I needed a new bolt for the MATCO brakes. Something happened with the threads on the one and I wasn't about to force a damaged 2 dollar bolt into a $1200.00 brake (or whatever the brake cost). Actually bought nine of them. Marking them as such so that I'll have spares for the brakes. The shipping costs more than the 9 bolts. Anywho...
Threaded the bolt onto the brake and it's ready for action. And... Following up on the brake "repair", I decided to mount the wheels to the two tread-bear tires I got from Whitey (the airplane one, not my beer drinking and football watching buddy). Tas easy to mount both and they're ready to be attached to the front landing gear.
Side Note: It's been awhile since I've been active in working on BIG ASS BIRD, and writing posts... and my post are just kinda BORING! DAMN! Need to get a little bit of energy back into this! Second Anywho... Wheels are ready for mounting so I'm ready to lift the BIRD up to attach the landing gear and then mount the wheels. Not so fast little fella.
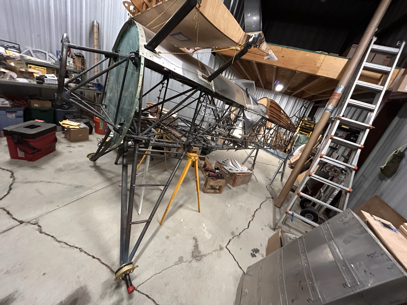
The Upper Wing Center Section is still mounted onto the fuselage which makes it a BEAR for me to lift up. So... I'm walking the front of the fuselage at station 0.0 by placing a 4" 2x4 under the port side, then the starboard side, then the port side, then the... Up as many pieces of 2x4's I could go. Then positioning the "dead man" that I have underneath to support it at the height I was able to raise it to. Not near high enough for me to attach the landing gear and the wheels/tires.
That was about all I could do at the moment (Saturday, September 28). The next week out at the airport there was a BIG PUSH to get the hangar cleaned up and presentable for EAA Chapter 515's visit to see BIG ASS BIRD. Nothing done on BIG ASS BIRD other than wiping off the dust that had settled on her over the past few months. I attached a lot of the parts and pieces that I had made and set a few of the others in place to give the members a feel for what it looks lie (turtledeck all in place, positioned the windshield in place, seat pan and seat back for the pilot snapped in place, etc etc etc.) Tuesday night and about 15 people came out to see BIG ASS BIRD. From what I saw they were pretty impressed. Not that many scratch-built experimental airplanes are being built nowadays.
Next week another visit out to the airport to put in a few more hours on her and then I'm off to Mexico City for three weeks.
More to come...
December 6, 2025
WAIT!
PUT ON THE BRAKES!
LOVE IT!
More time spent with BIG ASS BIRD. This year's hours haven't added up to much but they are all hours moving forward!
Out to FNL to work on BIG ASS BIRD.
The Plan:
1. Mount the landing Gear
2. Mount the brakes
Used the locating pins I made for the motor mount (locating pins for aligning the holes of the part with the holes of the bracket.) This help tremendously since I had to make sure the front bracket and the rear bracket were aligned before inserting the hardware.
The locating pins were the only easy find... BUT, I did find the exact hardware for the front and rear mounting points; AN7-42A for the front, and DAMN! I didn't write down the rear ones (Note to Self.)
I have an Aircraft Spruce amount of hardware that I need to label and log into some sort of spread sheet so that I know what I have instead of just buying new all the time. Something good to do on those cold winter weekends... until I get a heater for the hangar. :/
Not long after I finished mounting BOTH brakes I saw that I mounted the incorrectly. That'll be a quick fix before I mount the tires to the brakes next time out. :\
MISSION ACCOMPLISHED!
Don't look! They're on backwards! :/
Until next time...
December 13, 2025
Rollin' Rollin' Rollin'
Keep them doggies rollin'
More time with the Bird... aka BIG ASS BIRD.
First thing on the agenda is to correct the mistake I made when attaching the brakes... putting them on backwards!
Didn't take long. Now they're on as I remembered... how I had them on a few years back. It was kinda odd when I put them on last week and I was able to mount them with the brake system on the top of brake mounts (wasn't what I had remember, but hell! glad that I can.) And in the back of my mind, when I was looking at the mighty fine job I had done mounting them, I was trying to wrap my head around how I was going to mount the wheels with the brake system inside of the wheel. (oof!) When I got home reality set in... When I was looking at the photos I had taken I saw that they were on backwards. BACKWARDS!
Not a problem... As mentioned earlier, it was a quick fix before continuing to lift the fuselage to the point where I could mount the wheels/tires to the brake system.
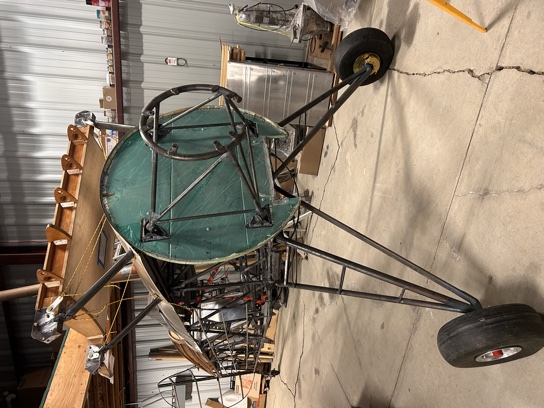
Main wheels and tires mounted...
Check
Check
Still had plenty of time before I had planned to leave for home to mount the tailwheel. Again... not having the correct hardware for attaching the leafspring to the fuselage or the tailwheel bracket. I'm just adddddddding time to the build looking for hardware. (at least I'm not having to run up and down the steps like I did in Mantua, NJ)
Tailwheel mounted...
Check
That's a wrap for today. And as Jed Clampett would say... 'Ya'll come back, y'hear?''