Mantua, New Jersey
Original Site:
September 2004
E-mail: usav8or@yahoo.com
The Radical Radial Throttle Quadrants.
June 11, 2008
Stopping the job....
but not stopping the project (when tasks get in the way of completing your project)
I
Come home...
run my pup...
grab a bite to eat...
work on the plane...
sleep...
work...
Come home...
run my pup...
grab a bite to eat...
work on the plane...
sleep...
work...
Come home...
run my pup...
grab a bite to eat...
work on the plane...
sleep...
work...
Come home...
run my pup...
grab a bite to eat...
work on the plane...
sleep...
work...
repeat
I'm on auto-pilot. All day long and well into the night.
Most of us are when we're hard at work on our planes. It's a determination that may, if we let slip for a day. be
the beginning of the end.
Many of the tasks we have to do on our planes are small enough where we don't need a break from the day-in-and-day-out
routine. But other times, when we're working on something large, like the fuselage, we may need a break to help us push through...
smaller projects allow us to take a break from that one large task, but at the same time allows us to work towards completing the plane.
My throttle quadrants, while not intending to serve that purpose, has shown me that tackling these smaller tasks, while working
on the larger ones, cleanses one's mind... sweeps the cob webs out that may be collecting as we are on automatic. Recharges the batteries
Plan now and have a few of those smaller tasks to break up the day-in-and-day-out routine of a larger part of the plane.
Something to keep in mind. The break-the-day-in-and-day-out-routine task should be something entirely different than the large project you're working
on. Remember, it's to recharge your batteries... put a little zip in your step as you approach the door to your workshop. Don't let a large job get in the way of completing your plane.
August 4, 2008
When you're feeling like a pro....
only 'cause...
it's the second time 'round.
I'm in between working on the tail feathers and finishing up the throttle quadrants. My head was spinning, wasn't sure which one to do tonight. Finally decided to complete the throttle quads.
The other night I did a trial fit of the knobs on the levers.
Found that the top area that the knobs screw on to are a little
too short (small) for the 10-32 screws to seat good. Which...
isn't good. First thing I needed to do was figure out how I was
going to get enough flat metal on that top area for
the screw head/washer to sit square.
I almost decided against
trying to make these levers work. Should have...
Without going into a long explaination why, the only way that I could get enough metal on that top tonge (I guess that's what it's called) was to give it a 1/4" radius instead of the 1/2" that I originally put on it. They're already cut down to size (or I wouldn't have to go through these gyrations) and you'll find out, just like I did,
that there isn't enough leverage with that small piece of metal to hit it with the dead blow and accomplish much. I was left to smashing the tonge with a regular 22 oz hammer. I knew once I went down that path there'd be no turning back.
And SMASH it I did. And I spent the next forty mintues trying to make a few seconds of smashing look like a Grand Champion job.
Didn't work.
Knew it wouldn't work
Shouldn't have even gone there.
Wasted forty-five minutes going there.
Should have started out the night making the wise decision to re-make the levers. Three hours, and forty-five minutes later, I only need to bend the upper sections of the levers; from the center hole up to the knob.
Times like these... you've been there before... only to feel like an old pro the second time 'round.
I'll be sure to leave enough tonge on these for those 10-32s 'cause I ain't going there again.
August 13, 2008
Details....
It's the little things...
that make the project look niiiiice.
DAMN ! Makes it look nice, but it sure do make it a whole lot longer to build.
From the smashing episode mentioned above, I needed to make a few more thottle levers over again. Not that they all needed to be remade, some would have been fine just as they were. But, I was making at least two, so why not make four ?
Where's the logic ? I'll let you know when I find it.
And the details I'm talking about aren't the pretty little things you do to it that pop-out at you. Not the nice pretty paint job, or a real sharp looking instrument panel, or a huge radial hanging on the front... I'm talking about some of the minute details.
These levers that I'm working on... I purchased the strips of 5/8" x .o70 4130 material from Aircraft Spruce (you might remember reading where I started cutting these from large
sheets only to end up with a few potato chip looking things) Well, you buy these strips and make the levers all nice like, but then you get to looking at the finish on them and it just ain't cutting it. If you know the difference in cold rolled and hot rolled 4130 you know the finish I'm talking about. And it was only on the sides of the strips.
The entire length of each strip had little craters.
Would it have been "OK" to leave them like they were ? Uh... hell yeah. Would it have been "OK" for me to leave them like they were ? Uh... hell yeah, but I'm not looking for "OK." So, I take out a small metal file that I have and some 180 grit sandpaper and spent the next three hours cleaning up the edges and sanding the face of each side.
Is it details like this that make a Grand Champion ? Can't answer that. But I do know that it's details like this that will make a plane that I'm proud to say I built.
Hi-ho Silver... and away !
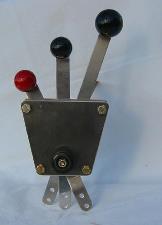
August 19, 2008
Finally....
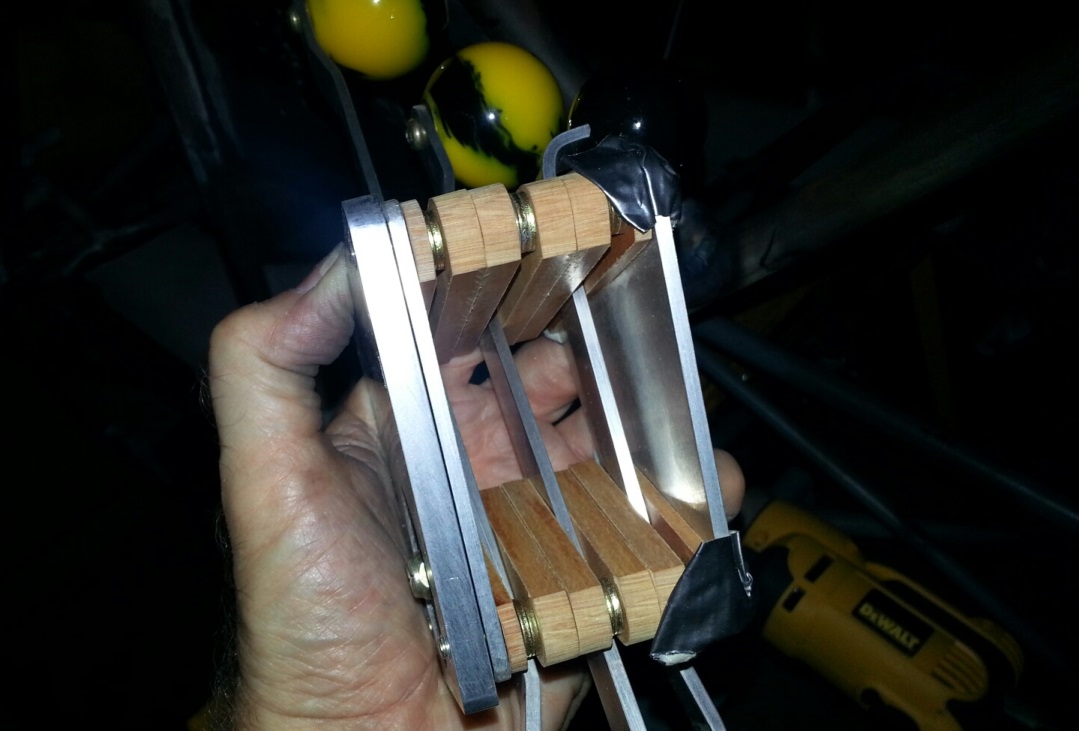
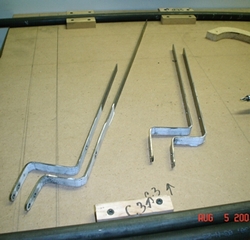
Yesterday I spent the morning putting light coats of paint on the throttle levers. I held off my excitment of putting them together until this morning. All that work and I didn't want these things sticking together.
This morning, during my oatmeal and coffee I took the time to assemble one of the quads. And here is what it turned out like.
I'll be writing up a detailed explanation of how I made these fine throttle quadrants in a day or two. I wanted to get the word out there about the guy who made these knobs for me. His name is Bruce, and he has a small business called Kool Knobs. Check out his site at
KoolKnobs.com . Let him know that you found him through my site. I don't get anything from it, but it'd be nice to know that I sent some business his way and he knew about it.
November 8, 2014
Looking for that smoooooth...
control.
Before I start... I just noticed that I was suppose to do a write up on how I made these throttle quads. It never happened... the write up, that is.
okay... After seeing and reading the stuff on the Fatboy Flightworks web site... I wasn't real happy with the smoothness of my throttles. Ya know... it's one of the few connections that you really have with the biplane, that and the joy stick and the seat of your pants.
It's important to me to have spot on contact with the biplane; like it was meant to be, no resistance... smooth as butter. I love the look of these throttles that I made but it feels like it's metal on metal... duh ! It is.
Fatboy Flightworks appears to be out of business... I saw a few posts on the Biplane Forum by Baxtert Quadrants. They've been in existance for over forty years making, you got it, throttle quadrants. I'm thinking...
Maybe they can re-work my quads; do whatever they do to theirs to make them smooth. Or... maybe have them make a set like mine. Or... I buy a set of theirs and throw my face plates and custom knobs on them. Whatever it is, I want the look of mine with smoothness. I email Baxter Quadrants and they email me back saying that they think they can do something for me and would like to talk about it over there phone. I could call or they could call... either way.
I call and Rock answers the phone. After a few minutes he starts telling me what I can do to get that smoothness in mine... where I have that metal to metal... replace it with pieces of phenolic. I'm thinking, yeah yeah... but then I'm thinking... I'll re-cut all the pieces out of the 6061 that he makes his out of. But then I'm thinking... I'll be spending quite a bit of money, along with the cost of shipping, to re-make these throttles. A quick look on Aircraft Spruce and the cost for materials will add up close to the cost of one quad from Baxter Quadrants... and THEN I'll need to take the time to re-make them. This image is the quad I'm looking at buying. Put the a new face plate and my knobs on it... and it'll look just like the ones I made.
random thoughts: I've already shown that I can make the quads... maybe I'll buy just the phenolic material? I'm really leaning toward buying them from Baxter... but ya know... I'm just not sure right this second.
May 25, 2015
Looking for...
my quads.
Update: Sent the knobs over to Rock about a week and a half ago. Waiting to hear back from Rock as to what can do with them. I just might send him an email asking about his progress.
Looking forward to getting them so that I can make the mounting plates and install, temporarily, in the biplane.
June 24, 2015
Still looking for...
my quads.
Big storms yesterday with power knocked out until 12midnight tonight (writing this on Thursday 6/25).
(It's pretty big when you have over turned cars in the parking lot. Photo courtesy of Lisa, my bother John's wife. They were at the local mall when the storm hit. Everyone was told to go down to the bottom floor of the mall to wait it out. This is what they saw when they came out to go home. Both of their vehicles had broken windows from the debris flying around... I guess they were lucky.)
After finally making it home on Tuesday I ask my sister (she is staying with me for a while, while she is in transition) if any mail came today (earlier I saw an email from Rock asking if I had received the quadrants yet). She said, "Yes, one letter." "No boxes", I replied. She said, "Oh yeah, on box did come and it's sitting on the floor next to the shelf."
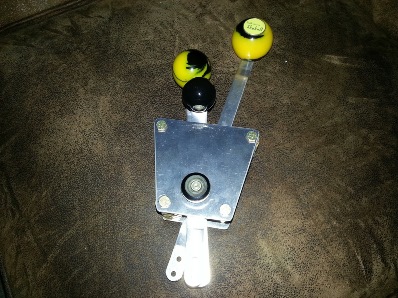
Opened the box up and saw two of these:
Custom made for the Radial Engined Skybolt... and smooth as anything. Nice work Rock !
He went beyond the call of duty to get these right for me... beyond what I was asking for. He initially called me back after receiving the knobs making sure I asked for the right "throw" on the quadrant (reversing VS. non-reversing). Then he went through a few iterations of making the throw levers for it. All the while he had the flu ! I can't say enough for Rock's work ethic. We need more guys like him in the aviation industry. Click here to go to their site: Baxter Quadrants.
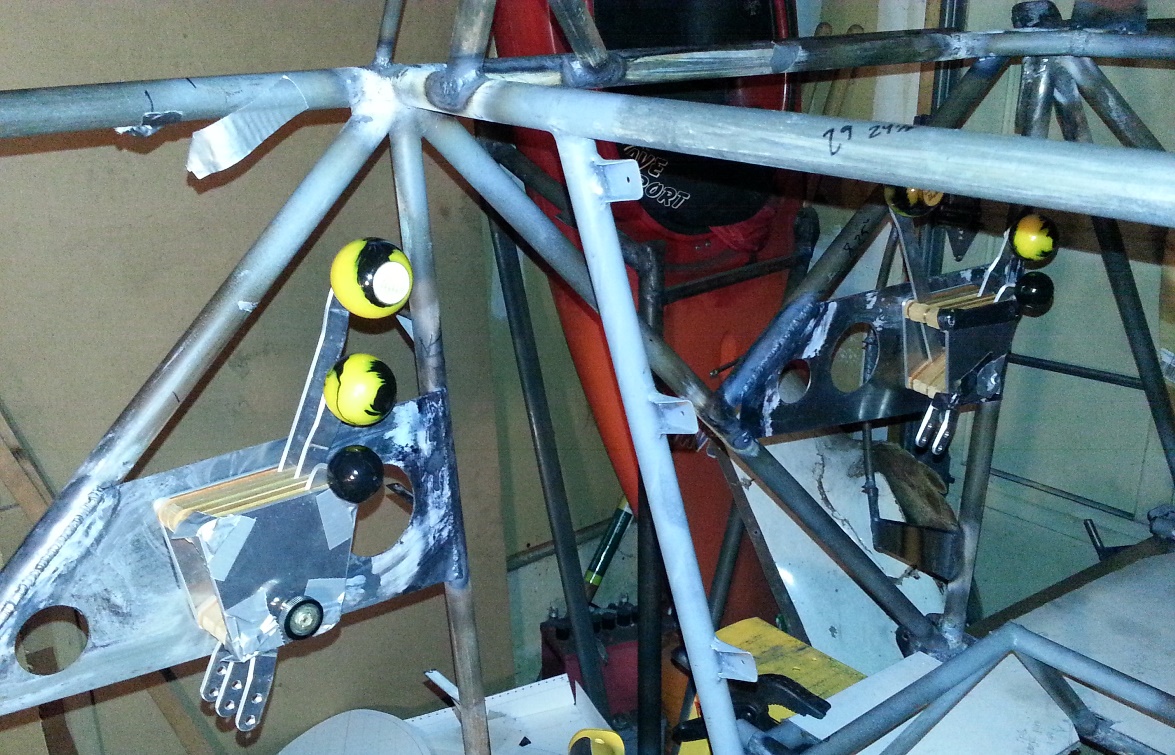
All I need to do is make custom covers that have the labeling of the throws on them and they are ready for installing on the biplane... which I took some time in trying to figure out today.
June 26, 2015
Mounting...
my quads.
More thinking about placement of the throttle quads and how to go about doing it.
You don't think of this but... too low and your leg is hitting it. Too high and well, it's too high and not easy to use (honestly... ya think of this one).
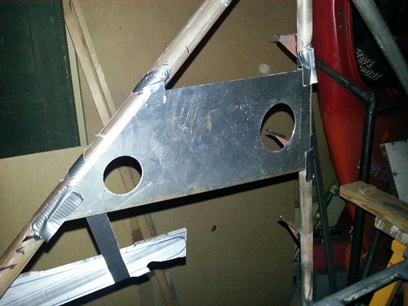
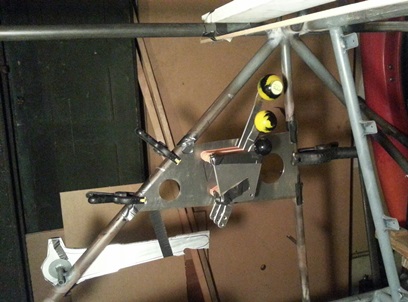
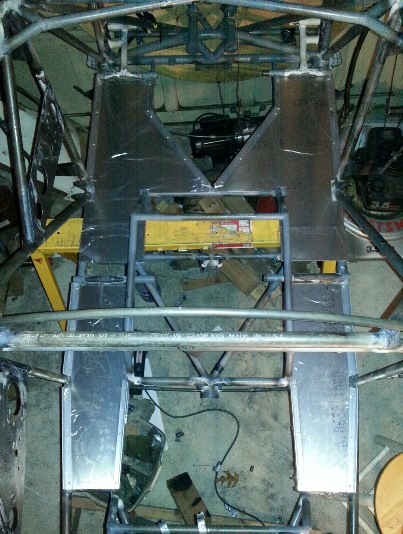
How to mount: On two pieces of metal; rail-like ? On a small isolated plate ? On a larger mounting plate ?
Just like my thoughts on the quads themselves. I want a solid feel. This is one of your connections with your biplane. Needs to be spot on. Needs to look attractive too... well, as attractive as possible. It didn't take me long to figure out what I wanted. I went with the larger mounting plate with a few lightening holes. Went with .o50. Was thinking .o70 or .o40 for the mount. Pointo70 seemed a little too thick: more material than I needed for it to be stiff. Didn't have a piece of .o40 but had a brand-spankin-new piece of .o50 for a while ago that I had bought thinking I didn't have it for something else. It was... just the ticket.
Took a few measurements on the fuselage when I FINALLY determined where I wanted it place. Made the pattern. Checked the look of it in place then went about tracing, cutting, filing, sanding and drilling...
I like the look of it... for a mounting plate. Still need to drill the mounting holes for the throttle quad and then on to the front plate.
It's things like this that take a lot of time. And... there are a lot of these type of things.
June 27, 2015
Mounting...
my front quad.
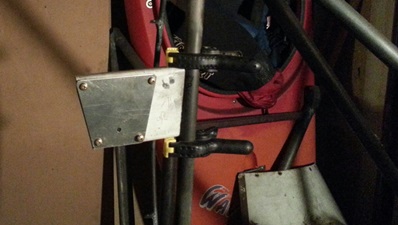
Today I took another look-see to figure out some type of bracket for the front throttle quadrant. Climbed up into the front pit and held the quadrant up to the port side of the fuselage... a bracket like the back cockpit is going to be very long (and you thought the one back there was long... has nothing on the one for the front if I make one like it). First thing that came to mind once I threw out the long bracket was something like the tabs I use on the flooring, except a lot BIGGER.
Okay... say I make a HUGE tab... what thickness material ??? I was thinking .o70 but when I went down to look at it, it was a little bit of an overkill. With bend edges to stiffen the piece up I won't need a piece that thick. Thinking... .o50 but couldn't find a piece big enough so decided on .o40.
Made a quick drawing of it so that I could spray mount that to the 4130... had to re-visit bend allowance and set-backs. The usual... cut, drill, file, sand... then bend. With the vise I have it's a real pain to bend anything that is deep or long. AND... so it was with the quad bracket.
Clamped one end in the vise and used one of my quick clamps on the other end. Bad decision ! The one side move as I was whacking it... the upper line was off about 1/4inch. Did the bottom side and use a large C-clamp instead of the quick clamp. STILL moved ! Looked at the piece and thought it was toast. Did some creative clamping and whacking and it's real close to being dead-on. If I wasn't I was going to chalk it up to a practice piece and make another one... a practice piece that took 5hours to practice on.
The legs on it aren't matching exactly 'cause of the re-bends so I'll need to go back and make them match.
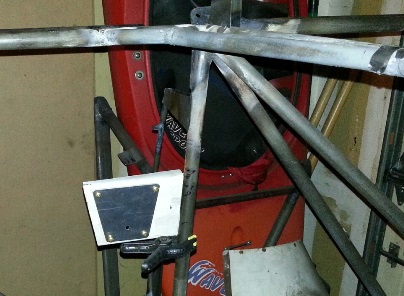
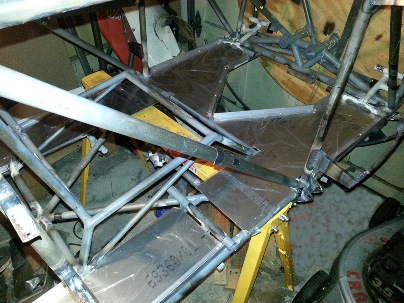
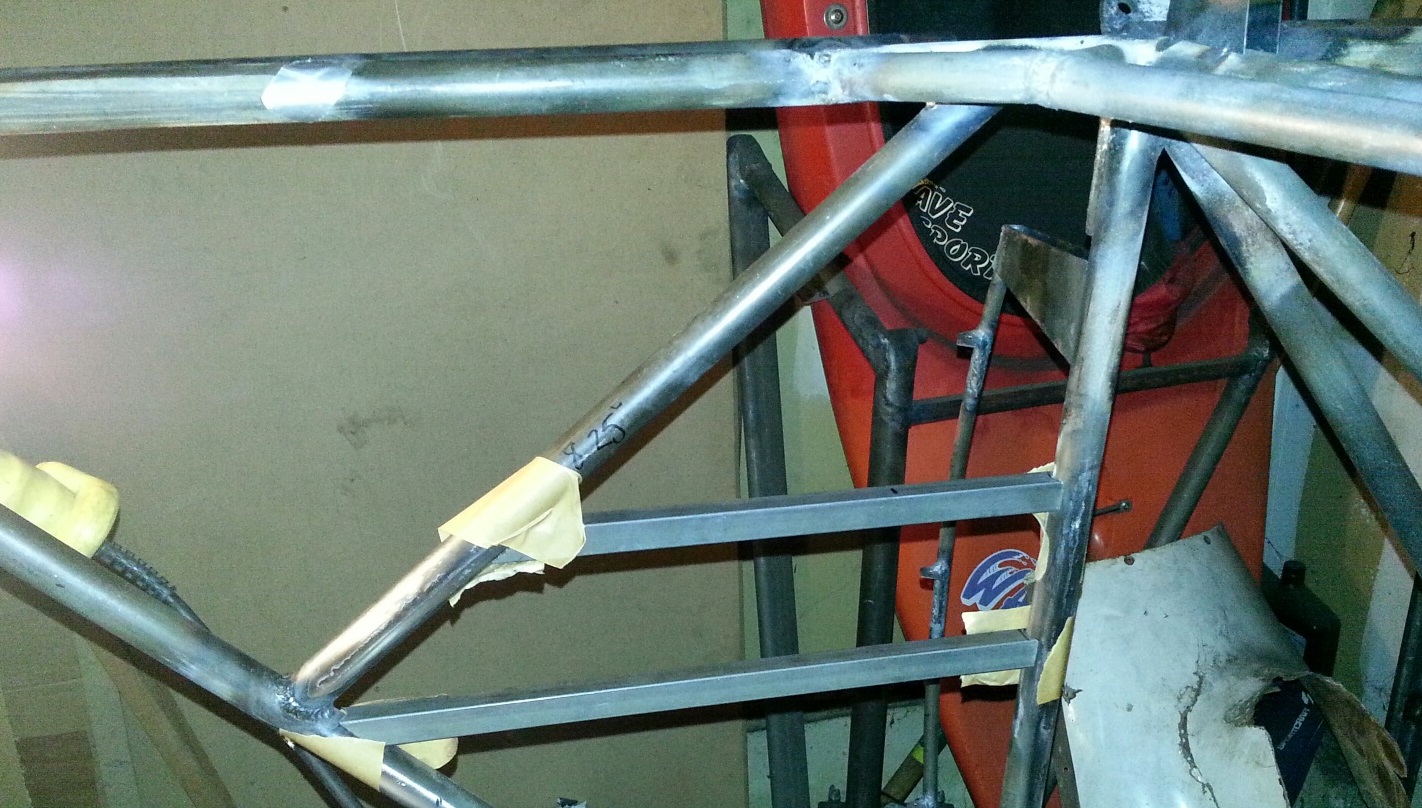
Needed to find the angle of the verical tube it was being welded to. I have one of those adjustable "squares" that will create the angle. Transferred that onto the bracket. Did a little more cutting, filing and sanding... Held the bracket up to the fuselage and... here it is.
Still need to re-work those bent-over legs, notch the end to fit the vertical tube... and then weld it on.
June 28, 2015 still Mounting...
my front quad.
All I can say is... I'm both proud and disappointement in what I did today...
I re-made the front quad bracket. Made it out of .o50 material and with a few changes turned out nice. Three point one hours and I had it made, start to finish. But... I'm sorry I made it. Decided to go in another direction. I'll make it look close to the back one... round tube and all !
Actually... like the look of the first one, but like the bends and finish on the second one. Doesn't matter since I'm going to re-work the entire look of it.
June 29, 2015
Am I still Mounting...
my front quad ???
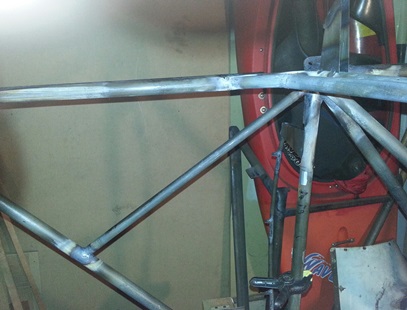
Did my magic on the fuselage today... measured, cut and fitted a new tube for the front quad bracket support. Used a piece of 5/8inch x .o35 tube for this project.
What a pain in the ass it was to weld the forward tube in place. It is located right next to the sway wire bracket and it sucked up the heat from the torch like there was no tomorrow. AND it was a pain in the ass to get to parts of the weld !
Still have a little bit more of the weld to complete... but it's in place and lookin' pretty good. Ordered the additional .o50 4130 for the bracket and some 1/4inch x 4inch x 12inch of 6061 aluminum to build up the backing plates to get the quads away from the side-wall.
July 1, 2015
No front mount...
yet ???
Wasn't happy with the weld at the top of the front support tube for the throttle quad. Just knew I didn't get it like it should have been gotten. Not that it's a structural part... but if it ain't right it ain't right and it's got to be corrected.
Two hours later and all I have to show for it is a chewed off piece of tubing.
No picture required.
July 2, 2015
Front mount... finally.
Wow ! I got a lot done today...
Started off by grinding and filing and then sanding the left over weld from the first bracket support tube.
Made quick work of the new support tube. Decided to go with the 7/8inch x .o35 size tube and it worked out a lot better. Wedled this one on about 1 1/2inch back from the cluster that I welded the first one into. One helluva lot easier to weld this on compared to that first one. And there wasn't any real need to weld it into the cluster... it's not a part of the fuselage structure.
Took a little bit of time to come up with the design/look of the forward quad bracket. Once I decided on the look it was just a matter of the grueling hole saw cutting: three holes in this bracket... and it took for-ev-er... I'm happy with the look of it and that it will look similar to the rear throttle quad bracket. Just need to weld these puppies on, make those aluminum spacer (to move the throttle quads away from the sides) and they're ready for mounting.
New support tube.
for-ev-er...
New bracket taped in place.
July 3, 2015
Saddling back up:
the re-mount...
Did a double take of the throttle quad mounts today and... they didn't look quite right to me. Sure... the back one angles in a bit because of the tubing but the kilter between the two was more than that.
Took a straight-edge spanning both of them and... yup, it was a little more than that. The one in the front title up in the back and the one in the back tilted up in the front. The wood stright-edge I used wasn't as straight as I thougt it was... must have bowed up in the center ???
Anyways... can't leave it like that so today I cut the tacks, re-aligned and re-tacked. Period !
(I'm writing this up on the 5th... and I did the work on the 3rd.) Looking at my hours... I know what the 1.4hrs were, but the additional .9hrs? Not quite sure what I did there...
Spent the rest of the day cleaning the basement workshop.
September 21, 2015 Workin' on stuff...
thats not workin' so much...
Spent a lot of time looking at and not liking how the throttle quad mounts are looking. Kinda not as flat as I had hopeed and the holes, although match-drilled... the bottoms (or the tops) were off centered ??? WTH ?
Before starting all that looking I needed to put together one of the throttle quads I had. Had taken it apart so that I could use it for match-drilling the mounts. It's been so long... I'm forgetting what goes where and how many washer? Another... WTH ?
Getting back to the mounts...
Tried fixing it with enlarged lower holes... not really happy with that. Worked great... but is it the right thing to do? The upper two holes fit perfect. (I'm still thinking what the hell???) And it comes down to "What the hell would someone think when they go to restore this bird later on down the road?" It keeps me on the straight and narrow. I don't WANT to grind this off but I know I need to. So, tonight, while it was a waste of time to some degree... wasn't.
AGAIN... I'm thinking all that time I've put into it thus far and now I'm backing out of it... "throwing away" all that time. Shit happens.
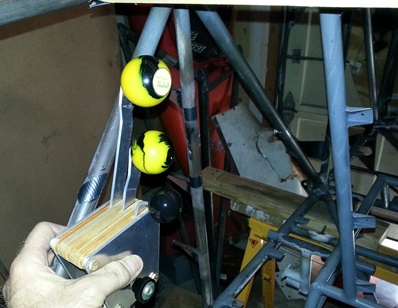
Here's what it looks like... but won't be looking like. But now that I'm looking at it... maybe ? naaaaaaa....
Click on image for close up.
September 22, 2015 Makin'...
the throttles work...
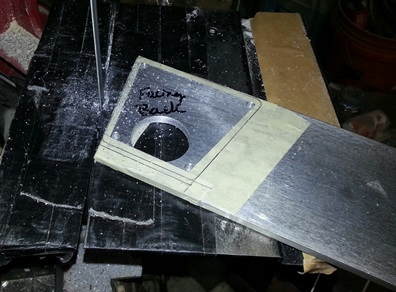
Playing with the throttles yesterday I confirmed that I need to make spacers to get the throttles away from the fuselage sides. As they are now... because of how they are made, the levers are bent slightly towards the port side. And because of that fact... they're hitting the upper, port longeron. I thought of this possibility a while back and ordered a length of aluminum bar for that purpose.
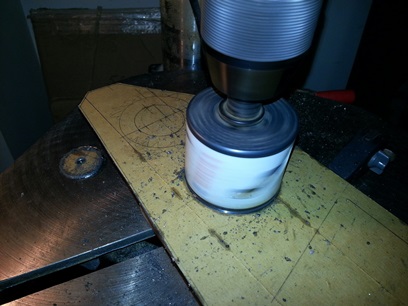
Was just a matter of making sure that the throttle's back plate is facing the correct way before tracing it on the aluminum. Clamped it to the drill press... drilled the four holes for mounting the plate (I think that's one thing that messed me up with the skewed mounting holes... the holes in the throttle's plates and hardware are slightly larger than 3/16inch, I made the mounting holes in the mounting plates 3/16inch... if I'm drilling each of the 3/16inch holes a little to the outside of each of those alignment holes I wouldn't be able to align the bolts into the mounting plate. YEAH... didn't think you followed that.)
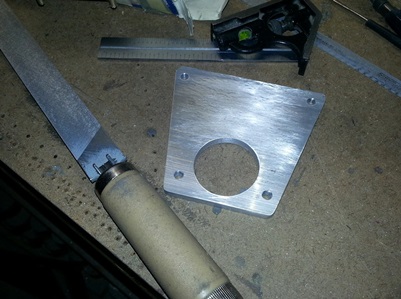
Anyways... used the larger drill bit to drill the holes into the aluminum plate and used a hole saw to cut the hole where the center friction screw goes (the one on the pilot's throttle has an anchor nut that needed a larger opening so I decided to make them identical). The larger hole from the hole saw only gave about 1/8inch of metal along the bottom edge so I extended the bottom another 1/4inch.
Made the cuts to make the outer shape, and filed and sanded the first one to size.
October 6, 2015 Waiting for something...
I haven't ordered yet.
Switching gears... need to order the "L" flange for the seat backs. Can't finish the seat backs until I do. SIDE BAR: Can't anneal the frames without them really really distorting. Makes sense, eh ?
What to do ? First thing that pops into my head tonight. Spotted a throttle quad and remembered I needed to make the second spacer (to bring it away from the side of the fulseage). Got the 1/4inch piece of aluminum stock out that was left over from the last one I cut and preceeded to cut the new one out.
Drilled the four smaller holes and one larger hole before cutting the shape out. Followed by a rough, close to the line cut. Followed by a little filing then a rub of 200 then 400 grit paper. Close to where it needs to be unless I want to shine the crap out of something that's not going to be seen. I just might...
October 13, 2015 First FINAL Final step...
on throttle quad mounts.
Started off tonight by wrapping the heel rails and floor boards with the plastic wrap that I have; protect them from scratching. Been thinking about those throttle quad mounts. Not real happy with the look of them; big flat plates with a few lightening holes in them. A lot cleaner look would be a few pieces of square tubing to mount them to.
Spent most of the night grinding both of the mounts off. Took a few measurements and I'll be ordering a few lengths of 5/8inch x 5/8inch x .o35 tubing. Ordering a length of 1/4inch x .o35 ( 5/16inch x .o58 as back up) to use as bushing to run the 3/16inch bolts through too.
and... since I'm ordering this stuff, I'll order those pieces of 1/2x1/2x1/16 "L" flanges for the seat backs.
Flooring in place.
Another view... flooring in place.
Co-pilot's throttle quad mount cut off.
October 14, 2015
Spent about a 1/2hour grinding off the excess throttle quad plates. Still need to clean them up a bit by filing and sanding the areas. 'nuff said.
October 15, 2015 Close to mounting the throttle quads...
again.
More work on the throttle quad mount re-do.
Left the fuselage last night with a few rough weld lines. Needed to grind them down and sand them smooth.
Well, actually I thought I would take my time with them and file the weld lines down. Wasn't working. Switched over to the grinder... and took my time grinding down the weld. A little over an hour and I have two of them ground down and sanded up to a 600 grit. Two more to go...
No photo available.
October 16, 2015 Not a screw up...
well, yeah.. a screw up.
Then again, not if I use it for the back mount !
Came home and saw the package from Aircraft Spruce waiting for me. The end was completely open and I'm thinking this ain't good. Saw that there were a few pieces taped together still inside, but thinking that it was only the large tubing and longer pieces of aluminum "L"'s. Pull them out and was happy to see that the smaller tubes and drill bits were taped on there as well. Thank you Aircraft Spruce !
After dinner I took a few measurements of one of the throttle quad back plates and saw that I needed the top of the top tube and bottom of the bottom tube 3 5/8inches apart. Made my marks and started cutting and filing away metal. Feeling like the ol' days of cutting and fitting tubing for the fuselage. Felt good to be working with tubing again. But then again... I had forgotten how many times I had to run up and down the steps to the basement work shop to file the notches on the ends.
Two hours later and I have the upper and lower tubes for the front quad ready for tacking on... or so I thought. Check the tube positions by taking one of the back plates and holding it up against the tubes... and... it overhangs the tubes by quite a bit. AND... the holes are even running out past the top and bottom. And then that ut oh moment when I realized I notched the lower tube to fit up against where the bottom of it should be. AND... it's angled so that where it needs to go now there ain't no way... ain't no way it's gonna work.
Okay... the top piece is still good to go. The bottom piece can be used for the lower pilot's throttle quad mount. Glad I checked this one out before moving on to the second one or I would have been screwed.
Here's close to what the mount will look like... albeit... the final one will be spaced a little closer together. I'm likin' it.
New one. Well close to being the new one.
(click for larger image)


 Should have started out the night making the wise decision to re-make the levers. Three hours, and forty-five minutes later, I only need to bend the upper sections of the levers; from the center hole up to the knob.
 These levers that I'm working on... I purchased the strips of 5/8" x .o70 4130 material from Aircraft Spruce (you might remember reading where I started cutting these from large
sheets only to end up with a few potato chip looking things) Well, you buy these strips and make the levers all nice like, but then you get to looking at the finish on them and it just ain't cutting it. If you know the difference in cold rolled and hot rolled 4130 you know the finish I'm talking about. And it was only on the sides of the strips.
The entire length of each strip had little craters.
These levers that I'm working on... I purchased the strips of 5/8" x .o70 4130 material from Aircraft Spruce (you might remember reading where I started cutting these from large
sheets only to end up with a few potato chip looking things) Well, you buy these strips and make the levers all nice like, but then you get to looking at the finish on them and it just ain't cutting it. If you know the difference in cold rolled and hot rolled 4130 you know the finish I'm talking about. And it was only on the sides of the strips.
The entire length of each strip had little craters.