Mantua, New Jersey
Original Site:
September 2004
E-mail: usav8or@yahoo.com
Three-piece upper wing... stronger than Babe the OX.
February 6 - 18, 2023 Find a solution and move on...
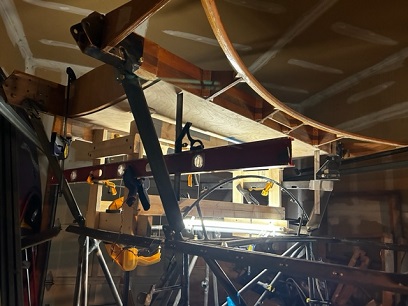
Getting, or got, the first two struts ready for mounting. Get those mounted and I'll be able to figure out the length of the rear two struts!
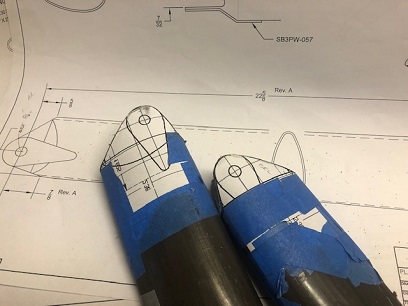
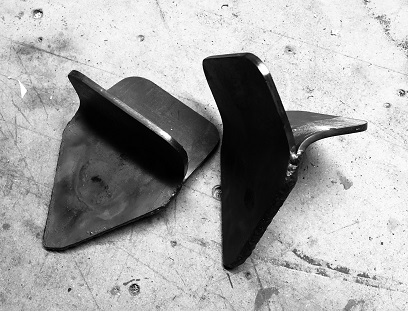
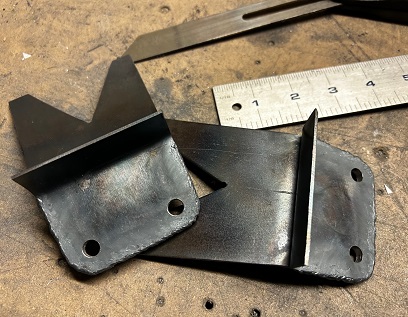
Prior to that fitting... I spent a little bit of time getting the tear drop reinforcing plates ready... modified the pattern slightly to cut them down a little bit. Glued, cut and filed/sanded to the finish shape on all sixteen of them. Now out to the garage workshop.
Took the two struts that were finished and ready to attach to the Upper Wing Center Section and the fuselage. A few discoveries... the angle of the brackets on the fuselage don't jive with the angle of the Upper Wing Center Section brackets. DAMN! Quick decision... heat up the brackets on the fuselage and bend to the correct angle. (with three seperate drawings for the brackets... there was a high chance of something like this happening... shouldn't have... but it did.) Now all I need to do is figure out what I'll use to bend them after heating. I have a few ideas... it's still out for the vote.
Second discovery... I was worried about not having the gap squeezed small enough. Now the issue is that I've squeezed it too small. I'll need to place them back on the 9/16" thick metal squeezing jig to heat and open them up a little bit. Okay, not a problem, but the nicely painted Upper Wing Center Section brackets are now all scratched up. A tiny set-back... all of this.
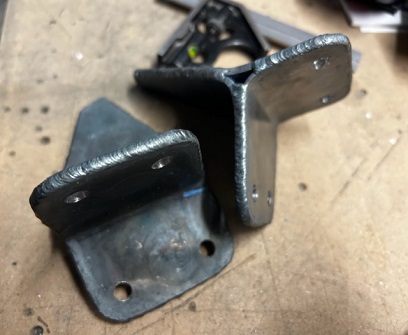
No photos (yet) of the off-angled fuselage brackets, but I do have a few photos of the freshly ground, notched, filed/sanded srut ends!
My take away from all of this... shit happens even when you think you've thought it all the way through. And when it happens... which it will, find a solution and move on with the build.
Moving on...
February 19 - 26, 2023 Move on...
after a few "minor" adjustments.
Ahhh... the beauty of making one of the first documented Skybolt Radials.
Went to fit up my beautifully made struts... that I lovingly crafted and BAMB! The trailing side of the end that fits up to the UWCS isn't deep enough. WHAT? How can that be???
Thinking... I followed the CAD measurements for the Delta version wings. BUT, I needed to modify the Delta version wings to fit the Delta version wings for the Radial version. Remember when I moved the wings forward eight inches? Well, that changed the geometry on the end so much that the CAD plans opening wasn't deep enough.
AGAIN, thinking I could just cut the inserts out easy peasy, and modify the opening and be happy with it.
- Cutting the inserts out. Easy Peasy. (check)
- Me happy with it. (un-checked)
And there, my friends, is my story for today. All week I spent
dealing with something that I should have been able to just
move on with it. But, hey, it's all on me. I should have known
that the Delta wing strut CAD wasn't going to work for the Delta
wings on the Radial version. Silly me!!! haha (insert voice
and laugh Jimmy McGill makes on Better Call Saul).
Not one to just dawdel (wurd?)... I email Univair to see if they have a 4' cutoff of the size streamline I need. Nope! I'd have to buy something like 111" for the 48" I need ($350.00 I'm not going to spend AGAIN). I look at Aircraft Spruce... it's something like $39.50/foot. On the fence about what to do for a day then made the decision to lower the wings to the 15" that I originally wanted them to be. A BIG decision! (I'll need to slightly notch with a flowing arch, the area that the wire will touch the box spars on the UWCS. I'll make it work... AND be safe.)
Made the decision, now I need to make that change. Modified the jig that holds the UWCS in place and make a quick alignment of it to see the modification I would need to make to the one end of the struts. Held the strut in kindof the right location and made the mark. Waited a day... went back and tweaked the alignment... checked and adjusted the mark on the end of the strut. Up to the computer to make that change on the existing CAD for the strut end and printed it out.
Next day I cut and fit the patterns to the first strut end and WTF??? Something's wrong. Took a measurement of the pattern and apparently the CAD program reset itself to print to "fit page" instead of printing the CAD 1:1. Went up... printed again. Ba BAM!!! Spot on! Cutout and aligned the patterns on both ends. Hacksawed, ground down, and filed to shape.
Ready for squeezing, making new inserts, and welding them in. Back to where I was about two weeks ago... Saul Goodman
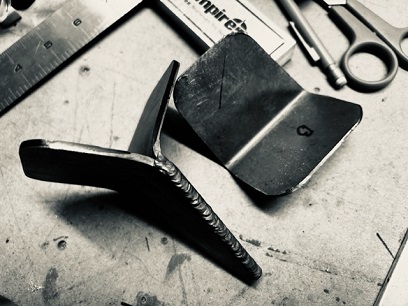
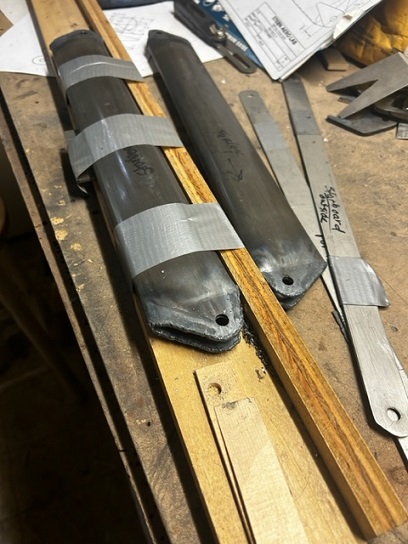
New strut length.
Ready to squeeze.
New strut kinda sorta in position.
February 27 - March 11, 2023 Repeat...
THEN, move on.
Ahhhhhhhhhhhhhhhh
Ahhhhhhhhhhhhhhhhhhhhhhh
Either it's me not correctly making the brackets or they just don't work as planned.
Went to bolt on the strut to the front strut brackets and... BAM! The hole on the strut only comes down enough so that I only see 1/2 the hole on the bracket. The trough isn't deep enough. The double should have been bent with an 1/8inch instead of 1/4inch bending block? AND the arm on it a little longer? Whatever the issue, the struts, at this point are unable to line up and bolt on.
Scratched my head that night... and the next day cut off both front brackets. The following day I re-worked the CAD for the strut arm side of the bracket so that it is 1/2inch longer.
I won't go into all of the cutting and banging over of the pieces (I did that before when I did it the first time...) Two weeks later and I'm back to just about ready to weld on the doublers onto the two front brackets and then weld those onto the fuselage. The doublers are .070 thick. Instead of bending these over with a 1/4inch radius I used an 1/8inch radius. NOTE: Bends should be made anywhere from 2.5 to 3.0 the thickness of the material bending.
The longer length on the one arm of the bracket and the tighter bend radius should do the trick!
This seems like a recurring statement: AND... Back to where I was about two weeks ago... Saul Goodman
Hammered
Welded
Doubler
March 11 - April 2, 2023 Rinse and Repeat AGAIN...
THEN, move on.
Went to fit up the NEW improved brackets to the fuselage and saw that the holes on the sway wire arms, in my opinion, don't clear the upper longeron enough (and yes, I made test pieces to see if things looked good... and they did at the time). AND... I don't want to weld these puppies on only to find out that they don't allow me to attach the nuts to the bolts.
Back down that "road" of re-re-doing of the CAD for the brackets. A longer arm on the sway wire side of things AND adjusted the look of that side so that it would better clear the firewall (in case the firewall vibrates slightly... it won't rub up against the bracket which is right at Station Zero). Did that by angling in that side approx. 1/2inch.
And back to cutting, grinding, sanding, banging out new pieces for these two brackets. After going through all the gyrations again for the third time, I did a dry run before welding up the brackets and they looked great. Back to the workshop to weld them up then drill the holes. Wasn't happy with how I drilled the holes on the last set (basically fumbling through it) so I sat back and thought it through. Ended up bolting my double-slide vice to the drill press and made these holes SPOT ON. VERY HAPPY with the final product.
Out to the fuselage to do a test fit (again) and they look be-u-tee-ful !
Ready to weld these onto the fuselage and get on to re-making the back brackets to make that adjustment on the depth of the arm.
This is a recurring statement: AND... Back to where I was about two weeks ago... Saul Goodman
Re-re-do of brackets
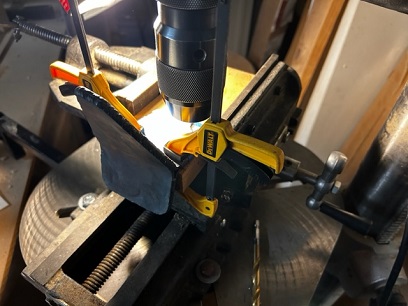
Double-slide vise.
Re-re-done brackets.
April 3 - 15, 2023 Rinse and Repeat AGAIN...
THEN, move on.
Wait... let's try that again.
Moving right along... er, moving, right along?
Got these newly designed brackets ready for attaching to the fuselage. Aligned! And tacked! to the fuselage. Looking good...
Adjusted the upper wing section to allow me to attach the strut brackets to both the fuselage bracket and the upper wing bracket. And no matter how hard I 'wished" the two properly align... they didn't. Ya see, I didn't make the brackets that I am using on the upper wing center section (one of the few that I didn't make)... so, it wasn't designed to be used on my R version with the lowered wings. And no matter how hard I wished for it to work because of not wanting to cut off the cabane attach part of the upper wing brackets, there is no way around it. If there is one thing I learned about the build... it's to take all things into consideration and MAKE a decision and move forward. DON'T dwell on it and hope things change.
With that decision made... I proceeded figure out the correct angle for the cabane attachment part of the bracket, take the upper wing center section down from it's high perch on the fuselage, un-bolt all the hardware, take the brackets off, cut the cabane fittings off and begin the journey back to where I was, you got it, Back o where I was about two weeks ago.
Had the parts and pieces cut before buying all four of the upper wing center sectio spar brackets (oh so many years ago), so investigated whether the cabane attachment parts would work on the ones I bought. Close... but no cigar. Angle is off. Printed out new patterns, made the adjustment for the fit over the main body of the bracket and started drilling, cutting, filing and sanding.
As of today I have one of the cabane attachment pieces of one bracket all sized up and ready to be welded onto the bracket. Once I finish the other one for the other front bracket I'll attach the brackets in place, heft it back up onto the fuselage and make sure that what I think is right actually works. Then it's back to lifting off the center section, un-bolt the few pieces of hardware holding the brackets in place, welding on the cabane fittings THEN bolting them back on the spars, hefting it back up on the fuselage, (fingers crossed) attaching struts to both the fuselage brackets and the upper wing brackets THEN going through the entire process again for the back brackets.
I hope to have this completed in a week or two.... Saul Goodman
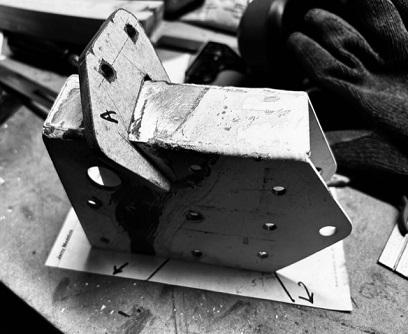
Old spar bracket with new cabane attachment. Ready for welding.
April 16 - May 5, 2023 All I want to be is...
HAPPY
So far... I'm not happy with the brackets/alignment for the cabane struts. Revisting the brackets that are attached to the upper longeron and... Banging the crap out of anything won't get you anywhere close to where things need to be. The first one won't be anywhere near close... the other not so much (which is WAY out of close). I knew this process wouldn't work... maybe just working out my fustration?
Let's start over AGAIN. (again again again echo echo echo)
Remaking the brackets that attach to the upper longerons. Actually... at this point in time, all I need to do with the remakes is drill the holes and align/tack both on the fuselage to see if this set will make me happy.
No photos until the brackets are in the right place and welded onto the fuselage with the cabane struts in place.
May 6 - May 28, 2023 Finally...
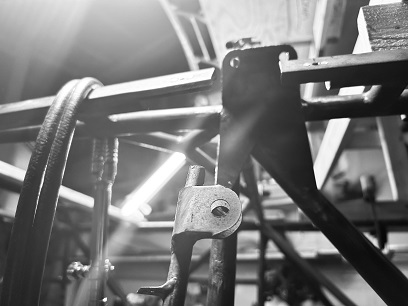
the front cabanes are attached.
I'm not going to say it... BUT, I'm going to say it. I'm FINALLY past making/adjusting-grinding off/tacking on/remaking the front cabane strut brackets! wow. WOW! Both front cabanes struts are now locked (bolted) into both the fuselage brackets and the spar brackets!
Other than just all the hours that I've put in on the re-dos of re-dos of re-dos... not much else to say. I've written it all before. It did confirm the statement that you need to make part B fit up with part A when scratch building... and here I was trying to fit up both A and B already made part. Ain't AIN'T gonna work.
Now to take the lessons I learned from the front and apply it to the back cabane brackets. It's gonna take some hours... just not nearly as many.
Below, a beauty shot of the front cabane attached to both sets of brackets.
May 29 - June 17, 2023 Bringing up the rear...
Repeat what was done on the front, on the back.
Other than a lot of the same... repeat repeat repeat. Working hard on the rear Upper Wing Center Section brackets, both the ones on the fuselage and the ones on the spar brackets.
Cutting off. Grinding. Making. re-Making. Finally happy. Tack. Off with the center section from the fuselage (it's getting much easier to do now... with all the practice I've had doing it). Cutting off of the ears from the spar brackets. And now finally ready to put the center section back in place. Make sure that it is aligned correctly. Lock in the front then check alignment for the back. THEN and only then... using custom measuring tool to get correct length of the port and startboard cabanes... then finish making these rear cabanes so that I can lock the back in as well.
New fuselage brackets for UWCS.
Bracket tacked.
Rear spar brackets... surgery.
A new cabane attach for rear spar bracket.
June 18 - July 1, 2023 Finally...
no more dittos.
I know the drill... you know the drill (if you've been following again allll this time). Rinse and repeat over and over again. A bunch of dittos... that have finally ended.
Picking up where we last ended, I was back on finishing/making the rear cabanes. Back to leveling and positioning the Upper Wing Center Section in the right location so that I could get a measurement on it with both of my adjustable cabane hole locating tools. GOT IT!
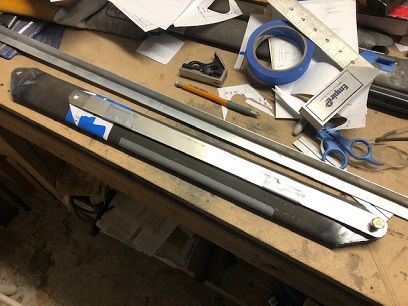
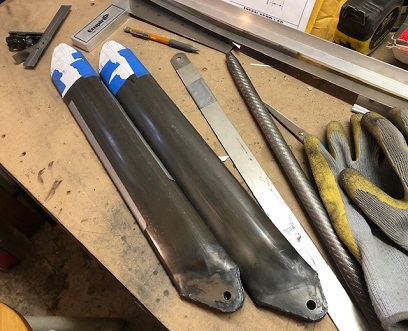
Back down to the basement workshop to profile both ends of each of the remaining cabane tubes. SQUEEZE per the plans. Bend trim and fit inserts. Then... drill all four holes.
Check
Check
Check
Check!
Back to confirming that the UWCS was in the correct location... I then positioned both cabanes, with the ears attached, and made the marks for the location and angle for each on the spar brackets. Took the spar brackets off the spars... tacked the ears onto the spar brackets and then RE-attached the spar brackets with ears back on the spars and Ba-BAM! Part "A" fits up with Part "B". It was all as simple as that.
"It was all quite simple." Ha!
How long ago did I begin this journey of the fitting of the cabanes to the existing brackets???
Now for the welding of these thick-ass pieces. Started on these already... soon they'll be show ready and I can buy the AN665-34R and -34L Tie Rod ends for all six tie rods.
Cabane hole drilling jig. You can see the hole measuring
tool in there too.
Final location check. Check. Check!
Spar brackets with ears tacked in place. Check for
correctness before finish welding these up.
July
2 - 12, 2023 WoW...
no
visible signs of support!
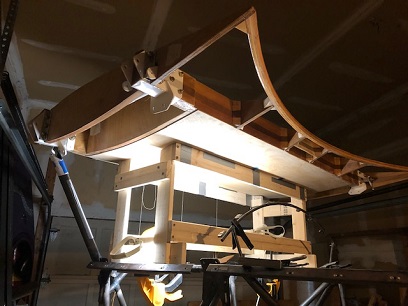
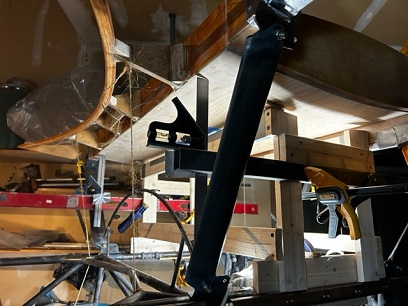
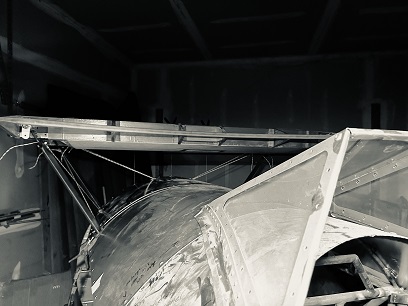
Welded up the four spar brackets and re-attached to the spars.
Welded up the four brackets on the fuselage... And with eight
temporary bolts... It fits! It works! The Upper Wing Center
Section, in all its glory is suspened in the air with only the
four cabanes holding it in place.
I still need to buy the tension wire turnbuckle forks and wires.
Twelve of those forks in all... at a cost of $35.00 to $45.00
each. YIKES!
oh... and I need to weld on all sixteen tear drop reinforcing
plates on the cabanes. Just purchased the replacement O2 cylinder
for doing that.
Not to drop that project completely... I decided to start back
working on the Duz fastening system for the turtledeck so that
I can put that part of the biplane build to bed. You can read
about that here.
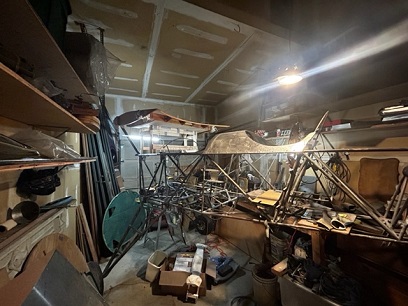
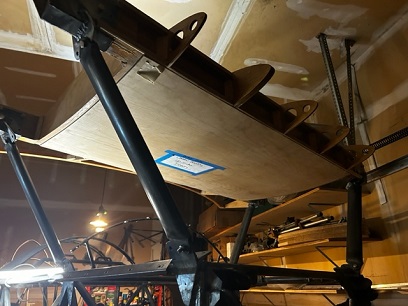
A few photos of the Upper Wing Center Section in place.
Cabanes locked in. Look-In Good!
July 13 - 29, 2023 Looking like a biplane...
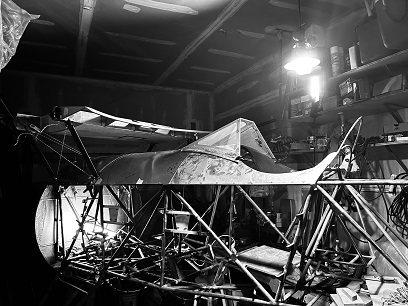
Lately it's all been about finishing up the ends of the cabanes (welding on the tear drops) and squaring the upper wing center section on the fuselage so that I can cut the holes in the aluminum skins.
Twine doesn't work... it just doesn't! Tried using that to square up the upper wing center section and it was a disaster. And I lost a day or two because of me trying to use twine. Push that experience behind me and went out and bought some 1/8inch cord. Worked like a charm.
Took a few rough measurements and cut the forward, top aluminum skin (used for a pattern)... Un-tied the cords to position the skin in place then screwed it on. Had to take it off and tweak it a little bit more. Back on again... screwed it on again, and, now it fits, albeit, very loose fit.
Just drew up a few nice hole cutting patterns on the Delta CAD and have printed these out. Today... or tomorrow I'll tape these onto the fuselage in the correct locations and make the second-round of patterns for that forward section and then fit it up to see how it looks. Maybe attach the sides and bottom skins on to giive me a feel for the finished, flying product.
by the way...
Right now I have three slot in the very front of that forward skin so that the plumb bobs fall through and show me that the upper wing center section is squared up in the correct location (you can see them in two of the images below if you look close enough)... I'll need a few additional points to work off of so I don't need to have those openings in the upper skin. Am I making any sense to you here?